Standing Hamstring Stretch: Safe Form, Benefits, Tips & FAQ
Learn the Standing Hamstring Stretch to improve hamstring flexibility, hip mobility, and posterior-chain control with safe form, tips, and FAQs.
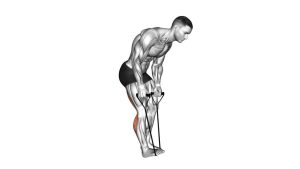
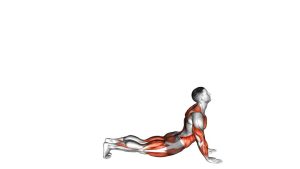
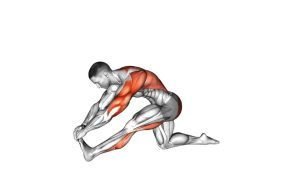
Standing Hamstring Stretch
This exercise is useful for warm-ups, cool-downs, mobility routines, and recovery sessions. It teaches you to lengthen the hamstrings without collapsing the lower back or forcing the knee. The stretch should feel smooth and controlled, with gentle tension through the back of the thigh and no sharp discomfort.
Quick Overview
| Body Part | Hamstrings |
|---|---|
| Primary Muscle | Hamstrings |
| Secondary Muscle | Calves, glutes, hip stabilizers, lower back stabilizers |
| Equipment | None |
| Difficulty | Beginner |
Sets & Reps (By Goal)
- Warm-up mobility: 1–2 sets × 8–10 controlled reps per side with a short 1–2 second pause.
- Cool-down flexibility: 2–3 sets × 20–40 seconds per side with relaxed breathing.
- Daily mobility practice: 1–3 sets × 15–30 seconds per side at low intensity.
- Post-workout recovery: 2 sets × 30–45 seconds per side without bouncing.
- Beginner flexibility routine: 1–2 sets × 15–25 seconds per side while holding a wall or chair for balance.
Progression rule: Increase hold time first, then gradually increase range of motion. Do not progress by forcing the torso lower.
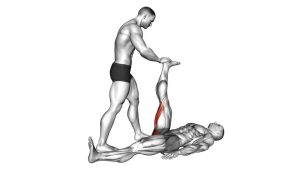
Setup / Starting Position
- Stand in a comfortable stance: Keep your feet about hip-width apart and your posture tall.
- Place one heel forward: Move one foot slightly in front of your body and rest the heel on the floor.
- Lift the toes: Pull the toes of the front foot upward so the ankle is flexed.
- Bend the support leg: Keep the back/support knee slightly bent to improve balance and reduce strain.
- Lengthen the spine: Keep the chest open, shoulders relaxed, and head aligned with the torso.
- Set your hips: Prepare to push the hips backward rather than rounding the back forward.
Tip: If balance is difficult, place one hand on a wall, bench, chair, or stable support before leaning forward.
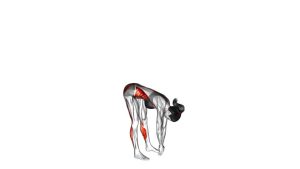
Execution (Step-by-Step)
- Start tall: Stand with the front heel grounded, toes lifted, and support knee softly bent.
- Hinge at the hips: Push your hips backward while keeping your spine long.
- Lean toward the front leg: Let the torso move forward only as far as your hamstrings allow.
- Keep the front leg controlled: Maintain a long leg position without aggressively locking the knee.
- Pause at the stretch: Hold when you feel a comfortable pull through the back of the thigh.
- Breathe slowly: Keep the neck relaxed and avoid holding your breath.
- Return to standing: Drive gently through the support leg and bring the torso upright with control.
- Repeat on the other side: Switch legs and perform the same pattern evenly.
Pro Tips & Common Mistakes
- Do not bounce: Use a steady hold or slow controlled reps. Bouncing can irritate the hamstrings.
- Avoid collapsing the chest: Keep the torso long so the stretch stays focused on the hamstrings.
- Do not force the knee: The front leg should be long, but not aggressively locked.
- Keep the toes lifted: Dorsiflexing the ankle can increase the stretch through the hamstrings and calves.
- Use a smaller range if tight: You do not need to reach the foot to make the stretch effective.
- Control the support leg: A slightly bent support knee improves balance and allows a cleaner hip hinge.
- Match both sides carefully: Stretch both legs evenly, but never force the tighter side to match the looser side immediately.
FAQ
Where should I feel the Standing Hamstring Stretch?
You should feel the stretch mainly through the back of the front thigh. You may also feel mild tension in the calf, especially when the toes are pulled upward.
Is the Standing Hamstring Stretch good for tight hamstrings?
Yes. It is a simple and beginner-friendly stretch that can help improve hamstring flexibility when practiced consistently with a controlled hip hinge and pain-free range.
Should I round my back to reach lower?
No. Reaching lower is not the main goal. Keep your spine long and hinge from the hips so the stretch stays focused on the hamstrings.
Can I use this stretch before a workout?
Yes. Before a workout, use short controlled reps or brief holds. Save longer static holds for cool-downs, mobility sessions, or recovery routines.
Why do I feel this stretch behind my knee?
Mild tension can happen if the knee is fully straight or the toes are pulled up strongly. If it feels sharp or uncomfortable, soften the knee slightly and reduce the range.
How long should I hold the Standing Hamstring Stretch?
A good starting point is 20–30 seconds per side. For flexibility-focused sessions, use 2–3 rounds while keeping the stretch comfortable.
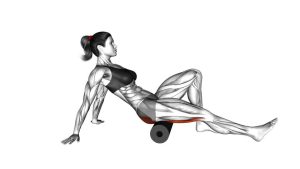
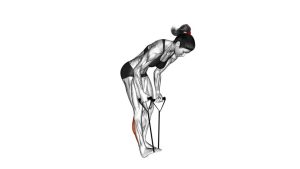
Recommended Equipment (Optional)
- Yoga Mat — provides a stable, comfortable surface for stretching and mobility routines.
- Stretching Strap — useful for assisted hamstring mobility and flexibility progressions.
- Foam Roller — helps prepare the hamstrings, calves, and glutes before stretching.
- Calf Stretch Slant Board — supports calf mobility and posterior-chain flexibility work.
- Balance Support Bar — helpful for beginners who need extra support during standing stretches.
Tip: Equipment is optional. Better results come from consistent practice, calm breathing, and a pain-free range of motion.