Handstand Shoulder Tap Against the Wall: Form, Sets, Tips & FAQ
Learn how to do the Handstand Shoulder Tap Against the Wall with proper form. Improve shoulder stability, core control, and handstand balance with setup tips, execution steps, sets by goal, mistakes to avoid, FAQs, and recommended equipment.
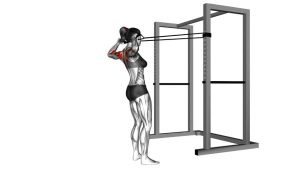
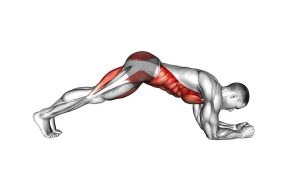
Handstand Shoulder Tap Against the Wall
This exercise is less about speed and more about controlled weight transfer. Each rep challenges the supporting shoulder, serratus, trunk, and midline stability while forcing you to resist rotation. When done well, the body stays long and braced, the ribs stay tucked, and the free hand leaves the floor only long enough to make a clean tap.
Quick Overview
| Body Part | Shoulders |
|---|---|
| Primary Muscle | Deltoids (especially front delts) and shoulder stabilizers |
| Secondary Muscle | Core, serratus anterior, triceps, upper chest, scapular stabilizers |
| Equipment | Bodyweight, wall, optional exercise mat |
| Difficulty | Intermediate to Advanced |
Sets & Reps (By Goal)
- Skill practice: 3–5 sets × 4–8 taps per side with full control and 60–90 sec rest
- Shoulder stability: 3–4 sets × 6–10 taps per side with smooth tempo and 60 sec rest
- Handstand conditioning: 2–4 sets × 20–40 sec total work using controlled alternating taps
- Advanced bodyweight training: 4–5 sets × 8–12 taps per side only if alignment stays clean
Progression rule: First improve wall handstand hold quality, then reduce sway, then add taps, and only after that increase volume. More reps should never come at the cost of stacked alignment.
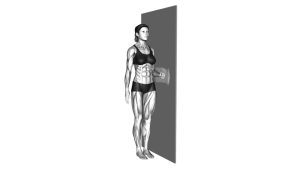
Setup / Starting Position
- Use a wall with open space: Place your hands on the floor about 4–8 inches from the wall, depending on your handstand style and mobility.
- Kick up into a wall-supported handstand: Let your heels or the soles of your feet lightly touch the wall for balance.
- Set your hand position: Hands should be shoulder-width apart with fingers spread wide for grip and balance.
- Stack your body: Push tall through the shoulders, brace the core, squeeze glutes lightly, and keep the ribs from flaring.
- Establish control first: Before attempting taps, make sure you can hold the wall handstand steadily for at least 20–30 seconds.
Tip: Think of “pushing the floor away” the entire time. A strong active shoulder position makes the taps safer and more stable.
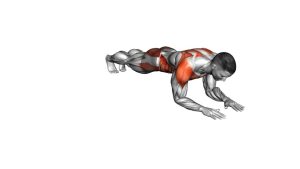
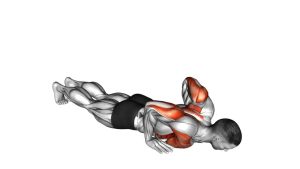
Execution (Step-by-Step)
- Start in a stable wall handstand: Lock in your shape with active shoulders, tight abs, and light wall contact.
- Shift your weight slightly: Lean into one hand just enough to make the opposite hand light without collapsing your position.
- Lift one hand carefully: Remove the hand from the floor under control and keep the elbow of the support arm strong.
- Tap the opposite shoulder: Bring the free hand across the body and touch the opposite shoulder quickly but deliberately.
- Return the hand to the floor: Replant it softly and regain full balance before starting the next side.
- Alternate sides: Continue switching left and right while keeping your hips, ribs, and legs as quiet as possible.
Pro Tips & Common Mistakes
- Push tall through the shoulders: Do not sink into the shoulder joints. Active elevation creates a safer base.
- Keep wall pressure light: The wall is there for balance, not for leaning your full bodyweight into.
- Shift before you tap: Don’t yank the hand off the floor without first loading the support side.
- Minimize rotation: Swaying hips and twisting ribs usually mean the core is not braced enough.
- Go slower, not faster: Controlled taps build more useful stability than rushed alternating reps.
- Keep eyes focused: Look between the hands or slightly ahead of them instead of turning your head.
- Avoid bent elbows: A soft elbow can quickly turn into collapse when weight shifts heavily to one side.
- Use regressions when needed: Shoulder taps from a pike position or wall handstand holds are smart stepping stones.
FAQ
What muscles does the Handstand Shoulder Tap Against the Wall work?
It mainly trains the shoulders, especially the front delts and stabilizers, while heavily involving the core, serratus anterior, triceps, and upper-body balance muscles.
Is this exercise for beginners?
Not usually. It is best for people who already have a solid wall handstand hold and enough shoulder strength to support single-arm weight shifts.
How do I make it easier?
Start with wall handstand holds, shoulder weight shifts, or elevated pike shoulder taps. Build comfort upside down before attempting full taps.
How many taps should I do per set?
Quality matters more than volume. Most trainees do well with 4–8 controlled taps per side before form starts to break down.
Why do my hips swing so much?
Excessive hip movement usually means you are shifting too aggressively, not bracing your core enough, or attempting more reps than you can control.
Can this help my freestanding handstand?
Yes. It improves shoulder loading awareness, balance correction, and midline control, which can carry over well to freestanding handstand practice.
Recommended Equipment (Optional)
- Handstand Parallettes — can reduce wrist extension demands and help reinforce pressing strength and handstand control
- Wrist Wraps for Handstand Training — useful for extra support during upside-down shoulder loading
- Gymnastics Chalk — helps improve hand traction if sweaty palms reduce stability
- Exercise Mat — adds comfort for setup work, kick-ups, and floor practice near the wall
- Resistance Bands Set — excellent for warm-ups, shoulder activation, and accessory stability work
Tip: Optional equipment should support better positioning and preparation, not replace the need for good handstand mechanics and progressive skill practice.