Alternating Shoulder Flexion Back to Wall (Y Raise): Form, Muscles Worked, Sets & Tips
Learn how to perform the Alternating Shoulder Flexion Back to Wall (Y Raise) for better shoulder mobility, posture, and overhead control. Includes muscles worked, setup, execution, sets and reps, common mistakes, FAQs, and recommended equipment.
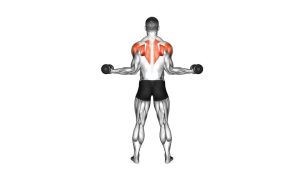
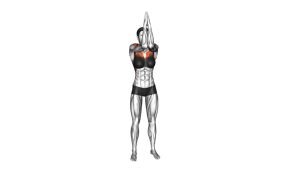
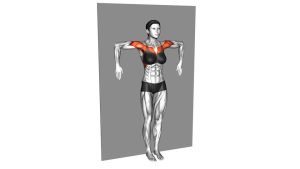
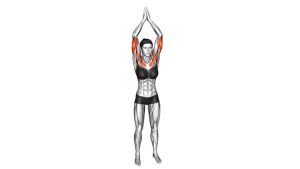
Alternating Shoulder Flexion Back to Wall (Y Raise)
This exercise is best used as a warm-up, mobility drill, or corrective accessory movement. It trains the shoulder to move overhead with better control while reinforcing scapular upward rotation and core stability. The goal is not speed or heavy effort. Focus on maintaining contact with the wall, moving one arm at a time, and avoiding compensations such as arching the lower back or shrugging the shoulder.
Quick Overview
| Body Part | Front Shoulders |
|---|---|
| Primary Muscle | Anterior deltoid |
| Secondary Muscle | Serratus anterior, upper and lower trapezius, supraspinatus, upper chest, core stabilizers |
| Equipment | Wall only |
| Difficulty | Beginner to Intermediate |
Sets & Reps (By Goal)
- Shoulder mobility / warm-up: 2–3 sets × 6–10 reps per side
- Posture and control: 2–4 sets × 8–12 reps per side
- Rehab-style movement quality: 2–3 sets × 5–8 slow reps per side with a 1–2 second pause overhead
- Upper-body activation before pressing: 2–3 sets × 6–8 reps per side
Progression rule: Increase range of motion quality first, then add reps, then add pause time. Keep every rep smooth and ribcage-controlled before progressing volume.
Setup / Starting Position
- Stand against a wall: Place your back against the wall with feet a few inches forward for balance.
- Align the body: Keep the head, upper back, and glutes lightly touching the wall.
- Brace the core: Gently pull the ribs down so the lower back does not arch excessively.
- Set the arms: Let both arms hang naturally by your sides with elbows straight but not locked.
- Start tall: Keep the chest neutral, neck long, and shoulders relaxed away from the ears.
Tip: If you cannot keep your ribs down against the wall, reduce the overhead range and focus on control instead of height.
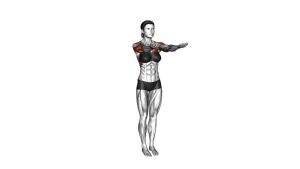
Execution (Step-by-Step)
- Brace and breathe: Maintain light wall contact through the torso and avoid flaring the ribs.
- Raise one arm: Lift one arm forward and upward in a slight diagonal path so it finishes in a Y-like overhead position.
- Keep the elbow long: The arm stays mostly straight while the shoulder blade rotates upward naturally.
- Pause briefly overhead: Stop at the highest position you can control without arching the back or shrugging.
- Lower with control: Bring the arm back down slowly to the start position.
- Switch sides: Repeat the same motion with the other arm and continue alternating in a steady rhythm.
Pro Tips & Common Mistakes
- Keep the ribs down: This is the most important cue for preventing lower-back compensation.
- Think “reach up,” not “lean back”: The arm should earn the range, not the spine.
- Use a slight Y-angle: This usually feels smoother than raising straight out in front for many lifters.
- Do not shrug: Let the shoulder blade rotate upward naturally without jamming the neck.
- Move slowly: Fast reps reduce the control benefit of the exercise.
- Alternate with intention: Reset posture between sides if needed rather than rushing the switch.
- Common mistake: Turning the movement into a lumbar extension drill by arching hard at the top.
- Common mistake: Forcing overhead range even when shoulder mobility is not available yet.
FAQ
What muscles does the Alternating Shoulder Flexion Back to Wall (Y Raise) work?
It mainly targets the anterior deltoids while also training the serratus anterior, trapezius, and other shoulder stabilizers that help control overhead movement.
Is this a mobility exercise or a strength exercise?
It is primarily a mobility and control drill. It can improve how your shoulders move overhead, but it is not meant to replace heavier strength exercises like presses or raises.
Should my entire back stay flat on the wall?
Focus on keeping the head, upper back, and glutes organized against the wall while preventing excessive rib flare and lower-back arching. A completely flattened lower back is not always necessary, but you should avoid obvious compensation.
Why use alternating reps instead of raising both arms together?
Alternating reps can make it easier to stay controlled, reduce compensations, and improve side-to-side awareness. It is often a good entry point before progressing to bilateral wall-slide variations.
When should I use this exercise in a workout?
It works well during the warm-up, in a mobility block, or as a light accessory drill before overhead pressing, upper-body training, or posture-focused sessions.
Recommended Equipment (Optional)
- High-Density Foam Roller — useful for pairing with wall slides, thoracic mobility, and upper-back prep
- Mini Loop Resistance Bands — great for adding light shoulder activation work alongside wall raises
- Stretching Strap — helpful for shoulder mobility, chest opening, and controlled range work
- Peanut Massage Ball — useful for upper-back and thoracic soft-tissue prep before mobility drills
- Posture Support Strap — optional reminder tool for posture awareness, not a replacement for training
Tip: Use equipment to support better movement quality, not to force range. For this exercise, clean mechanics matter more than extra resistance.