Cow Pose Bitilasana: Benefits, Form, Sets, Tips & FAQ
Learn Cow Pose Bitilasana for spinal mobility, posture, and gentle back activation with step-by-step form, sets, tips, mistakes, FAQs, and gear.
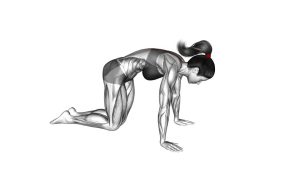
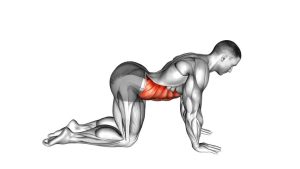
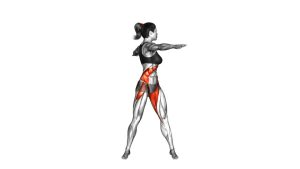
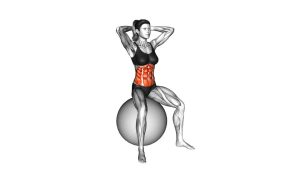
Cow Pose (Bitilasana)
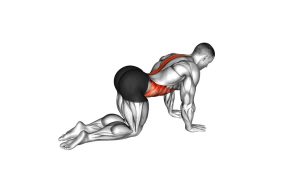
In the video, the exercise begins in a stable quadruped position with the hands under the shoulders and the knees under the hips. Then, the spine moves from neutral into a gentle arch as the chest lifts and the abdomen lowers toward the floor. Finally, the body returns back toward neutral with control, which keeps the movement smooth instead of rushed.
Quick Overview
| Body Part | Back |
|---|---|
| Primary Muscle | Spinal extensors / erector spinae |
| Secondary Muscle | Core stabilizers, shoulders, hips, upper back, and neck extensors |
| Equipment | Bodyweight; optional yoga mat or knee pad |
| Difficulty | Beginner |
Sets & Reps (By Goal)
- Mobility warm-up: 2–3 sets × 8–12 slow reps with relaxed breathing
- Yoga flow practice: 1–3 rounds × 30–60 seconds paired with Cat Pose
- Posture reset: 1–2 sets × 6–10 controlled reps during a desk break
- Gentle recovery: 1–2 sets × 5–8 reps using a small, pain-free range
Progression rule: First improve control, breathing, and range quality. After that, increase time under control rather than forcing a deeper arch.
Setup / Starting Position
- Start on all fours: Place your hands on the floor under your shoulders and your knees under your hips.
- Spread the fingers: Press evenly through the palms so the wrists and shoulders feel stable.
- Stack the lower body: Keep the knees grounded and hip-width apart for balance.
- Begin with a neutral spine: Keep the back flat before moving into the arch.
- Relax the neck: Let the head start in line with the spine instead of forcing it upward early.
Use a folded towel or knee pad if the floor feels uncomfortable. Better comfort usually improves control and breathing.
Execution (Step-by-Step)
- Set your base: Keep the hands and knees planted while the body stays balanced.
- Lower the abdomen: Allow the belly to move gently toward the floor without collapsing into the shoulders.
- Lift the chest: Open the front of the torso as the upper back moves into extension.
- Raise the head gradually: Let the gaze move forward and slightly upward while keeping the neck long.
- Pause briefly: Hold the peak cow position for a moment without bouncing.
- Return with control: Bring the spine back toward neutral slowly and smoothly.
Pro Tips & Common Mistakes
- Move slowly: Cow Pose works best when the spine changes shape with control instead of momentum.
- Avoid dumping into the low back: Lift the chest as you arch so the movement does not come only from the lumbar spine.
- Keep the arms steady: The hands should support the body while the spine performs the main action.
- Do not shrug: Keep the shoulders away from the ears to avoid unnecessary neck tension.
- Use a comfortable neck angle: Look forward or slightly upward, but avoid crunching the back of the neck.
- Breathe naturally: Although breathing is not visible in the video, calm breathing usually helps the movement feel smoother.
- Pair it with Cat Pose: For a classic mobility flow, move from Cow Pose into Cat Pose and repeat slowly.
FAQ
What is Cow Pose good for?
Cow Pose is commonly used to improve spinal mobility, open the chest, and practice gentle back extension. Additionally, it can help prepare the body for yoga flows, warm-ups, and posture-focused movement sessions.
Is Cow Pose beginner-friendly?
Yes. Cow Pose is beginner-friendly because it uses bodyweight support and a small controlled range. However, beginners should move slowly and avoid forcing the spine into a deep arch.
Should Cow Pose hurt my lower back?
No. You may feel a gentle stretch or activation, but sharp pain is not normal. If the lower back feels pinched, reduce the range, lift the chest more gradually, and return to neutral.
What is the difference between Cow Pose and Cat Pose?
Cow Pose places the spine into extension by lowering the abdomen and lifting the chest. In contrast, Cat Pose rounds the spine upward into flexion. Together, they create the Cat-Cow mobility flow.
How many reps of Cow Pose should I do?
Most people can start with 8–12 slow reps for 2–3 sets. For yoga practice, you can also perform it for 30–60 seconds as part of a calm mobility sequence.
Recommended Equipment
- Non-Slip Yoga Mat — provides grip and cushioning for hands and knees
- Yoga Knee Pad — adds extra comfort if kneeling bothers the knees
- Yoga Blocks — useful for modified yoga flows and mobility support
- Foam Roller — helpful for upper-back mobility work before or after yoga
- Yoga Strap — supports stretching routines that pair well with spinal mobility practice
Tip: Equipment should make the pose more comfortable, not more aggressive. If any tool increases discomfort, remove it and use a simpler setup.