Lying Tuck Crunch: Proper Form, Core Benefits, Sets, Tips & FAQ
Learn the Lying Tuck Crunch for stronger abs and better core control with step-by-step form, sets, mistakes, FAQs, and useful gear.
Lying Tuck Crunch
This exercise is best performed with slow control rather than speed. Since the upper body and lower body move together, the goal is to create a smooth fold through the trunk without throwing the arms or swinging the legs. Moreover, the return phase matters just as much as the crunch because the abs must resist the body as it lengthens back to the floor.
Quick Overview
| Body Part | Core |
|---|---|
| Primary Muscle | Rectus abdominis |
| Secondary Muscle | Hip flexors, transverse abdominis, obliques |
| Equipment | None required; optional exercise mat |
| Difficulty | Beginner to intermediate, depending on leg extension control |
Sets & Reps (By Goal)
- Core control: 2–3 sets × 8–12 reps with a slow return.
- Muscle endurance: 3–4 sets × 12–18 reps with steady breathing.
- Beginner practice: 2 sets × 6–10 reps using a smaller range of motion.
- Ab finisher: 2–3 rounds × 20–30 seconds with clean, controlled reps.
Progression rule: First improve control, then increase reps. After that, make the movement harder by extending the legs farther without letting the lower back lose position.
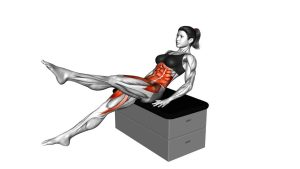
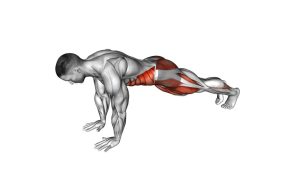
Setup / Starting Position
- Lie on your back: Use a flat floor or exercise mat so your spine has stable support.
- Extend your legs: Keep both legs straight and slightly elevated if you can control your lower back.
- Reach your arms overhead: Let the arms lengthen behind you while keeping the ribs controlled.
- Brace lightly: Draw the ribs down and prepare your abs before the first rep.
- Keep the neck calm: Lift with your trunk, not by yanking the head forward.
If the full extended start is too difficult, begin with the feet closer to the floor or bend the knees slightly.
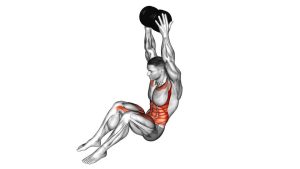
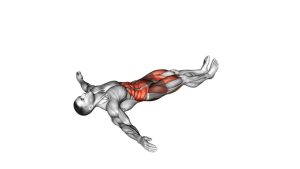
Execution (Step-by-Step)
- Start long: Begin with your arms overhead and your legs extended away from your body.
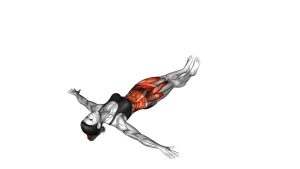
- Curl upward: Bring your arms forward while your shoulders and upper back lift from the floor.
- Tuck the knees: Bend both knees and pull them toward your chest as your torso comes forward.
- Reach toward the shins: At the top, compress into a compact tuck position without forcing the neck.
- Pause briefly: Hold the top for a moment to feel the abs contract.
- Return with control: Extend your legs and arms back out while lowering your torso slowly.
- Reset tension: Finish in the long position, then repeat without relaxing completely.
Pro Tips & Common Mistakes
- Move with control: Avoid swinging the arms forward just to create momentum.
- Keep the abs engaged: Do not let the lower back arch aggressively during the extended phase.
- Exhale into the tuck: Breathing out helps the ribs come down and improves abdominal contraction.
- Avoid neck pulling: Let the trunk curl naturally instead of forcing the chin toward the chest.
- Do not rush the lowering phase: The slow return builds more control and prevents sloppy reps.
- Shorten the range if needed: A clean small tuck is better than a large rep with back strain.
- Keep both sides even: Since the movement is symmetrical, both knees should travel toward the chest together.
FAQ
What muscles does the Lying Tuck Crunch work?
The Lying Tuck Crunch mainly works the rectus abdominis. In addition, the hip flexors assist as the knees tuck toward the chest, while the deeper core muscles help stabilize the pelvis.
Is the Lying Tuck Crunch good for beginners?
Yes, it can be beginner-friendly when the range is controlled. However, beginners should start with fewer reps and avoid extending the legs too far if the lower back starts to arch.
Should my feet touch the floor between reps?
They can touch lightly if you need a reset. However, keeping the legs slightly elevated increases core tension and makes the exercise more challenging.
Why do I feel this mostly in my hip flexors?
You may be pulling the knees in too aggressively or losing rib control. To fix this, slow down, exhale during the tuck, and focus on curling the ribs toward the pelvis.
How can I make the Lying Tuck Crunch harder?
You can extend the legs farther during the return, pause longer at the top, or slow the lowering phase. Nevertheless, only progress if your lower back stays controlled.
Recommended Equipment (Optional)
- Exercise Mat — provides comfort and support for lying ab exercises.
- Thick Yoga Mat — useful if your spine or tailbone needs extra cushioning.
- Ab Mat — helps support some crunch and sit-up variations during core training.
- Light Ankle Weights — optional progression tool for advanced users with strong control.
- Foam Roller — useful for warm-ups, recovery, and improving comfort before floor work.
Tip: Equipment is optional. For this exercise, clean form and steady control are more important than adding resistance.