Plank Side Toe Tap: Form, Core Benefits, Sets, Tips & FAQ
Learn the Plank Side Toe Tap for stronger abs, obliques, and shoulder stability. Includes setup, steps, sets, mistakes, FAQs, and equipment.
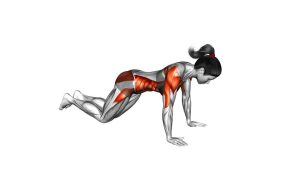
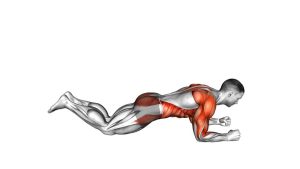
Plank Side Toe Tap
This exercise works best when your plank stays firm before, during, and after the side reach. Therefore, your hips should not collapse, your shoulders should stay active, and your core should remain braced. Although the toe tap adds rotation, the goal is still control. Move smoothly, touch lightly, and return to plank with balance.
Quick Overview
| Body Part | Core |
|---|---|
| Primary Muscle | Abs and obliques |
| Secondary Muscle | Shoulders, chest, triceps, hip flexors, glutes, and deep core stabilizers |
| Equipment | No equipment required; exercise mat optional |
| Difficulty | Intermediate because it combines plank strength, rotation, balance, and single-arm support |
Sets & Reps (By Goal)
- Core control: 2–3 sets × 6–8 reps per side, using a slow and steady pace.
- Oblique strength: 3–4 sets × 8–10 reps per side, resting 45–75 seconds between sets.
- Conditioning: 3 rounds × 30–45 seconds, keeping each tap clean and controlled.
- Beginner progression: 2 sets × 4–6 reps per side, with a smaller side step and lighter reach.
Progression rule: First improve control, then add reps. After that, increase tempo only if your hips stay stable and your shoulders remain stacked.
Setup / Starting Position
- Start in a high plank: Place your hands under your shoulders with your arms straight.
- Set your feet wider than hip-width: A slightly wider base helps you balance during the side tap.
- Brace your core: Pull your ribs down and keep your body long from head to heels.
- Keep your neck neutral: Look slightly down so your head does not drop or lift excessively.
- Press the floor away: Keep your shoulders active before you lift one hand from the ground.
Tip: If your wrists feel overloaded, warm up your hands and shoulders first. Also, use push-up handles only if they help you keep a stronger wrist position.
Execution (Step-by-Step)
- Hold a strong plank: Keep both hands planted and stabilize your shoulders.
- Shift your weight slightly: Move enough weight into one supporting hand so the opposite hand can lift.
- Move one leg to the side: Extend the same-side leg outward while keeping your core tight.
- Rotate with control: Turn your torso slightly as your same-side hand reaches toward your foot.
- Tap lightly: Touch the foot or reach toward it without collapsing your hips.
- Return to plank: Place the hand back down, bring the leg back, and reset your body line.
- Repeat on the other side: Alternate sides only if you can keep each rep balanced and clean.
Pro Tips & Common Mistakes
- Keep your supporting shoulder strong: Push the floor away so your shoulder does not sink.
- Avoid rushing the tap: Fast reps usually reduce core tension and increase hip swinging.
- Do not over-rotate: Rotate only enough to reach the foot while staying controlled.
- Keep your hips lifted: If your hips sag, reduce the range or return to a basic plank first.
- Use a wide foot base: Wider feet make the one-hand support phase more stable.
- Breathe through the movement: Exhale during the reach, then inhale as you return to plank.
- Touch lightly: The foot tap is a target, not a resting point.
FAQ
What muscles does the Plank Side Toe Tap work?
It mainly works the abs and obliques. In addition, it trains the shoulders, chest, triceps, hip flexors, glutes, and deep core stabilizers because the body must stay balanced during rotation.
Is the Plank Side Toe Tap beginner-friendly?
It is better for intermediate users because one hand leaves the floor during the tap. However, beginners can modify it by using a smaller leg movement and reaching only halfway.
Should I alternate sides every rep?
You can alternate sides if your control stays consistent. However, if you lose balance, complete all reps on one side first, reset, and then train the other side.
Why do my hips drop during this exercise?
Hip dropping usually means your core is losing tension or your feet are too narrow. Therefore, widen your stance, brace harder, and use a shorter reach.
Can I use this exercise for abs workouts at home?
Yes. Since it requires no equipment, it fits well into home abs workouts, bodyweight circuits, and core finishers.
Recommended Equipment (Optional)
- Exercise Mat — adds comfort and grip during plank-based core exercises
- Push-Up Handles — may reduce wrist strain while supporting high-plank positions
- Core Sliders — useful for advanced plank variations and controlled leg movement
- Resistance Bands Set — helpful for warm-ups, shoulder activation, and core accessory training
- Wrist Support Wraps — provides light wrist support during floor-based bodyweight work
Tip: Equipment is optional. However, a stable mat and comfortable wrist position can make the exercise easier to control.