Standing Side Crunch Elbow to Knee: Form, Benefits, Sets & Tips
Learn the Standing Side Crunch Elbow to Knee for oblique activation, core control, and balance with proper form, sets, tips, FAQs, and gear.
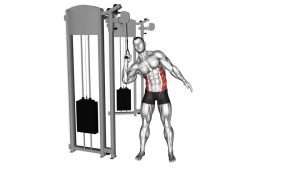
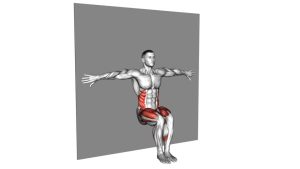
Standing Side Crunch Elbow to Knee
This exercise works best when the motion comes from the side of the waist rather than from pulling on the head. Because it is performed standing, it also challenges balance, hip control, and coordination. Therefore, it can fit well into beginner core workouts, warm-ups, low-impact cardio circuits, or bodyweight abdominal routines at home.
Quick Overview
| Body Part | Core |
|---|---|
| Primary Muscle | Obliques |
| Secondary Muscle | Rectus abdominis, hip flexors, glutes, and standing-leg stabilizers |
| Equipment | None |
| Difficulty | Beginner |
Sets & Reps (By Goal)
- Beginner form practice: 2–3 sets × 8–12 reps per side with a slow, steady tempo.
- Core endurance: 3–4 sets × 12–20 reps per side with controlled breathing.
- Low-impact cardio circuit: 30–45 seconds per side or alternating sides for 3–5 rounds.
- Warm-up activation: 1–2 sets × 10–15 reps per side before full-body training.
Progression rule: First improve balance and control. Then add more reps, slower pauses, or longer work intervals. Do not increase speed if your torso starts twisting or your standing foot loses stability.
Setup / Starting Position
- Stand tall: Place your feet about hip-width apart and keep your weight balanced through the standing foot.
- Position your hands: Bring your hands near or behind your head without pulling the neck forward.
- Open your elbows: Keep the elbows wide so the crunch comes from the side of the waist.
- Brace gently: Tighten your core lightly before lifting the knee.
- Set your posture: Keep the chest lifted, shoulders relaxed, and gaze forward.
In the video, the exercise is shown with a clear upright start before each side crunch. This reset helps keep the reps clean and repeatable.
Execution (Step-by-Step)
- Start upright: Stand tall with both hands near the head and your elbows open.
- Lift one knee: Raise the knee on one side while staying balanced on the opposite leg.
- Side-bend the torso: Bring the same-side elbow downward toward the lifting knee.
- Crunch with control: Shorten the side of your waist without yanking on the head or collapsing forward.
- Reach the peak position: Let the elbow and knee come close together, then pause briefly if balance allows.
- Return smoothly: Lower the knee and bring the torso back to the upright starting position.
- Repeat: Continue for the target reps, then switch sides or alternate sides depending on your workout style.
Pro Tips & Common Mistakes
- Do not pull on your head: Your hands are only there for positioning. Pulling can strain the neck.
- Move from the waist: Focus on bringing the ribs and hip closer on the working side.
- Avoid twisting: This exercise is mainly a side crunch, so keep the chest mostly facing forward.
- Control the standing leg: Keep your foot planted and avoid hopping or leaning too far.
- Use a steady rhythm: A controlled rep is better than a fast rep with poor balance.
- Keep your shoulders relaxed: Do not shrug as the elbow travels down.
- Return fully upright: Reset your posture between reps so each crunch starts from a clean position.
FAQ
What muscles does the Standing Side Crunch Elbow to Knee work?
It mainly works the obliques, which help side-bend and stabilize the trunk. Additionally, the hip flexors help lift the knee, while the standing leg and glutes help maintain balance.
Is this exercise good for beginners?
Yes. It is beginner-friendly because it requires no equipment and uses a simple standing pattern. However, beginners should move slowly, keep the range comfortable, and focus on balance before increasing speed.
Should I alternate sides or finish one side first?
Both options work. Alternating sides can feel more like a low-impact cardio drill, while finishing one side first can create more focused oblique fatigue on that side.
Why do I feel this more in my hip than my abs?
The hip flexors assist with knee lifting, so some hip involvement is normal. However, if the hip dominates, slow down and think about side-bending the ribs toward the hip instead of only lifting the knee higher.
Can this exercise help reduce waist fat?
It can strengthen and condition the side abdominal muscles, but fat loss requires overall calorie control, consistent training, and regular activity. Therefore, use this exercise as part of a complete fitness routine.
Recommended Equipment (Optional)
- Exercise Mat — useful for warm-ups, cooldowns, and floor-based core exercises paired with this movement
- Mini Resistance Bands — helpful for glute and hip activation before standing core work
- Adjustable Ankle Weights — optional progression for advanced users who already control the movement well
- Balance Pad — can increase balance demand once the basic version feels easy
- Fitness Interval Timer — useful for timed standing core circuits and low-impact cardio rounds
Tip: Add equipment only after your bodyweight reps stay controlled. If balance, posture, or neck position breaks down, return to the basic version.