Resistance Band–Assisted Nordic Hamstring Curl: Form, Sets, Tips & FAQ
Learn the resistance band-assisted Nordic hamstring curl for stronger hamstrings, better eccentric control, safer form, sets, tips, FAQs, and equipment.
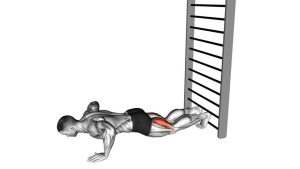
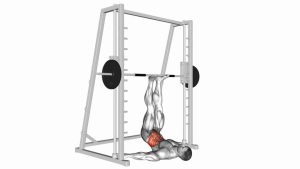
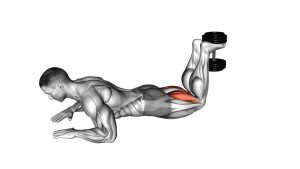
Resistance Band–Assisted Nordic Hamstring Curl
This exercise is especially useful for building eccentric hamstring strength, improving knee-flexion strength, and developing better posterior-chain control. Unlike a hip-hinge movement, the Nordic hamstring curl challenges the hamstrings mainly through the knee joint. The resistance band makes the exercise more accessible by helping you return to the upright position and by reducing strain during the hardest part of the movement.
Quick Overview
| Body Part | Hamstrings |
|---|---|
| Primary Muscle | Hamstrings: biceps femoris, semitendinosus, semimembranosus |
| Secondary Muscle | Glutes, calves, spinal erectors, core stabilizers |
| Equipment | Resistance band, secure anchor point, knee pad or exercise mat, ankle anchor support |
| Difficulty | Intermediate; easier than an unassisted Nordic curl but still demanding |
Sets & Reps (By Goal)
- Strength foundation: 3–4 sets × 4–6 slow reps, resting 90–150 seconds between sets.
- Eccentric hamstring control: 3–5 sets × 3–5 reps with a 3–6 second lowering phase.
- Hypertrophy support: 3–4 sets × 6–10 controlled reps using moderate band assistance.
- Injury-prevention style training: 2–3 sets × 4–6 reps, focusing on perfect control and no rushing.
- Beginner progression: 2–3 sets × 3–5 partial-range reps with a stronger assistance band.
Progression rule: First improve your lowering control, then increase range of motion, then reduce band assistance. Do not remove assistance until you can lower smoothly without hip bending or collapsing.
Setup / Starting Position
- Anchor your ankles: Secure your feet under a stable pad, partner hold, low bar, or Nordic curl setup so your lower legs stay fixed.
- Attach the band: Anchor a resistance band in front of you at a strong, stable point. Loop it around your chest, upper torso, or shoulders depending on the setup.
- Kneel on padding: Use a thick mat or knee pad to protect the knees and maintain comfort during the movement.
- Stack your body: Start tall with your knees, hips, shoulders, and head in one straight line.
- Brace lightly: Tighten your glutes and core to prevent your hips from folding backward.
- Set your arms: Keep your arms ready in front of your body in case you need to catch yourself at the bottom.
The band should help you control the descent, but it should not pull you out of position. Choose a band tension that supports clean reps without making the movement too easy.
Execution (Step-by-Step)
- Begin tall: Kneel upright with your hips extended, glutes lightly squeezed, and torso firm.
- Lean from the knees: Slowly allow your body to move forward as one straight unit. Do not sit back or hinge at the hips.
- Control the lowering phase: Fight gravity with your hamstrings while the band helps reduce the load.
- Keep the hips locked: Maintain a straight line from shoulders to knees. Avoid letting the hips drop forward or fold backward.
- Reach your lowest controlled point: Lower only as far as you can maintain tension and alignment.
- Use assistance wisely: Let the band help you return upward, but continue pulling with the hamstrings.
- Reset at the top: Return to tall kneeling before starting the next rep.
Pro Tips & Common Mistakes
- Keep your hips extended: The most common mistake is turning the exercise into a hip hinge. Stay long from head to knees.
- Lower slowly: The main benefit comes from resisting the descent, not from falling forward quickly.
- Use enough assistance: A stronger band is better than sloppy reps with poor control.
- Do not bounce from the bottom: Pause briefly or return smoothly. Avoid using momentum.
- Protect your knees: Always use padding and avoid placing direct pressure on a hard floor.
- Keep the ankles secure: Loose foot anchoring makes the movement unsafe and reduces hamstring tension.
- Control your head position: Keep the neck neutral and avoid looking sharply up or down.
- Progress gradually: Reduce band assistance only when every rep stays clean and controlled.
FAQ
What muscles does the resistance band-assisted Nordic hamstring curl work?
It primarily works the hamstrings, especially during the eccentric lowering phase. The glutes, calves, core, and spinal erectors also help stabilize the body.
Is this easier than a regular Nordic hamstring curl?
Yes. The resistance band reduces the amount of bodyweight your hamstrings must control. This makes the exercise more manageable while still training the same movement pattern.
Should I go all the way down to the floor?
Only if you can maintain control and proper alignment. Most people should start with a partial range and gradually increase depth as strength improves.
Why do my hamstrings cramp during this exercise?
Cramping may happen if the exercise is too intense, the range is too large, or the hamstrings are not ready for the load. Use more band assistance, reduce range, and warm up properly.
Can this exercise help prevent hamstring injuries?
It can support hamstring resilience because it trains eccentric strength, which is important for sprinting, deceleration, and athletic movement. It should be progressed gradually.
How much band assistance should I use?
Use enough assistance to lower slowly for at least 3 seconds while keeping your hips extended. If you cannot control the descent, the band is too light.
Recommended Equipment
- Resistance Bands Set — essential for assisted Nordic curl progressions and scalable support.
- Nordic Hamstring Curl Strap — helps secure the ankles under a door or stable anchor point.
- Thick Exercise Mat / Knee Pad — protects the knees and improves comfort during kneeling reps.
- Door Anchor for Resistance Bands — creates a stable band attachment point for home training setups.
- Nordic Curl Bench — provides a dedicated setup for safer ankle anchoring and repeatable training.
Tip: Choose equipment that keeps the ankles secure and the knees comfortable. Better setup quality usually means better hamstring tension and safer reps.