Resistance Band Kneeling High-to-Low Anti-Rotation Chop: Form, Sets, Tips & FAQ
Learn how to perform the resistance band kneeling high-to-low anti-rotation chop for stronger obliques, better core stability, and improved rotational control. Includes setup, execution, sets by goal, mistakes, FAQs, and recommended equipment.
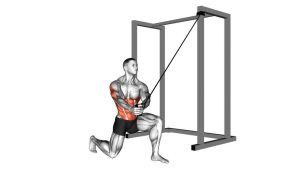
Resistance Band Kneeling High-to-Low Anti-Rotation Chop
This exercise blends diagonal pulling with anti-rotation control, making it valuable for athletes, lifters, and anyone who wants a stronger, more stable core. The kneeling position limits help from the lower body, so the trunk has to work harder to stay organized. Done well, you should feel the abs and obliques brace hard while the shoulders and arms guide the band through a smooth, controlled arc.
Quick Overview
| Body Part | Core / Obliques |
|---|---|
| Primary Muscle | Obliques |
| Secondary Muscle | Rectus abdominis, transverse abdominis, serratus anterior, shoulders, lats, glutes (stabilizing) |
| Equipment | Resistance band with a high anchor point |
| Difficulty | Intermediate |
Sets & Reps (By Goal)
- Core stability: 2–4 sets × 8–12 reps per side with a controlled 2–3 second lowering phase
- Athletic trunk power: 3–4 sets × 6–10 reps per side using crisp intent but strict control
- Warm-up activation: 1–3 sets × 6–8 reps per side with light resistance and smooth tempo
- Hypertrophy-focused core work: 3–4 sets × 10–15 reps per side with moderate resistance and minimal torso sway
Progression rule: Increase tension only after you can keep the ribs down, hips quiet, and finish every rep without leaning, shrugging, or rotating out of position.
Setup / Starting Position
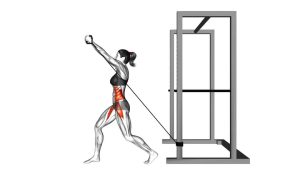
- Anchor the band high: Secure the band above shoulder level so the line of pull travels diagonally downward.
- Take a kneeling stance: Set up in a stable half-kneeling or tall-kneeling variation based on your equipment and comfort. In the video, the athlete uses a split kneeling stance for balance and trunk control.
- Face slightly away from the anchor: This creates diagonal tension across the body and increases the anti-rotation demand.
- Grip the handle with both hands: Extend the arms up and slightly across the body toward the anchor point.
- Brace before the first rep: Keep the chest tall, ribs stacked over the pelvis, glutes engaged, and eyes forward.
Tip: A narrower base increases the stability challenge. If you are still learning the pattern, use a lighter band and prioritize a steady kneeling position first.
Execution (Step-by-Step)
- Start long and braced: With both hands on the handle, reach toward the high anchor while keeping the shoulders packed and the trunk tight.
- Pull from high to low: Drive the hands diagonally downward across the body toward the lower chest, ribs, or front hip area, depending on your setup.
- Resist rotation: Let the arms move, but do not allow the torso to collapse, excessively twist, or get pulled toward the anchor.
- Pause in the finish: Briefly hold the bottom position while maintaining tension through the abs and obliques.
- Return under control: Slowly guide the band back up to the starting position without losing posture or balance.
- Repeat evenly: Complete all reps on one side, then switch sides to train balanced diagonal control.
Pro Tips & Common Mistakes
- Brace before you move: Don’t wait until the band pulls you around to tighten the core.
- Keep the ribs down: Flaring the ribcage reduces core tension and often shifts stress into the low back.
- Use the obliques, not momentum: Swinging through the range defeats the anti-rotation purpose of the exercise.
- Stay tall through the kneeling stance: Avoid collapsing into the hips or drifting sideways during the chop.
- Control the return: The eccentric phase is where many lifters lose posture. Fight for position on the way back up.
- Don’t shrug the shoulders: Keep the traps calm and let the trunk do the stabilizing work.
- Match the band to your skill level: Too much tension turns a clean chop into a sloppy twist.
FAQ
What should I feel during the kneeling high-to-low anti-rotation chop?
You should mainly feel strong tension through the obliques, abs, and deep core while the shoulders and arms guide the handle. A small amount of shoulder and lat involvement is normal, but your torso should feel like the main stabilizer.
Is this an anti-rotation exercise or a rotational exercise?
It is primarily an anti-rotation exercise. The arms move through a diagonal path, but the torso should resist being pulled or twisted out of alignment by the band.
Should I use a half-kneeling or tall-kneeling stance?
Both can work. Half-kneeling usually gives more balance and lets you organize the hips more easily, while tall-kneeling can increase the demand on trunk stability if you already control the pattern well.
How heavy should the resistance band be?
Use a band that lets you move with clean posture and zero jerking. If you have to lean, twist, or rush the return phase, the band is too strong for the quality of movement you want.
Can beginners use this exercise?
Yes, but most beginners do better with light resistance and a slower tempo. Mastering posture, bracing, and controlled diagonal movement matters more than loading it heavily.
Recommended Equipment
- Resistance Bands Set — useful for scalable tension and full-body band training
- Resistance Band Set with Handles — ideal if you want a more comfortable grip for chops, presses, and rows
- Cable Machine Handles — helpful for improving grip comfort on band and cable-based diagonal pulls
- Workout Mat — adds knee comfort and stability during kneeling core work
- Resistance Band Bar Set — a useful upgrade for lifters who want more band exercise variety beyond basic handles
These product categories are directly relevant to this exercise: Amazon currently surfaces dedicated results for resistance band sets, handles, mats, and resistance band bar systems.