Shoulder Tap Exercise: Core Stability, Plank Form, Sets, Tips & FAQ
Learn the Shoulder Tap exercise for core stability, anti-rotation strength, shoulder control, and plank endurance with form tips, sets, mistakes, FAQs, and gear.
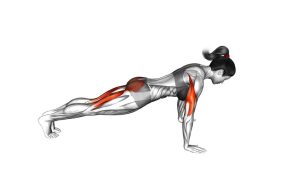
Shoulder Tap
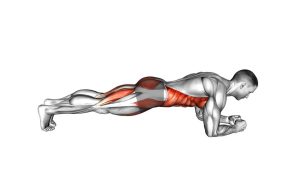
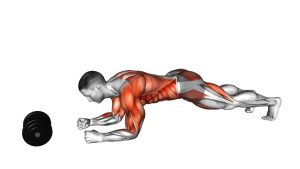
This movement starts in a strong high plank with both hands under the shoulders and the body aligned from head to heels. Then, one hand lifts from the floor, crosses the chest, taps the opposite shoulder, and returns to the starting position before the other side repeats. Because the base of support changes with every tap, the core must work hard to prevent the hips from twisting side to side.
Although the Shoulder Tap looks simple, it rewards slow and controlled reps. Therefore, the best technique is not about tapping quickly. Instead, it is about keeping the ribs controlled, the hips level, the shoulders stacked, and the spine neutral through every repetition.
Quick Overview
| Body Part | Core |
|---|---|
| Primary Muscle | Rectus abdominis, transverse abdominis, and deep core stabilizers |
| Secondary Muscle | Obliques, shoulders, chest, triceps, glutes, hip stabilizers, and lower-back stabilizers |
| Equipment | No equipment required; optional exercise mat for wrist and hand comfort |
| Difficulty | Beginner to intermediate, depending on tempo, stance width, and plank control |
Sets & Reps (By Goal)
- Beginner control: 2–3 sets × 6–8 taps per side with a slow tempo and wide feet.
- Core stability: 3–4 sets × 8–12 taps per side while keeping the hips level.
- Shoulder endurance: 3–4 sets × 20–30 total taps with steady breathing.
- Warm-up activation: 1–2 sets × 10–16 total taps before push-ups, planks, or upper-body training.
- Conditioning finisher: 3–5 rounds × 20–40 seconds, resting 30–60 seconds between rounds.
Progression rule: First, improve control and reduce hip rotation. After that, bring the feet closer together, slow the tempo, add a pause at the shoulder, or increase total reps.
Setup / Starting Position
- Start on the floor: Place your hands under your shoulders with your arms straight and palms flat.
- Step into a high plank: Extend both legs back and balance on your toes.
- Set your stance: Keep your feet slightly wider than hip-width at first for better stability.
- Brace your core: Tighten your abs as if you are preparing for a light punch to the stomach.
- Align your body: Keep your head, shoulders, hips, knees, and heels in one long line.
- Lock in your shoulders: Press the floor away gently so the upper back stays active, not collapsed.
- Look down: Keep your neck neutral by looking at the floor slightly ahead of your hands.
Setup tip: A wider foot position makes the exercise easier. However, a narrower foot position increases the anti-rotation demand.
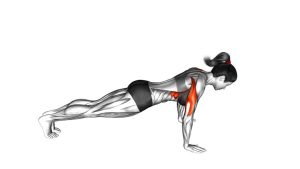
Execution (Step-by-Step)
- Hold the plank: Begin with both hands on the floor and your body straight from head to heels.
- Shift slightly: Move a small amount of body weight into one hand without letting the hips twist.
- Lift one hand: Raise one palm from the floor while keeping the supporting arm strong and stable.
- Tap the opposite shoulder: Bring the lifted hand across the body and touch the opposite shoulder lightly.
- Pause briefly: Hold the tap for a moment while keeping your ribs down and hips square.
- Return with control: Place the hand back under the shoulder without dropping your chest or rocking backward.
- Repeat on the other side: Switch hands and continue alternating shoulder taps with a steady rhythm.
- Keep breathing: Exhale gently during the tap and inhale as the hand returns to the floor.
Pro Tips & Common Mistakes
Pro Tips
- Move slowly: A slower tap makes the core work harder and reduces momentum.
- Press the floor away: This keeps the shoulders active and prevents the chest from sinking.
- Keep the hips square: Imagine balancing a glass of water on your lower back.
- Use your glutes: Light glute tension helps keep the pelvis stable during each tap.
- Control the return: Place the hand down softly instead of dropping it onto the floor.
- Adjust your feet: Wider feet build confidence, while closer feet increase difficulty.
Common Mistakes
- Rotating the hips: This reduces the anti-rotation benefit and shifts tension away from the core.
- Sagging the lower back: This can create unnecessary lumbar stress. Brace your abs and squeeze your glutes.
- Rushing the taps: Fast reps often become sloppy and momentum-based.
- Letting the shoulders collapse: Keep the upper back active by pushing the floor away.
- Reaching too far: Tap the shoulder lightly. Do not twist across the body more than needed.
- Holding the breath: Breathe steadily so the core stays strong without excessive tension.
FAQ
What muscles do Shoulder Taps work?
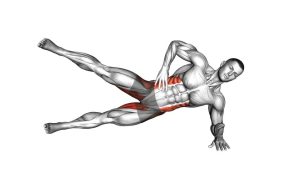
Shoulder Taps mainly work the core, especially the rectus abdominis, transverse abdominis, and obliques. In addition, they train the shoulders, chest, triceps, glutes, and hip stabilizers because the body must stay balanced while one hand leaves the floor.
Are Shoulder Taps good for abs?
Yes. Shoulder Taps are effective for abs because they challenge the core to resist rotation. However, they are not just a “crunch” exercise. Instead, they build functional core stability that carries over to planks, push-ups, crawling patterns, and athletic movement.
How do I stop my hips from moving during Shoulder Taps?
Widen your feet, slow down each repetition, brace your abs, and squeeze your glutes lightly. Also, tap the shoulder gently instead of reaching aggressively. As your control improves, gradually bring your feet closer together.
Are Shoulder Taps beginner-friendly?
They can be beginner-friendly when performed with a wide stance and slow tempo. Nevertheless, beginners who cannot hold a stable high plank should first practice regular planks, incline planks, or plank holds from the knees.
Should I do Shoulder Taps fast or slow?
Slow reps are usually better for form and core stability. Fast reps may be useful for conditioning, but only after you can control the plank without hip rotation, shoulder collapse, or lower-back sagging.
Can Shoulder Taps help with push-ups?
Yes. Shoulder Taps can support better push-up performance because they improve plank strength, shoulder stability, wrist loading tolerance, and body alignment. Therefore, they work well as a warm-up or accessory exercise before push-up training.
Recommended Equipment
- Exercise Mat — adds comfort for hands, wrists, knees, and floor-based core training.
- Wrist Support Wraps — useful if your wrists need extra support during plank-based exercises.
- Push-Up Handles — help keep the wrists more neutral during plank and push-up variations.
- Core Sliders — add progression options for plank, mountain climber, and anti-rotation core drills.
- Resistance Bands Set — useful for pairing Shoulder Taps with upper-back and shoulder stability work.
Equipment note: The Shoulder Tap does not require gear. However, a mat, wrist support, or push-up handles may make the exercise more comfortable if your floor surface or wrist position limits your form.