Side Plank Supported Wall: Form, Core Benefits, Sets, Tips & FAQ
Learn the Side Plank Supported Wall for stronger obliques, better lateral core stability, and safer posture control with setup, form tips, FAQs, and gear.
Side Plank Supported Wall
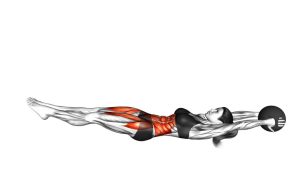
This exercise works best when the body stays long, stacked, and steady. Because the movement is a static hold, every second should feel intentional. Keep your elbow under your shoulder, brace your core gently, and maintain a straight line from your head through your hips and feet. Additionally, avoid rushing the setup, since a poor starting position makes the hold harder to control.
Quick Overview
| Body Part | Core |
|---|---|
| Primary Muscle | Obliques |
| Secondary Muscle | Transverse abdominis, glutes, hip stabilizers, shoulder stabilizers |
| Equipment | Bodyweight only; optional exercise mat or elbow pad |
| Difficulty | Beginner to intermediate, depending on hold time and body control |
Sets & Reps (By Goal)
- Beginner core control: 2–3 sets × 10–20 seconds per side, resting 45–75 seconds.
- Core endurance: 3–4 sets × 20–40 seconds per side, resting 45–90 seconds.
- Strength and stability: 3–5 sets × 30–45 seconds per side, resting 60–90 seconds.
- Warm-up activation: 1–2 sets × 10–20 seconds per side before core or lower-body training.
Progression rule: First increase hold quality, then increase hold time. If your hips drop or your shoulder collapses, end the set and reset before adding more seconds.
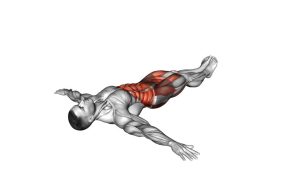
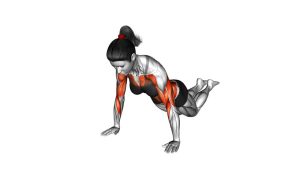
Setup / Starting Position
- Lie on your side: Position your body sideways with your legs extended and stacked.
- Place your forearm down: Set your elbow under your shoulder so the upper arm is vertical.
- Stack the body: Keep your shoulders, hips, knees, and feet aligned in one long line.
- Set the top hand: Place the top hand on your hip, as shown in the visible demonstration.
- Brace gently: Tighten your core enough to resist sagging, but do not hold your breath.
Note: The uploaded video shows a stable forearm side plank hold. A wall is not clearly visible as a contact point, so the instructions focus on the visible supported side-plank position.
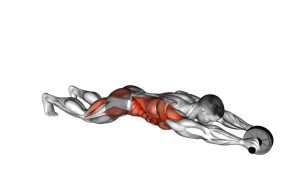
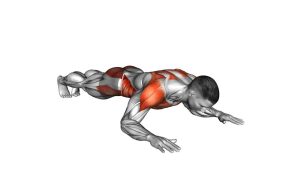
Execution (Step-by-Step)
- Lift into the side plank: Press through your forearm and raise your hips until your body forms a straight line.
- Hold the stacked position: Keep your top shoulder above your bottom shoulder and your top hip above your bottom hip.
- Keep the hips high: Do not let the waist sink toward the floor. Instead, gently lift through the lower side of your torso.
- Control the shoulder: Push the floor away through your forearm so the bottom shoulder stays strong and stable.
- Breathe smoothly: Maintain steady breathing while holding the position for the planned time.
- Lower with control: After the hold, bring your hips down slowly and switch sides.
Pro Tips & Common Mistakes
- Keep your elbow under your shoulder: This improves leverage and reduces unnecessary shoulder strain.
- Do not rotate your chest down: Stay stacked so the obliques work evenly.
- Avoid hip sagging: Dropping the hips turns the hold into a weak position and reduces core tension.
- Keep your neck neutral: Look forward instead of craning your head up or dropping it down.
- Use shorter holds when needed: Clean 15-second holds are better than long, messy holds.
- Train both sides equally: Since this is a side-to-side core exercise, balance matters.
- Use a mat if needed: Forearm pressure can distract from proper core engagement.
FAQ
What muscles does the Side Plank Supported Wall work?
It mainly works the obliques. Additionally, it trains the transverse abdominis, glutes, hip stabilizers, and shoulder stabilizers because the body must resist bending and rotation.
Is this exercise good for beginners?
Yes, it can be beginner-friendly when the hold is short and controlled. However, beginners should start with 10–20 seconds per side and stop before the hips sag.
Should I feel this in my shoulder?
You may feel the supporting shoulder working, but it should not feel painful or pinched. If the shoulder feels overloaded, check that your elbow is under your shoulder and press the floor away gently.
Why do my hips keep dropping?
Hip dropping usually means the hold is too long, your setup is not stacked, or your obliques are fatigued. Therefore, reduce the time and focus on a shorter, cleaner hold.
How can I make this exercise easier?
You can bend the knees and perform a modified side plank. Also, you can reduce the hold time and rest longer between sets.
How can I make it harder?
Increase the hold time gradually, add a top-leg lift, or progress to a full side plank variation with stricter alignment. However, only progress when you can hold the basic version without twisting or sagging.
Recommended Equipment (Optional)
- Exercise Mat — adds comfort for the forearm, elbow, hip, and side plank setup.
- Elbow Pad for Plank Exercise — reduces pressure on the supporting elbow during longer holds.
- Non-Slip Yoga Mat — helps keep the forearm and feet from sliding during the hold.
- Core Sliders — useful for advanced core progressions after mastering the static hold.
- Resistance Bands Set — helpful for pairing side planks with glute, hip, and core stability drills.
Tip: Equipment should make the exercise safer and more comfortable. If any item causes slipping, pressure, or discomfort, remove it and return to a simpler setup.