Sitting Side Bend Elbow to Floor Tap: Core Form, Sets, Tips & FAQ
Learn the Sitting Side Bend Elbow to Floor Tap for controlled oblique strength, seated core stability, form cues, mistakes, sets, and equipment.
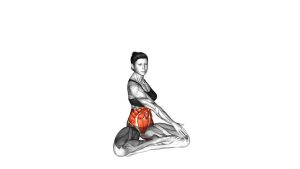
Sitting Side Bend Elbow to Floor Tap
This exercise works best when the movement stays slow, clean, and side-focused. Because the body is seated, the hips should remain stable while the torso bends sideways. As a result, the obliques must control both the lowering phase and the return phase. In addition, the movement teaches better awareness of lateral core motion without requiring weights or machines.
Quick Overview
| Body Part | Core |
|---|---|
| Primary Muscle | Obliques |
| Secondary Muscle | Rectus abdominis, transverse abdominis, spinal stabilizers |
| Equipment | None required; optional exercise mat for comfort |
| Difficulty | Beginner-friendly, with intermediate control demands if performed slowly |
Sets & Reps (By Goal)
- Beginner control: 2–3 sets × 8–10 reps per side, using a slow and comfortable range.
- Core endurance: 3–4 sets × 12–15 reps per side, keeping the tempo smooth from start to finish.
- Oblique strength focus: 3 sets × 8–12 reps per side with a brief pause near the floor tap.
- Warm-up activation: 1–2 sets × 6–8 reps per side before a core or full-body session.
Progression rule: First improve control and range. Then add more reps or a slower lowering phase. Avoid rushing the tap just to complete more repetitions.
Setup / Starting Position
- Sit on the floor: Position yourself comfortably with your legs bent in front of you.
- Lengthen the torso: Sit tall before moving so the spine starts from a neutral, upright position.
- Place one hand near the head: Keep the elbow pointed outward so it can travel down toward the floor.
- Set the opposite side: Keep the other arm relaxed near the body or floor for balance if needed.
- Anchor the hips: Keep both hips grounded throughout the movement.
Tip: Use an exercise mat if the floor feels uncomfortable. A softer surface can make the seated position easier to maintain.
Execution (Step-by-Step)
- Start tall: Brace lightly through the core while keeping the shoulders relaxed.
- Bend to the side: Move the elbow down toward the floor beside your hip.
- Keep the motion lateral: Focus on side bending rather than twisting or crunching forward.
- Tap or approach the floor: Touch the floor lightly with the elbow only if your range allows it.
- Control the bottom: Pause briefly without bouncing or collapsing into the side bend.
- Return upright: Use the obliques to bring the torso back to the starting position.
- Repeat evenly: Complete the target reps, then switch sides with the same tempo and control.
Pro Tips & Common Mistakes
- Move slowly: A controlled elbow tap is more effective than a fast, loose side bend.
- Avoid twisting: Keep the chest relatively open and bend to the side instead of rotating the torso.
- Do not collapse: Lower with control so the obliques manage the movement.
- Keep the hips grounded: If one hip lifts, the range may be too large.
- Relax the neck: The hand near the head should not pull the neck down.
- Use a comfortable range: The elbow does not need to forcefully hit the floor on every rep.
- Control both directions: The return to upright is just as important as the descent.
FAQ
What muscles does the Sitting Side Bend Elbow to Floor Tap work?
It primarily works the obliques, especially during the side bend and the controlled return. The rectus abdominis, transverse abdominis, and spinal stabilizers also assist with posture and control.
Should my elbow touch the floor every rep?
Only tap the floor if you can do it without twisting, lifting the hips, or collapsing. If your range is limited, move the elbow toward the floor and stop at a comfortable point.
Is this exercise good for beginners?
Yes. It is beginner-friendly because it uses bodyweight only and a seated position. However, beginners should use a smaller range and focus on smooth control before adding more reps.
Is this a crunch exercise?
Not exactly. Although it trains the core, the main movement is lateral flexion, meaning the torso bends sideways. Therefore, it targets the obliques more directly than a standard forward crunch.
Why do I feel this in my lower back?
Mild stabilizer work can happen, but strong lower-back discomfort usually means the range is too large, the torso is twisting, or the core is not braced. Reduce the range and keep the hips anchored.
Recommended Equipment (Optional)
- Exercise Mat — adds comfort for seated floor core exercises.
- Thick Yoga Mat — provides extra cushioning if the hips or floor contact points feel uncomfortable.
- Pilates Mat — useful for slow, controlled bodyweight core training.
- Core Sliders — helpful for adding other controlled core exercises to the same workout.
- Foam Roller — useful for warm-ups, mobility work, and recovery around core sessions.
Equipment is optional for this exercise. However, a comfortable mat can improve consistency, especially when practicing seated floor movements.