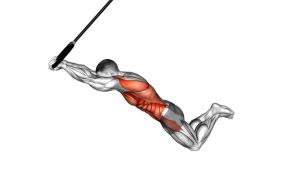
V-Up Hold: Core Form, Benefits, Sets, Tips & FAQ
Learn the V-Up Hold to build stronger abs, hip flexors, and core stability with safe form, setup cues, sets, mistakes, FAQs, and gear.
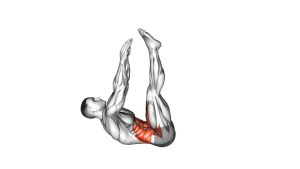
V-Up Hold
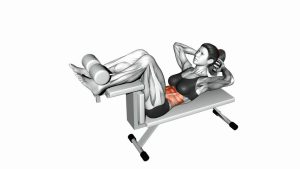
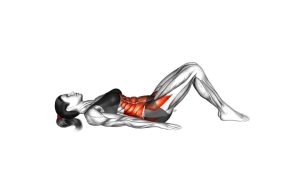
This exercise works best when the body moves with control instead of momentum. First, the torso and legs rise from the floor together. Then, the arms reach forward while the body balances on the glutes or sit bones. As a result, the abs must stay tight to prevent the lower back from collapsing or the legs from dropping.
Although the V-Up Hold looks simple, it requires strong coordination between the rectus abdominis, hip flexors, and stabilizing muscles around the trunk. Therefore, keep the movement smooth, breathe calmly, and choose a hold duration that allows clean form from start to finish.
Quick Overview
| Body Part | Core |
|---|---|
| Primary Muscle | Rectus abdominis |
| Secondary Muscle | Hip flexors, obliques, transverse abdominis, quadriceps |
| Equipment | No equipment required; exercise mat optional |
| Difficulty | Intermediate because it requires balance, straight-leg control, and sustained core tension |
Sets & Reps (By Goal)
- Core endurance: 3–4 sets × 15–30 second holds, resting 45–75 seconds between sets.
- Beginner control practice: 2–3 sets × 8–15 second holds with knees slightly bent if needed.
- Ab strength focus: 3–5 sets × 10–25 second holds while keeping the legs straight and together.
- Workout finisher: 2–3 sets × max clean hold, stopping before the lower back loses position.
Progression rule: First increase hold time by 3–5 seconds. After that, improve leg straightness and torso height before adding advanced variations.
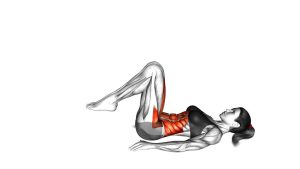
Setup / Starting Position
- Lie on your back: Start flat on the floor with your legs extended and your body long.
- Prepare your arms: Keep the arms overhead or slightly forward so they can reach toward the legs during the lift.
- Brace your core: Gently tighten your abs before moving so the lower back does not overarch.
- Keep the legs together: Point both legs in the same direction and maintain straight, controlled tension.
- Set your gaze: Keep the neck comfortable and avoid aggressively pulling the head forward.
Tip: If the full straight-leg version feels too demanding, bend the knees slightly while keeping the same V-shaped body position.
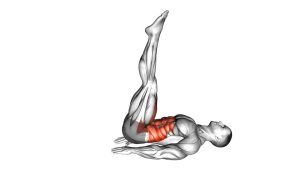
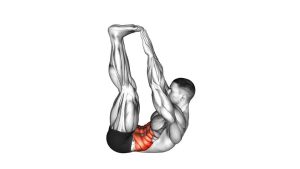
Execution (Step-by-Step)
- Start from the floor: Lie flat with your legs extended and your arms prepared to move forward.
- Lift together: Raise your upper body and legs at the same time instead of lifting one side first.
- Reach forward: Extend your arms toward your shins, ankles, or feet while keeping your chest lifted.
- Create the V shape: Balance on your glutes or sit bones with the legs elevated and the torso angled upward.
- Hold steady: Keep the abs tight, legs controlled, and arms reaching forward without swinging.
- Breathe under tension: Take short, controlled breaths while maintaining the position.
- Exit with control: Lower back down slowly when the hold ends, rather than dropping suddenly.
Pro Tips & Common Mistakes
- Lift both sides together: Avoid throwing the torso up first or swinging the legs with momentum.
- Keep the legs active: Straight, connected legs make the hold cleaner and more challenging.
- Reach forward, not upward: The arms should help balance the body without pulling the neck forward.
- Do not hold your breath: Controlled breathing keeps tension stable and prevents unnecessary bracing pressure.
- Avoid lower-back strain: If the back arches or hurts, shorten the hold or bend the knees slightly.
- Stay balanced: Small adjustments are normal, but excessive rocking means the hold is too hard or too long.
- Control the ending: Lower slowly so the abs continue working through the return.
FAQ
What muscles does the V-Up Hold work?
The V-Up Hold mainly targets the rectus abdominis. Additionally, the hip flexors, obliques, transverse abdominis, and quadriceps help stabilize the lifted V position.
Is the V-Up Hold good for abs?
Yes. Because the exercise requires you to hold your torso and legs off the floor, it creates strong isometric tension through the abs. However, the form must stay controlled to keep the work in the core instead of the lower back.
How long should I hold a V-Up Hold?
Start with 8–15 seconds if you are still learning. Then, gradually build toward 20–30 seconds as your core strength and balance improve.
Why does my lower back hurt during the V-Up Hold?
Lower-back discomfort often happens when the abs fatigue, the legs drop too low, or the lower back arches. Therefore, shorten the hold, bend the knees, or use an easier variation until your control improves.
Can beginners do the V-Up Hold?
Beginners can practice a modified version with bent knees or shorter holds. Still, the full straight-leg V-Up Hold is usually better for people who already have basic core strength.
Should I move during the V-Up Hold?
No. This version is an isometric hold, so the goal is to stay steady in the V position. Small balance corrections are normal, but the body should not swing or bounce.
Recommended Equipment (Optional)
- Exercise Mat — adds comfort for the spine, hips, and tailbone during floor-based core work.
- Thick Yoga Mat — helpful if you need extra cushioning while holding the V position.
- Core Sliders — useful for pairing this hold with other controlled abdominal exercises.
- Adjustable Ankle Weights — an advanced option for stronger users who can already hold clean form.
- Ab Wheel — supports advanced core training when combined with isometric holds and anti-extension work.
Tip: Equipment is optional for this exercise. Most people should master the bodyweight V-Up Hold first before adding harder core tools.