Lying Leg Raise to Side: Core Form, Oblique Tips & FAQ
Learn the Lying Leg Raise to Side for stronger abs, obliques, and hip control with step-by-step form, sets, tips, FAQs, and gear.
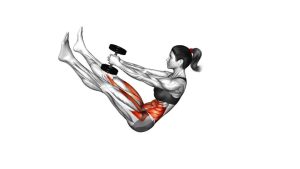
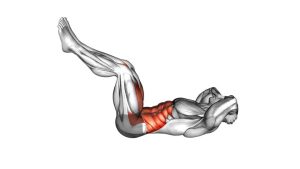
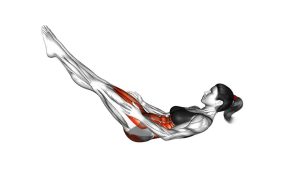
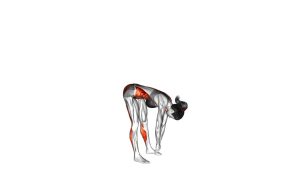
Lying Leg Raise to Side
This exercise is best performed with a slow tempo and strict control. First, you lift both straight legs upward from the floor. Then, from the raised position, you guide the legs toward one side while keeping your shoulders anchored. Finally, you return the legs under control before lowering them back down.
Quick Overview
| Body Part | Core |
|---|---|
| Primary Muscle | Rectus abdominis and obliques |
| Secondary Muscle | Hip flexors, transverse abdominis, and deep core stabilizers |
| Equipment | No equipment required; optional exercise mat |
| Difficulty | Intermediate because the straight-leg position and side lowering demand strong core control |
Sets & Reps (By Goal)
- Core control: 2–3 sets × 6–8 reps per side with slow, clean movement
- Oblique strength: 3–4 sets × 8–10 reps per side with a controlled side range
- Lower-ab endurance: 2–3 sets × 10–12 total reps with shorter rest periods
- Beginner modification: 2 sets × 5–6 reps per side with slightly bent knees
Progression rule: Increase control before range. Once you can keep your shoulders down, legs together, and lower back stable, gradually move the legs farther to the side.
Setup / Starting Position
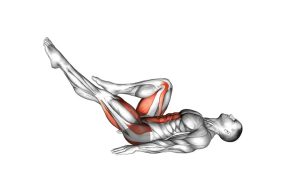
- Lie on your back: Position your body flat on the floor with your head neutral and your eyes facing upward.
- Set your arms: Place your arms along your sides with palms pressing lightly into the floor for balance.
- Extend your legs: Keep both legs straight and together before starting the lift.
- Brace gently: Tighten your midsection as if preparing to resist movement through your trunk.
- Control your pelvis: Keep your lower back from arching excessively as the legs move.
Tip: If straight legs feel too demanding, slightly bend your knees. This reduces leverage while still training the same core pattern.
Execution (Step-by-Step)
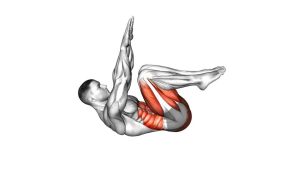
- Begin from the floor: Keep your legs extended, feet together, and arms steady beside your body.
- Raise both legs: Lift your legs upward together until they reach a near-vertical position above your hips.
- Stabilize at the top: Pause briefly and keep your shoulders, upper back, and arms anchored to the floor.
- Move to the side: Slowly guide both legs toward one side without letting them fall or separate.
- Stop before losing control: Lower only as far as you can while keeping your torso mostly stable.
- Return to center: Use your abs and obliques to bring the legs back to the vertical position.
- Lower with control: Bring the legs back down toward the floor without swinging or arching the lower back.
- Repeat smoothly: Reset your brace and perform the next repetition with the same slow rhythm.
Pro Tips & Common Mistakes
- Move slowly: A slower tempo increases abdominal tension and prevents momentum from taking over.
- Keep the legs together: Separating the legs usually reduces control and changes the movement pattern.
- Avoid dropping too low: Stop the side descent before your shoulders lift or your lower back twists hard.
- Use your arms lightly: Your hands can support balance, but they should not push aggressively into the floor.
- Control the return: The hardest part is often bringing the legs back to center without swinging.
- Do not rush the lowering phase: Lowering too quickly can pull the lower back into an unsafe arch.
- Breathe steadily: Exhale during the side movement and return; inhale as you reset.
FAQ
What muscles does the Lying Leg Raise to Side work?
It mainly works the abs and obliques. Additionally, the hip flexors assist during the leg raise, while the deep core muscles help stabilize your pelvis and spine.
Is this exercise good for obliques?
Yes. The side lowering phase strongly challenges the obliques because they must resist rotation and help bring the legs back to center.
Should my legs stay straight?
In the full version, yes. However, if your lower back arches or your legs feel too heavy, slightly bend your knees until you can control the movement properly.
Why does my lower back lift during this exercise?
Your lower back may lift because the leg lever is too demanding or because your core is losing tension. Reduce the range, bend the knees, or perform fewer reps until your control improves.
Is the Lying Leg Raise to Side beginner-friendly?
It can be modified for beginners, but the full straight-leg version is better for intermediate exercisers. Start with a smaller side range and progress only when your form stays stable.
Recommended Equipment (Optional)
- Exercise Mat — adds comfort and grip for floor-based core exercises
- Thick Yoga Mat — helpful if your lower back or hips need extra padding
- Adjustable Ankle Weights — advanced option for adding resistance after mastering bodyweight control
- Core Sliders — useful for related abdominal stability and control drills
- Resistance Bands Set — useful for pairing this exercise with hip and core accessory work
Tip: Equipment is optional. Master the bodyweight version first, then add difficulty only when your reps stay smooth and controlled.