45-Degree Sled Leg Press: Safe Form, Muscles Worked, Sets & Tips
Learn the 45-degree sled leg press for stronger quads, glutes, and legs. Includes setup, form cues, sets, mistakes, FAQs, and gear tips.
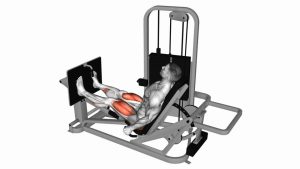
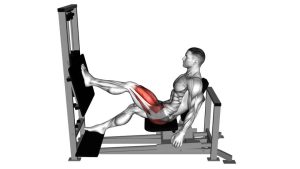
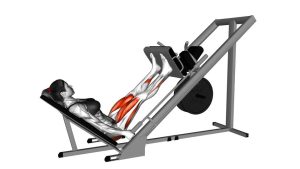
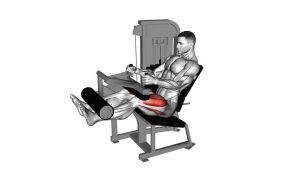
45-Degree Sled Leg Press
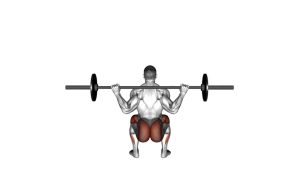
This exercise is excellent for building lower-body strength because the machine provides stability and allows the lifter to focus on leg drive instead of balance. It is especially useful for targeting the quadriceps while still involving the glutes, hamstrings, adductors, and calves as supportive muscles. Good technique depends on a stable back position, controlled depth, and consistent knee alignment.
Quick Overview
| Body Part | Legs |
|---|---|
| Primary Muscle | Quadriceps |
| Secondary Muscle | Glutes, hamstrings, adductors, calves |
| Equipment | 45-degree sled leg press machine, weight plates |
| Difficulty | Beginner to advanced, depending on load and range of motion |
Sets & Reps (By Goal)
- Beginner technique: 2–3 sets × 10–12 reps using a light-to-moderate load and controlled depth.
- Muscle growth: 3–5 sets × 8–15 reps with a steady tempo and strong quad tension.
- Strength focus: 4–6 sets × 4–8 reps with heavier loading, full control, and longer rest periods.
- High-rep leg finisher: 2–4 sets × 15–25 reps using lighter weight and constant tension.
Progression rule: Add weight only when you can complete every rep with stable hips, controlled lowering, clean knee tracking, and no bouncing at the bottom.
Setup / Starting Position
- Sit into the machine: Place your back and hips firmly against the pad before unracking the sled.
- Set your feet: Position your feet about shoulder-width on the platform with toes slightly turned out.
- Brace your body: Hold the handles, keep your ribs down, and maintain full back contact with the pad.
- Unlock the safety handles: Press the sled slightly upward, then release the safety stops carefully.
- Start with soft knees: Begin with the legs extended but not aggressively locked out.
Foot placement changes emphasis: a lower foot position usually increases quad demand, while a higher foot position often brings more glute and hamstring involvement.
Execution (Step-by-Step)
- Lower the sled slowly: Bend your knees and hips while keeping your feet flat on the platform.
- Control the bottom position: Lower until you reach a strong, comfortable depth without your hips lifting or lower back rounding.
- Track the knees correctly: Keep your knees moving in the same direction as your toes throughout the rep.
- Press through the platform: Drive through the mid-foot and heel to move the sled upward along the rails.
- Finish with control: Extend the legs until near lockout, but keep slight softness in the knees to maintain tension.
- Repeat smoothly: Continue for the target reps without bouncing, rushing, or letting the sled drop.
Pro Tips & Common Mistakes
- Keep your feet fully planted: Do not let the heels rise during the lowering phase.
- Avoid bouncing at the bottom: Use muscle control instead of rebound to protect the knees and hips.
- Do not lock out hard: Stop just short of aggressive knee lockout to keep tension on the muscles.
- Control your depth: Deep range is useful only if your hips stay down and your spine stays supported.
- Keep knees aligned: Let the knees travel naturally over the toes without collapsing inward.
- Use the handles: Holding the handles helps keep the pelvis stable and prevents the body from shifting.
- Do not overload too early: The leg press allows heavy weight, but clean control matters more than plate count.
FAQ
What muscles does the 45-degree sled leg press work?
The main target is the quadriceps. The glutes, hamstrings, adductors, and calves also assist depending on foot position, depth, and load.
Is the 45-degree leg press good for beginners?
Yes. It is beginner-friendly because the machine guides the movement and reduces balance demands. Beginners should start light, learn proper depth, and avoid locking the knees at the top.
How deep should I go on the leg press?
Lower the sled until your knees are comfortably bent and your hips remain stable on the pad. Do not force extra depth if your lower back rounds or your hips lift.
Should I place my feet high or low on the platform?
A lower foot position usually increases quad emphasis. A higher foot position often shifts more work toward the glutes and hamstrings. Choose the position that matches your goal while keeping your knees comfortable.
Is the leg press better than squats?
It is not automatically better or worse. The leg press is excellent for machine-based leg loading, while squats require more balance, core control, and full-body coordination. Both can be useful in a complete lower-body program.
Why do my knees hurt during leg press?
Knee discomfort may come from too much load, poor knee tracking, excessive depth, or foot placement that does not suit your structure. Reduce the weight, slow the tempo, and adjust your foot position. Stop if pain continues.
Recommended Equipment
- Weightlifting Knee Sleeves — helpful for knee warmth and light support during heavy leg training.
- Flat-Sole Weightlifting Shoes — provide a stable base and better platform contact during pressing.
- Weight Lifting Gloves — useful for grip comfort when holding machine handles during high-volume sets.
- Resistance Bands — helpful for warm-ups, glute activation, and knee-tracking drills before leg press work.
- Foam Roller — useful for pre-workout tissue prep and post-workout lower-body recovery.
Tip: Equipment can support training, but it should not replace clean technique, controlled depth, and smart load progression.