Lever Horizontal One-Leg Press: Form, Muscles, Sets, Tips & FAQ
Learn the Lever Horizontal One-Leg Press for stronger quads, glutes, and single-leg control. Includes form cues, sets, mistakes, FAQ, and equipment.
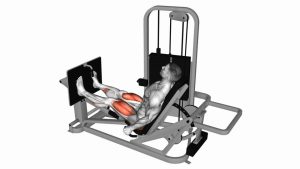
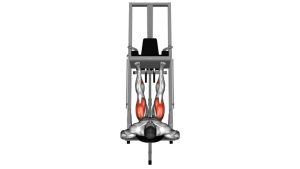
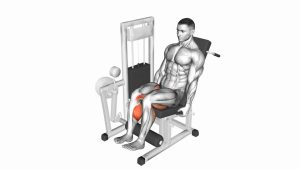
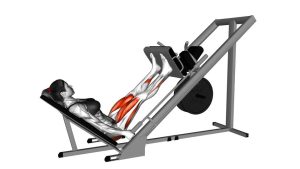
Lever Horizontal One-Leg Press
This exercise works best when the movement is controlled from start to finish. Because only one leg is working, small technique details matter more than heavy loading. Keep your hips stable against the seat, drive through the mid-foot and heel, and avoid letting the knee collapse inward during the press. A clean rep should feel strong, balanced, and smooth, with tension in the quads, glutes, and surrounding hip stabilizers.
Quick Overview
| Body Part | Legs |
|---|---|
| Primary Muscle | Quadriceps |
| Secondary Muscle | Glutes, hamstrings, calves, hip stabilizers |
| Equipment | Lever horizontal leg press machine |
| Difficulty | Beginner to Intermediate |
Sets & Reps (By Goal)
- Muscle growth: 3–4 sets × 8–12 reps per leg with a controlled lowering phase.
- Strength development: 4–5 sets × 5–8 reps per leg using heavier resistance and strict form.
- Balance and control: 2–3 sets × 10–15 reps per leg with slower tempo and moderate load.
- Warm-up activation: 1–2 sets × 12–15 reps per leg using light resistance before heavier leg work.
Progression rule: Add reps first, then add small weight increases. Do not increase the load if your knee caves inward, your hips shift, or your range of motion becomes inconsistent.
Setup / Starting Position
- Sit firmly into the machine: Keep your back and hips supported against the pad.
- Place one foot on the platform: Position the working foot around mid-platform with the toes slightly turned out if natural.
- Align the knee: Your knee should point in the same direction as your toes before the rep begins.
- Set your non-working leg: Keep it relaxed and out of the way so it does not assist the press.
- Grip the handles: Use your hands for stability, not to twist or pull your body out of position.
- Create tension: Brace lightly, keep your heel grounded, and prepare to press through the working leg.
A slightly higher foot position usually increases glute involvement, while a slightly lower foot position usually increases quad demand. Keep the position comfortable for your knees.
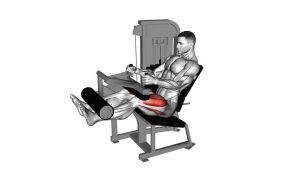
Execution (Step-by-Step)
- Start from a controlled bottom position: Let the knee bend comfortably without allowing the hips to lift or the lower back to round.
- Press through the working foot: Drive the platform away using the quad and glute of the working leg.
- Track the knee correctly: Keep the knee moving in line with the toes throughout the press.
- Reach near full extension: Extend the leg without snapping or locking the knee hard at the top.
- Pause briefly: Maintain tension for a moment while keeping the hips square and stable.
- Lower with control: Bend the knee slowly and allow the platform to return without bouncing.
- Repeat smoothly: Keep every rep consistent before switching to the other leg.
Pro Tips & Common Mistakes
- Drive through the full foot: Press through the heel and mid-foot instead of pushing only through the toes.
- Control the eccentric: Lower the platform slowly to build strength and protect the knee.
- Avoid knee collapse: Do not let the working knee drift inward as the weight gets heavier.
- Do not lock out aggressively: Keep a slight softness in the knee at the top to maintain muscular tension.
- Keep your hips square: Avoid twisting toward the working leg or shifting the pelvis off the pad.
- Use equal work on both sides: Start with your weaker leg and match the same reps on the stronger leg.
- Do not rush reps: A fast, bouncing motion reduces muscle tension and increases joint stress.
- Choose a smart range: Go deep enough to train the leg, but not so deep that your lower back rounds or your hip pinches.
FAQ
What muscles does the Lever Horizontal One-Leg Press work?
It mainly targets the quadriceps. The glutes, hamstrings, calves, and hip stabilizers also assist, especially when you control the lowering phase and keep the hips stable.
Is the one-leg press better than the regular leg press?
It is not always better, but it is more specific for correcting strength imbalances. The regular leg press is useful for heavier bilateral loading, while the one-leg version helps improve control, symmetry, and single-leg strength.
Where should I place my foot?
A mid-platform foot position is a good starting point. A slightly lower position usually emphasizes the quads more, while a slightly higher position may involve the glutes more. Your knee should always track comfortably with your toes.
Should I fully lock my knee at the top?
No. Extend close to the top, but avoid snapping into a hard lockout. Keeping a slight bend helps maintain tension on the muscles and reduces unnecessary joint stress.
Is this exercise good for beginners?
Yes, if the machine is adjusted correctly and the load is light enough to control. Beginners should focus on knee alignment, smooth tempo, and equal reps on both legs before adding heavier resistance.
Recommended Equipment
- Leg Press Machine — the main machine option for horizontal or angled pressing variations.
- Weight Lifting Knee Sleeves — useful for warmth, comfort, and light joint support during leg training.
- Stable Training Shoes — help keep the foot planted and stable during machine pressing.
- Resistance Bands — helpful for glute activation and knee-tracking warm-up drills.
- Gym Towel — useful for comfort, hygiene, and added support on machine pads.
Choose equipment that improves control and comfort. No accessory should allow you to use more weight than you can handle with clean single-leg form.