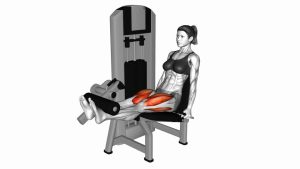
Lever Seated Leg Press: Proper Form, Muscles Worked, Sets & Tips
Learn the Lever Seated Leg Press for stronger quads, glutes, and legs. Step-by-step form, sets by goal, mistakes, FAQs, and equipment tips.
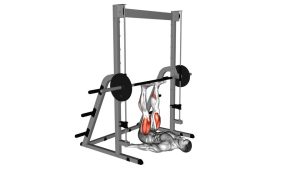
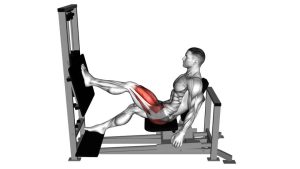
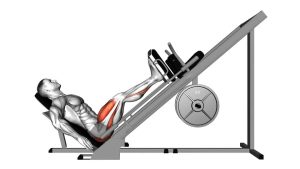
Lever Seated Leg Press
This exercise is excellent for building strong legs while giving the back more support than many free-weight squat variations. It is especially useful for lifters who want to train the quads hard, practice controlled knee extension, or add lower-body volume without needing advanced balance demands.
Quick Overview
| Body Part | Quads |
|---|---|
| Primary Muscle | Quadriceps |
| Secondary Muscle | Glutes, hamstrings, adductors, and calves as stabilizers |
| Equipment | Lever seated leg press machine / plate-loaded leg press machine |
| Difficulty | Beginner to Intermediate |
Sets & Reps (By Goal)
- Muscle growth: 3–5 sets × 8–15 reps with controlled lowering and strong full-foot pressure.
- Strength focus: 4–6 sets × 5–8 reps using heavier loads while keeping the knees soft at lockout.
- Beginner technique: 2–3 sets × 10–12 reps with light-to-moderate weight and a slow tempo.
- Quad emphasis: 3–4 sets × 10–15 reps with feet slightly lower on the platform, if knees tolerate it well.
- Glute emphasis: 3–4 sets × 8–12 reps with feet slightly higher and a controlled deeper range.
Progression rule: Add reps first, then increase weight gradually. Do not sacrifice depth, knee tracking, or lower-back position just to move heavier plates.
Setup / Starting Position
- Adjust the seat: Sit with your back fully supported and your hips stable against the pad.
- Place your feet: Set your feet about shoulder-width apart on the platform with toes slightly turned out.
- Set your knee angle: Start with the knees bent comfortably, not jammed into the chest.
- Brace lightly: Keep your ribs down, core engaged, and hands holding the machine handles if available.
- Check alignment: Knees should point in the same direction as the toes before the first press.
Tip: A mid-platform foot position is the best starting point for most lifters. Move the feet slightly higher or lower only after your basic form is consistent.
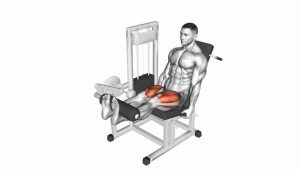
Execution (Step-by-Step)
- Prepare the press: Keep your back flat against the pad and maintain full contact through the heel and mid-foot.
- Drive the platform away: Push smoothly through both feet as your knees and hips extend together.
- Keep the knees aligned: Let the knees track over the toes without collapsing inward or flaring excessively outward.
- Stop before hard lockout: Reach the top with your legs nearly straight, but keep a slight bend in the knees.
- Lower with control: Bend the knees and hips slowly as the platform returns toward you.
- Use safe depth: Lower until you feel a strong leg stretch without your hips tucking or lower back lifting from the pad.
- Repeat smoothly: Press again without bouncing, jerking, or losing foot pressure.
Pro Tips & Common Mistakes
- Press through the whole foot: Avoid shifting only onto the toes. Keep heel and mid-foot pressure balanced.
- Do not lock out hard: Snapping the knees straight can increase joint stress and reduce muscle tension.
- Control the negative: Lower the platform slowly instead of letting the machine pull you into the bottom.
- Watch knee collapse: If the knees cave inward, reduce the load and focus on tracking them with the toes.
- Do not lift the hips: If your pelvis rolls or your lower back leaves the pad, shorten the depth slightly.
- Use foot placement intentionally: Lower feet usually bias the quads more; higher feet usually involve more glutes and hamstrings.
- Keep your head relaxed: Avoid neck strain by keeping your head supported and shoulders down.
FAQ
What muscles does the Lever Seated Leg Press work?
The main target is the quadriceps. The glutes, hamstrings, adductors, and calves assist depending on your foot placement, depth, and machine angle.
Is the lever seated leg press good for beginners?
Yes. The machine provides a guided path and back support, which makes it easier to learn lower-body pressing mechanics. Beginners should start light, focus on knee tracking, and avoid excessive depth until they can control the movement.
Should I place my feet high or low on the platform?
A middle foot position is best for general training. A slightly lower position may increase quad emphasis, while a slightly higher position may involve more glutes and hamstrings. Avoid any position that causes knee pain or lower-back rounding.
How deep should I go on the seated leg press?
Lower the platform until your knees bend comfortably and your legs are working hard, but stop before your hips tuck under or your lower back lifts from the pad. Safe depth is more important than forcing maximum range.
Is the lever seated leg press the same as a 45-degree sled leg press?
No. A lever seated leg press moves through a fixed lever arc, while a 45-degree sled leg press moves along angled rails. Both train similar muscles, but the machine path and resistance feel different.
Recommended Equipment
- Weightlifting Shoes — firm sole support for stable foot pressure during heavy leg pressing
- Knee Sleeves — optional warmth and joint support for lower-body machine training
- Olympic Weight Plates — useful for plate-loaded lever leg press machines
- Gym Towel — helps keep the back pad clean and improves comfort during high-volume sets
- Workout Log Book — useful for tracking sets, reps, load, and progression over time
Tip: Equipment can support your training, but clean form, controlled tempo, and consistent progression matter most.