Band Alternating Biceps Curl: Form, Sets, Muscles Worked & Tips
Learn how to do the Band Alternating Biceps Curl with proper form. Discover muscles worked, setup, sets and reps by goal, common mistakes, FAQs, and recommended equipment.
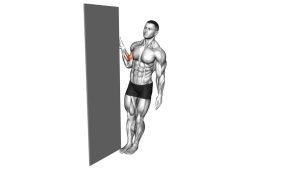
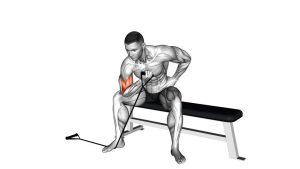
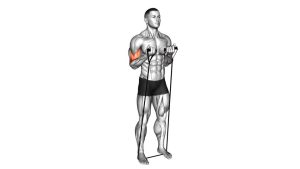
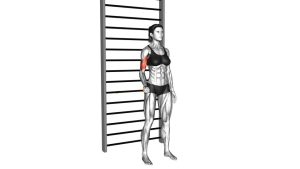
Band Alternating Biceps Curl
Unlike many free-weight curls, the resistance band increases tension as you move upward, making the top half of the rep especially demanding. The alternating style also helps reduce momentum and gives you more time to focus on squeezing the working biceps while the opposite arm resets. When done correctly, this exercise can improve arm size, contraction quality, and training control without needing a full gym setup.
Quick Overview
| Body Part | Biceps |
|---|---|
| Primary Muscle | Biceps brachii |
| Secondary Muscle | Brachialis, brachioradialis, forearm flexors |
| Equipment | Resistance band with handles or loop band |
| Difficulty | Beginner to Intermediate |
Sets & Reps (By Goal)
- Muscle growth: 3–4 sets × 8–15 reps per arm
- General toning and endurance: 2–4 sets × 12–20 reps per arm
- Strength-focused band training: 3–5 sets × 6–10 reps per arm using a heavier band
- Warm-up or activation: 2–3 sets × 10–15 smooth reps per arm
Progression tip: Increase band resistance, slow down the lowering phase, or add a brief squeeze at the top once you can complete all reps with strict form and without body sway.
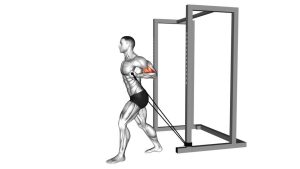
Setup / Starting Position
- Anchor the band: Stand on the center of the resistance band with both feet about hip-width apart for stability.
- Grip the handles: Hold one handle in each hand with your palms facing forward.
- Stand tall: Keep your chest up, shoulders down, and core lightly braced.
- Set your arms: Let both arms hang at your sides with a slight bend in the elbows and your elbows tucked near your torso.
- Start under tension: There should be light tension in the band at the bottom, but not so much that your shoulders rise.
Tip: If the band feels too loose at the bottom, widen your stance slightly on the band or use a thicker band for better tension.
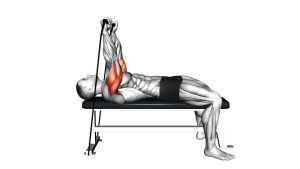
Execution (Step-by-Step)
- Curl one arm first: Bend one elbow and bring the handle upward toward the same-side shoulder while keeping your upper arm mostly still.
- Keep the wrist neutral: Do not excessively bend the wrist backward or forward as you lift.
- Squeeze at the top: When the handle reaches near shoulder height, pause briefly and contract the biceps.
- Lower with control: Slowly return the handle to the starting position without letting the band snap downward.
- Alternate sides: As one arm finishes lowering, begin curling with the opposite arm and continue switching side to side for the full set.
Pro Tips & Common Mistakes
- Train one clean rep at a time: The alternating rhythm works best when each arm completes a full controlled curl before the other side starts.
- Do not swing the body: Leaning back turns the movement into a whole-body effort and reduces direct biceps tension.
- Keep elbows pinned: Letting the elbows drift forward can shift stress away from the biceps and reduce isolation.
- Control the eccentric: Lowering slowly improves tension, technique, and muscular stimulus.
- Use full but comfortable range: Extend the arm well at the bottom and curl high at the top without forcing joint position.
- Match band tension to your goal: Lighter bands are great for higher reps and cleaner form, while thicker bands work well for lower-rep overload.
FAQ
What muscles does the Band Alternating Biceps Curl work?
It mainly targets the biceps brachii, while the brachialis, brachioradialis, and forearm muscles assist during elbow flexion and grip control.
Is a resistance band curl effective for building biceps?
Yes. Resistance bands can be very effective for biceps growth when you use enough tension, control the tempo, and train close to muscular fatigue. They are especially useful for home workouts and joint-friendly training.
Should I curl both arms together or alternate them?
Alternating curls can help you focus more on each arm individually and reduce momentum. Curling both arms at once also works, but the alternating version is often easier to control and more comfortable for beginners.
How do I make this exercise harder without heavier dumbbells?
You can use a thicker band, shorten the band setup to increase tension, slow down the lowering phase, add a pause at the top, or increase total reps and sets.
What are the most common mistakes in band biceps curls?
The biggest mistakes are leaning backward, swinging the handles, letting the elbows move too much, and lowering the band too quickly. Strict form and controlled tempo matter more than rushing the reps.
Recommended Equipment
- Resistance Bands with Handles — ideal for comfortable alternating curls and adjustable home workouts
- Loop Resistance Bands — simple and portable option for curls, rows, presses, and lower-body training
- Resistance Band Door Anchor — expands your exercise options beyond curls for a more complete band-training setup
- Workout Gloves — can improve grip comfort during higher-rep band sessions
- Exercise Mat — provides a more stable and comfortable training surface for home workouts
Tip: A high-quality band set with multiple resistance levels gives you the most flexibility for progression, warm-ups, drop sets, and different arm-training goals.