Kneeling Fist Roll: Forearm Strength, Wrist Control, Form & FAQ
Learn the Kneeling Fist Roll for stronger forearms, better wrist control, and joint conditioning. Includes setup, execution, sets by goal, mistakes, FAQs, and equipment.
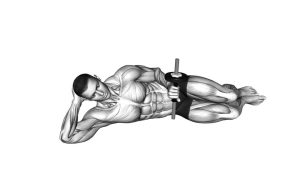
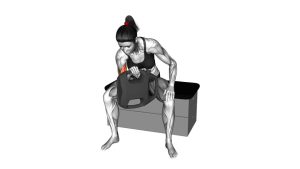
Kneeling Fist Roll
This exercise is especially useful for building wrist tolerance, forearm endurance, and joint control for calisthenics, martial arts, push-up variations, hand support drills, and grip-based training. Because the wrists are loaded through a closed-fist position, the movement should be performed with a small range, slow tempo, and careful weight management.
Quick Overview
| Body Part | Forearms |
|---|---|
| Primary Muscle | Forearm flexors and wrist stabilizers |
| Secondary Muscle | Forearm extensors, hand muscles, shoulders, core stabilizers |
| Equipment | None required; optional exercise mat for knee comfort |
| Difficulty | Beginner to Intermediate depending on wrist strength and bodyweight pressure |
Sets & Reps (By Goal)
- Wrist warm-up: 1–2 sets × 8–12 slow rolls before upper-body training
- Forearm conditioning: 2–4 sets × 10–15 controlled rolls
- Joint control practice: 2–3 sets × 6–10 very slow rolls with a 1–2 second pause
- Calisthenics preparation: 2–3 sets × 12–20 total rolls after wrist mobility work
Progression rule: Add range and time under tension before adding more bodyweight. The cleanest progression is slower reps, smoother transitions, and better wrist control—not forcing the fists farther than your joints can tolerate.
Setup / Starting Position
- Kneel on the floor: Place your knees on a mat or soft surface so your lower body stays comfortable.
- Set your fists down: Make closed fists and place the knuckles on the floor in front of your knees.
- Align the wrists: Keep the fists firm, wrists stacked, and knuckles evenly planted.
- Position the shoulders: Shoulders stay above or slightly behind the hands at the start.
- Brace lightly: Keep the core engaged, ribs controlled, and spine neutral.
- Use light pressure first: Do not dump full bodyweight into the wrists on the first rep.
Tip: Start with your hips slightly back toward your heels. This reduces wrist load and gives you better control before shifting forward.
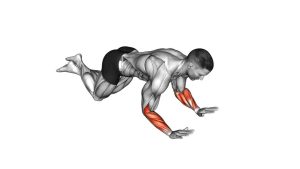
Execution (Step-by-Step)
- Start on stable fists: Keep the knuckles grounded and elbows softly bent.
- Shift weight forward: Slowly move your shoulders forward to increase pressure through the fists.
- Roll through the wrists: Allow the fists to gently roll while the wrists move through a controlled range.
- Keep the motion small: Do not force the wrist into an extreme end range.
- Pause briefly: Hold the peak position for a moment while keeping the fists active and stable.
- Return with control: Shift your weight backward and roll the fists back to the starting position.
- Repeat smoothly: Continue for the target reps without bouncing, collapsing, or rushing.
Pro Tips & Common Mistakes
- Use a slow tempo: Move deliberately so the wrists and forearms control every part of the roll.
- Do not collapse into the wrists: Keep the fists active instead of letting the joints absorb all the pressure.
- Avoid excessive range: More range is not always better. Stay within a pain-free, controlled zone.
- Keep the elbows soft: Locking the elbows can make the movement feel harsher on the wrists.
- Do not shrug: Shoulders should stay relaxed and stable, not lifted toward the ears.
- Spread pressure evenly: Avoid rolling onto one knuckle or twisting one wrist more than the other.
- Use knee position to scale: Hips farther back means easier; shoulders farther forward means harder.
- Stop before irritation: Wrist conditioning works best with consistent low-to-moderate loading.
FAQ
What muscles does the Kneeling Fist Roll work?
It mainly works the forearm flexors, forearm extensors, and wrist stabilizers. The hands, knuckles, shoulders, and core also assist by keeping the body stable during the rolling motion.
Is the Kneeling Fist Roll good for wrist strength?
Yes. It can help build wrist strength, wrist tolerance, and forearm control when done carefully. It is especially useful as a preparation drill for push-ups, calisthenics, martial arts, and other exercises that place load through the hands.
Should my wrists hurt during this exercise?
No. You may feel muscular effort in the forearms, but you should not feel sharp pain, pinching, numbness, or tingling. If you feel joint pain, reduce the range, shift less weight forward, or stop.
How can I make the exercise easier?
Keep your hips farther back toward your heels, use a softer surface, reduce the roll range, and move slower. You can also perform fewer reps until your wrists adapt.
How can I make the exercise harder?
Move your shoulders slightly farther forward, slow down the tempo, pause at the end range, or perform more controlled reps. Only progress if the wrists feel strong and stable.
Recommended Equipment (Optional)
- Exercise Mat — useful for knee comfort during kneeling wrist and forearm drills
- Training Wrist Wraps — optional support for general wrist training, not a replacement for control
- Hand Grip Strengthener — helps build supporting grip and forearm strength
- Wrist Roller Forearm Exerciser — excellent for progressive forearm flexion and extension strength
- Push-Up Bars — useful for wrist-friendly pressing variations and upper-body support work
Product category ideas were checked against Amazon search result categories for wrist rollers, wrist/forearm strengtheners, and grip trainers. Choose tools that match your current wrist tolerance and avoid anything that increases pain.