Resistance Band Standard Biceps Curl: Proper Form, Sets, Tips & FAQ
Learn the Resistance Band Standard Biceps Curl for stronger biceps, better arm control, and effective home workouts. Includes setup, execution, sets by goal, mistakes, FAQs, and recommended equipment.
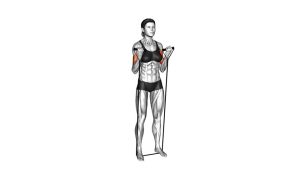
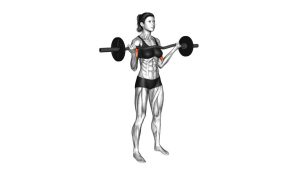
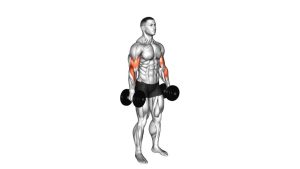
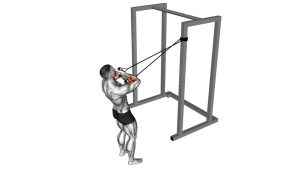
Resistance Band Standard Biceps Curl
This exercise is excellent for beginners, home workouts, warm-ups, and higher-rep arm training because the band naturally increases resistance as it stretches. You should feel the front of the upper arm working strongly, especially near the top of the curl. Keep your torso tall, ribs controlled, wrists neutral, and shoulders relaxed so the biceps—not momentum—perform the movement.
Quick Overview
| Body Part | Biceps |
|---|---|
| Primary Muscle | Biceps brachii |
| Secondary Muscle | Brachialis, brachioradialis, forearm flexors, grip stabilizers |
| Equipment | Resistance band with handles or loop band |
| Difficulty | Beginner-friendly; adjustable by band thickness, stance width, and tempo |
Sets & Reps (By Goal)
- Beginner technique: 2–3 sets × 10–12 reps with a light band and slow control
- Muscle growth: 3–4 sets × 10–20 reps with a strong squeeze at the top
- Strength endurance: 3–5 sets × 15–25 reps using constant tension and short rest
- Warm-up activation: 1–2 sets × 12–15 reps before heavier curls, rows, or pull workouts
- Finisher: 2–3 sets × 20–30 reps with controlled tempo and no swinging
Progression rule: Increase control first, then reps, then band resistance. You can also make the curl harder by standing wider on the band or slowing the lowering phase.
Setup / Starting Position
- Anchor the band: Stand on the center of the resistance band with both feet about hip-width to shoulder-width apart.
- Grip the handles: Hold one handle in each hand with palms facing forward in a supinated grip.
- Stand tall: Keep your chest lifted, ribs controlled, spine neutral, and core lightly braced.
- Set the shoulders: Keep shoulders relaxed and slightly back without shrugging.
- Lock in the elbows: Position your elbows close to your sides with arms extended down, but not aggressively locked out.
Tip: The wider your feet are on the band, the more starting tension you create. Beginners should start with moderate tension before increasing resistance.
Execution (Step-by-Step)
- Start from control: Stand tall with the handles down by your thighs and the band lightly stretched.
- Curl upward: Bend your elbows and pull the handles toward your shoulders while keeping your upper arms still.
- Keep elbows close: Do not let the elbows swing forward or flare outward as the hands rise.
- Squeeze the biceps: Pause briefly at the top when your hands reach around chest or shoulder height.
- Lower slowly: Extend the elbows under control, resisting the band as it pulls your hands back down.
- Keep tension: Stop just before the arms fully relax, then begin the next rep smoothly.
Pro Tips & Common Mistakes
- Keep the elbows pinned: Your elbows should stay close to your torso so the biceps do the work.
- Control the lowering phase: Do not let the band snap your hands down. The eccentric phase builds strength and control.
- Avoid leaning back: If you lean backward to curl, the resistance is too high or your reps are too fast.
- Keep wrists neutral: Do not bend the wrists backward at the top. Keep knuckles aligned with the forearms.
- Use full but clean range: Lower until the arms are nearly straight, then curl up without losing posture.
- Do not shrug: Relax your traps and keep the shoulders down throughout the curl.
- Adjust resistance smartly: Use a thicker band, shorter band length, or wider stance only when form stays strict.
- Squeeze, don’t yank: The top position should feel like a controlled biceps contraction, not a fast pull.
FAQ
Is the resistance band standard biceps curl good for beginners?
This exercise is highly beginner-friendly because resistance can be easily adjusted by changing the band strength, stance width, or range of motion. It also helps develop proper elbow control without needing heavy weights.
Where should I feel this exercise?
The primary sensation should be in the front of the upper arm, mainly the biceps brachii. Supporting muscles such as the brachialis and forearms may assist, while strain in the lower back or shoulders indicates a form issue.
Why does the curl feel harder at the top?
Resistance bands increase tension as they stretch, which makes the top portion of the movement more challenging. This creates a strong peak contraction and improves muscle engagement at the end range.
Can resistance band curls build muscle?
Muscle growth is absolutely possible with band curls when proper tension, controlled tempo, and progressive overload are applied consistently over time.
Should I fully straighten my arms at the bottom?
Extending the arms close to straight is fine, but aggressively locking the elbows or losing all tension should be avoided. A slight active bend helps maintain continuous muscle engagement throughout the set.
How can I make this exercise harder?
Increasing resistance can be done by using a thicker band, widening the stance, slowing down the lowering phase, or adding pauses at the top. Progression should always maintain strict form and controlled movement.
Recommended Equipment
- Resistance Bands with Handles — ideal for standard biceps curls, rows, presses, and full-body home workouts
- Heavy Resistance Bands Set — useful for progressive overload as your biceps get stronger
- Exercise Mat — provides a stable, non-slip workout surface for standing band exercises
- Workout Gloves — improves grip comfort when using band handles for higher-rep curls
- Door Anchor for Resistance Bands — expands band exercise options for curls, rows, triceps work, and upper-body training
Tip: Choose bands with strong handles, secure stitching, and multiple resistance levels so you can progress safely over time.