Alternate Lying Floor Leg Raise: Proper Form, Benefits, Sets & Core Tips
Learn how to do the Alternate Lying Floor Leg Raise with proper form. Build lower abs, hip flexor control, and core stability with step-by-step technique, sets, mistakes, FAQs, and equipment tips.
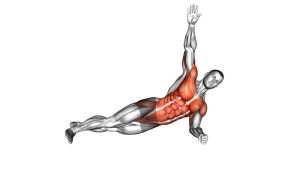
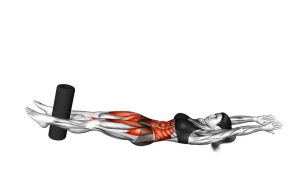
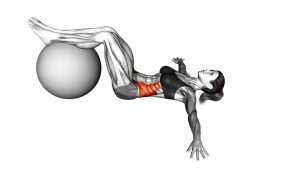
Alternate Lying Floor Leg Raise
The Alternate Lying Floor Leg Raise is especially useful for training the lower portion of the abdominal wall because one leg lowers close to the ground while the other leg lifts. This creates a strong anti-extension demand, meaning your core must work to stop the pelvis from tipping forward and the lower back from lifting off the floor. Although the movement looks simple, clean technique matters. A small amount of control is more valuable than a large range of motion done with momentum.
This exercise can be used in home workouts, core finishers, warm-ups, beginner ab routines, and waist-focused training sessions. It is easier to manage than a double-leg raise because only one leg moves high at a time, but it can still become challenging when the non-lifting leg stays low and the tempo remains slow.
Quick Overview
| Body Part | Abs |
|---|---|
| Primary Muscle | Rectus abdominis, especially lower-abdominal control |
| Secondary Muscle | Hip flexors, transverse abdominis, obliques, deep core stabilizers |
| Equipment | No equipment required; optional exercise mat |
| Difficulty | Beginner to intermediate depending on leg height and tempo |
Sets & Reps (By Goal)
- Beginner core control: 2–3 sets × 8–12 reps per side with slow, clean movement.
- Lower abs endurance: 3–4 sets × 12–20 reps per side with constant tension.
- Core finisher: 2–3 sets × 30–45 seconds using a steady alternating rhythm.
- Strength-focused tempo work: 3 sets × 8–10 reps per side with a 3-second lowering phase.
- Warm-up activation: 1–2 sets × 8–10 reps per side before leg raises, planks, or full-body training.
Progression rule: First improve control, then increase reps, then slow the lowering phase. Only lower the non-working leg closer to the floor when your lower back stays stable.
Setup / Starting Position
- Lie on your back: Start on a flat surface with your body long, legs extended, and head resting naturally on the floor.
- Set your arms: Place your arms beside your body with palms down. If you need extra support, slide your hands slightly under your hips without forcing your lower back upward.
- Brace your core: Gently draw your ribs down and tighten your midsection as if preparing to absorb light pressure to the stomach.
- Control your pelvis: Slightly tuck the pelvis so your lower back stays close to the floor. Avoid letting the back arch as the legs move.
- Extend both legs: Keep the knees mostly straight, toes relaxed or slightly pointed, and heels hovering just above the floor if your core can handle it.
- Choose your range: Beginners can start with the low leg higher off the floor. Advanced users can keep it closer to the floor for more tension.
Execution (Step-by-Step)
- Start with both legs extended: Keep both heels hovering lightly above the floor or resting down if you need an easier version.
- Lift one leg: Raise one leg upward from the hip while keeping the knee mostly straight. Move smoothly instead of kicking.
- Keep the opposite leg low: The non-lifting leg stays extended near the floor. This is where the lower abs must work to control the pelvis.
- Reach the top position: Lift until the working leg is around 60–90 degrees, or only as high as your hamstring flexibility allows without bending excessively.
- Switch sides with control: Lower the raised leg while the opposite leg begins to lift. The legs pass each other in a steady alternating pattern.
- Keep your lower back stable: If your back arches, shorten the range, bend the knees slightly, or lift the low leg higher from the floor.
- Continue alternating: Repeat the movement side to side while maintaining a calm breathing pattern and consistent rhythm.
- Finish cleanly: Bring both legs down with control rather than dropping them suddenly at the end of the set.
Pro Tips & Common Mistakes
Pro Tips
- Press the lower back gently down: This helps keep the abs active and prevents the movement from turning into a hip-flexor-only exercise.
- Move from the hips: Keep the knees mostly straight and avoid bending and straightening the legs to cheat the range.
- Use a slow lowering phase: The lowering leg is often the most important part because that is when the abs fight hardest against back arching.
- Keep the low leg higher if needed: A higher low leg is easier and safer for beginners. Lower it closer to the floor only when your core is ready.
- Breathe with control: Exhale slightly as one leg lowers and the other rises. Do not hold your breath through the entire set.
- Keep your upper body quiet: Your shoulders, neck, and head should not lift or strain unless you are intentionally doing an advanced crunch variation.
Common Mistakes
- Arching the lower back: This is the most common mistake. It shifts stress away from the abs and can irritate the lower back.
- Swinging the legs: Fast momentum reduces core tension and makes the exercise less effective.
- Lowering too far too soon: If the low leg is too close to the floor before you have enough strength, your pelvis will tilt and your back will arch.
- Pulling through the neck: Keep the head relaxed and avoid straining the jaw or shoulders.
- Letting the knees bend too much: A slight bend is fine, but excessive bending turns the exercise into a much easier variation.
- Rushing the transition: The moment when the legs pass each other should stay smooth and controlled.
FAQ
What muscles does the Alternate Lying Floor Leg Raise work?
It mainly targets the abs, especially lower-abdominal control, while also involving the hip flexors. The transverse abdominis and obliques help stabilize the pelvis and prevent the lower back from arching.
Is the Alternate Lying Floor Leg Raise good for lower abs?
Yes. While the abs work as one connected muscle group, this exercise strongly challenges the lower-abdominal region because the legs create leverage against the pelvis. The lower your leg gets toward the floor, the more your core must resist extension.
Why does my lower back hurt during this exercise?
Lower-back discomfort usually happens when the legs lower too far and the core cannot keep the pelvis stable. Try bending your knees slightly, raising the low leg higher, placing your hands under your hips, or reducing the total reps.
Should my legs touch the floor between reps?
For more tension, keep the heels hovering above the floor. For beginners, it is acceptable to lightly reset the foot on the floor if that helps maintain control and prevents back arching.
Is this easier than a double-leg raise?
Usually, yes. A double-leg raise creates more load because both legs move together. The alternating version is more manageable while still building core strength, endurance, and control.
How can I make this exercise harder?
Slow down the lowering phase, keep the non-working leg closer to the floor, increase time under tension, or add ankle weights only after your lower back stays fully controlled.
Can beginners do Alternate Lying Floor Leg Raises?
Yes, beginners can do it if they use a smaller range of motion. Start with the low leg higher above the floor and focus on keeping the lower back stable before increasing difficulty.
Recommended Equipment
- Exercise Mat — provides cushioning for the spine, hips, and elbows during floor-based ab exercises.
- Thick Yoga Mat — useful if you train on hard floors and need more comfort during lying core movements.
- Adjustable Ankle Weights — optional progression tool for advanced users who can already control the movement perfectly.
- Core Sliders — helpful for adding other core variations such as mountain climbers, plank slides, and knee tucks.
- Resistance Bands Set — useful for pairing this exercise with hip flexor, glute, and core stability work.
Tip: Equipment is optional. For this exercise, clean body position and controlled tempo matter more than adding resistance.