Standing Obliques Slides: Form, Benefits, Sets, Tips & FAQ
Learn Standing Obliques Slides for controlled side-bending, oblique activation, core stability, posture control, sets, mistakes, and tips.
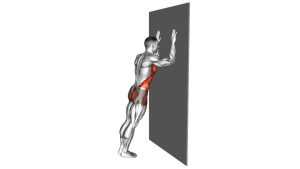
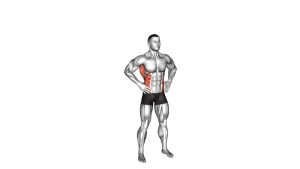
Standing Obliques Slides
This movement works best when the body stays controlled from the feet to the head. Instead of rushing, focus on a smooth side bend, a steady return, and a neutral reset between sides. As a result, the exercise becomes more useful for learning trunk control and building a stronger connection with the obliques.
Quick Overview
| Body Part | Obliques |
|---|---|
| Primary Muscle | Obliques |
| Secondary Muscle | Rectus abdominis, transverse abdominis, lower back stabilizers |
| Equipment | No equipment required |
| Difficulty | Beginner |
Sets & Reps (By Goal)
- Beginner control: 2–3 sets × 8–10 reps per side with slow, clean movement
- Core endurance: 3–4 sets × 12–16 reps per side with steady breathing
- Warm-up activation: 1–2 sets × 8–12 reps per side before a core or full-body session
- Low-impact daily practice: 1–3 sets × 6–10 reps per side at easy effort
Progression rule: First increase control, then increase reps. However, do not add speed or extra range if the hips shift, the torso twists, or the lower back starts to pinch.
Setup / Starting Position
- Stand tall: Place your feet about hip-width apart and keep your weight balanced.
- Relax your arms: Let both arms hang naturally by your sides.
- Set your posture: Keep your chest open, shoulders relaxed, and head facing forward.
- Brace lightly: Gently engage your core before you begin the side bend.
- Stay grounded: Keep both feet planted so the movement comes from the torso, not from stepping or swaying.
Tip: Use a mirror if available. It helps you notice whether you are bending sideways cleanly or accidentally twisting forward.
Execution (Step-by-Step)
- Start upright: Stand tall with both hands close to your thighs.
- Slide one hand down: Slowly slide one hand down the same-side thigh toward the knee.
- Bend sideways: Allow the torso to bend laterally while keeping the hips stable.
- Reach your comfortable bottom point: Stop when you feel a controlled side bend, not a forced stretch.
- Return to center: Pull your torso back upright smoothly while the hand slides back up.
- Reset posture: Stand tall again before switching to the opposite side.
- Repeat evenly: Perform the same controlled slide and side bend on the other side.
Pro Tips & Common Mistakes
Pro Tips
- Move slowly: A slower tempo helps the obliques control the bend and the return.
- Keep the hips quiet: The torso should bend while the lower body stays steady.
- Think “slide,” not “collapse”: Let the hand guide the path, but do not drop your body suddenly.
- Use both sides equally: Match the same range and tempo on the left and right side.
- Breathe normally: Exhale gently as you bend, then inhale as you return to center.
Common Mistakes
- Twisting the torso: Keep the chest mostly facing forward instead of rotating.
- Bending forward: The movement should travel sideways, not into a standing crunch.
- Using momentum: Avoid bouncing at the bottom or swinging back to center.
- Shifting the hips: Do not push the hips far to the side to fake more range.
- Holding the breath: Keep breathing smooth so the movement stays relaxed and controlled.
FAQ
What are Standing Obliques Slides?
Standing Obliques Slides are a bodyweight core exercise where you stand upright and slide one hand down the same-side thigh while bending the torso sideways. Then, you return to center and repeat on the other side.
Which muscles do Standing Obliques Slides work?
The main target is the obliques. Additionally, the abs and lower back stabilizers help control the torso as you bend sideways and return upright.
Are Standing Obliques Slides beginner-friendly?
Yes. This exercise is beginner-friendly because it uses bodyweight only and allows a small, controlled range. However, beginners should move slowly and avoid forcing the side bend.
Should I use weight for this exercise?
The version shown is performed without visible equipment. Start with bodyweight first. After you control the movement well, you may use light resistance only if it does not change your posture or cause discomfort.
How far should I slide my hand down?
Slide only as far as you can while staying controlled. In the video, the hand travels down toward the knee area. Still, your range may be smaller depending on mobility and comfort.
Recommended Equipment (Optional)
- Exercise Mat — useful for warm-ups, cooldowns, and floor-based core exercises paired with this movement
- Resistance Bands Set — helpful for adding upper-body and core stability work after mastering bodyweight control
- Core Sliders — useful for related oblique and core exercises such as mountain climbers and plank slides
- Adjustable Dumbbells — optional progression tool for advanced standing side-bend variations
- Fitness Mirror — helps monitor posture, torso path, and side-to-side symmetry during standing core drills
Tip: Equipment is optional for this exercise. For the cleanest technique, master the no-equipment version first.