Bent-Knee Side Bridge: Safe Form, Core Benefits, Sets & Tips
Learn the Bent-Knee Side Bridge to build oblique strength, hip stability, and core control with safe form, sets, tips, FAQs, and equipment.
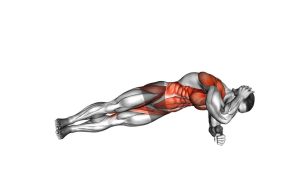
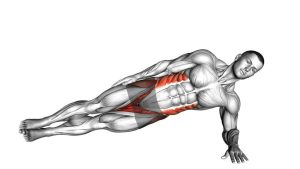
Bent-Knee Side Bridge
This exercise works best when performed with slow control, stacked alignment, and a steady brace through the side of the core. You should feel the bottom-side obliques working to keep the hips lifted, while the outer hip helps prevent the pelvis from dropping or rotating. Avoid rushing the movement, twisting the torso, or pushing into the shoulder with poor control.
Quick Overview
| Body Part | Core |
|---|---|
| Primary Muscle | Obliques |
| Secondary Muscle | Glute medius, quadratus lumborum, transverse abdominis, shoulder stabilizers |
| Equipment | Bodyweight only; optional exercise mat |
| Difficulty | Beginner to early intermediate |
Sets & Reps (By Goal)
- Beginner core control: 2–3 sets × 10–20 second holds per side
- Core endurance: 3–4 sets × 20–35 second holds per side
- Hip stability warm-up: 2 sets × 8–12 controlled hip lifts per side
- Side plank progression: 3 sets × 20–30 seconds before moving to a full side plank
Progression rule: First increase hold quality, then hold duration. Progress only when you can keep the shoulders, hips, and knees aligned without sagging or rotating.
Setup / Starting Position
- Lie on your side: Stack your hips and knees while keeping the body long from head to knees.
- Bend the knees: Keep both knees bent comfortably, usually around 90 degrees, with the feet slightly behind the body.
- Place the elbow under the shoulder: Your bottom forearm should rest flat on the floor, pointing forward.
- Stack the shoulder: Keep the bottom shoulder strong and avoid sinking into the joint.
- Brace gently: Tighten the core as if preparing for a light push, without holding your breath.
- Set the head position: Keep the neck neutral and aligned with the spine.
Tip: Use a mat under the forearm and knees if the floor feels uncomfortable. Comfort improves control and helps you focus on core alignment.
Execution (Step-by-Step)
- Press through the forearm and bottom knee: Create a stable base before lifting.
- Lift the hips upward: Raise your hips until your body forms a straight line from shoulders to hips to knees.
- Keep the torso stacked: Do not roll the chest toward the floor or lean backward.
- Hold the top position: Maintain steady breathing while keeping the hips high and the ribs controlled.
- Lower with control: Bring the hips back down slowly without collapsing or dropping quickly.
- Repeat or hold: Perform the movement as controlled repetitions or maintain the top position for time.
Pro Tips & Common Mistakes
- Push the floor away: Keep the shoulder active by pressing through the forearm instead of sinking down.
- Lift from the side waist: Think about shortening the bottom-side obliques to raise the hips.
- Do not rotate: Keep the chest, hips, and knees facing sideways rather than turning toward the floor.
- Avoid hip sagging: Dropping the hips reduces core tension and shifts stress into the lower back.
- Keep the neck neutral: Do not let the head hang down or crane upward.
- Control the descent: Lower slowly to train stability through the full range.
- Use both sides evenly: Train left and right sides with the same attention to alignment.
FAQ
What muscles does the Bent-Knee Side Bridge work?
The Bent-Knee Side Bridge mainly works the obliques. It also trains the glute medius, quadratus lumborum, transverse abdominis, and shoulder stabilizers.
Is the Bent-Knee Side Bridge easier than a full side plank?
Yes. Bending the knees shortens the lever, which reduces the load on the core and shoulder. This makes it a useful regression before progressing to a full side plank.
Where should I feel this exercise?
You should feel the side of your core working, especially the obliques on the bottom side. You may also feel the outer hip working to stabilize the pelvis.
Why do my hips keep dropping?
Hip dropping usually means the hold is too long, the brace is not strong enough, or the elbow is not positioned well under the shoulder. Shorten the set, reset your alignment, and focus on lifting the hips from the side waist.
Can beginners do this exercise?
Yes. This is one of the best beginner side plank variations because it builds lateral core strength with less total body load than the full version.
How do I progress the Bent-Knee Side Bridge?
Progress by increasing hold time, adding slow hip lifts, extending the top leg, or moving toward a full side plank when your alignment stays clean.
Recommended Equipment (Optional)
- Exercise Mat — adds comfort under the elbow, hip, and knees during side bridge holds
- Yoga Knee Pad — useful for reducing knee pressure during bent-knee plank variations
- Mini Resistance Bands — helpful for progressing hip stability and glute medius activation
- Core Sliders — useful for advanced core stability drills after mastering basic side bridges
- Foam Roller — helpful for warm-up and recovery around the hips, glutes, and upper back
Tip: Equipment is optional. A comfortable mat is usually the most useful item because it allows better focus on alignment and core control.