Hollow Hold Exercise: Core Form, Benefits, Sets, Tips & FAQ
Learn the Hollow Hold to build stronger abs, core stability, and anti-extension control with proper form, sets, tips, mistakes, FAQs, and equipment.
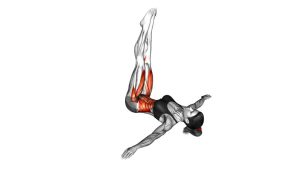
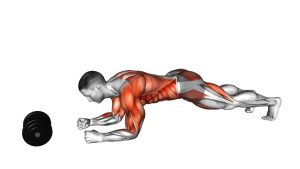
Hollow Hold
This exercise is highly effective because it teaches the core to stabilize the pelvis and rib cage at the same time. When performed correctly, the abs stay braced, the ribs stay down, and the legs remain straight without the lower back arching. The Hollow Hold is often used in gymnastics, calisthenics, bodyweight training, and athletic core programs because it builds strong anti-extension control.
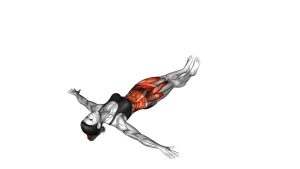
The movement shown in the video is a clean static hold. The athlete lies on the back, raises the arms and legs, lifts the head and shoulders, and holds a tight hollow-body position. There is no swinging, crunching, or uncontrolled leg movement. This makes the exercise excellent for improving body tension, trunk endurance, and core awareness.
Quick Overview
| Body Part | Abs |
|---|---|
| Primary Muscle | Rectus abdominis |
| Secondary Muscle | Transverse abdominis, obliques, hip flexors, deep core stabilizers |
| Equipment | No equipment required; optional exercise mat |
| Difficulty | Beginner to intermediate, depending on leg height and hold duration |
Sets & Reps (By Goal)
- Core activation: 2–3 sets × 10–20 seconds with controlled breathing.
- Beginner strength: 3 sets × 15–25 seconds, using bent knees if needed.
- Core endurance: 3–5 sets × 25–45 seconds with full-body tension.
- Calisthenics preparation: 4–6 sets × 20–40 seconds, focusing on a strong hollow-body shape.
- Workout finisher: 2–4 rounds × max quality hold, stopping before the lower back arches.
Progression rule: First increase control, then increase time. After that, lower the legs closer to the floor. Never progress by allowing the lower back to arch.
Setup / Starting Position
- Lie on your back: Start flat on the floor or on an exercise mat. Keep your body straight and relaxed before beginning.
- Extend your arms overhead: Reach the arms long behind your head. Keep the elbows straight without shrugging the shoulders aggressively.
- Straighten your legs: Bring the legs together and point them forward. Keep the knees locked or softly straight.
- Brace your core: Pull the ribs down and gently press the lower back into the floor.
- Lift into position: Raise the shoulders, arms, and legs together until your body forms a controlled hollow curve.
In the video, the athlete uses a strong hollow-body line with the arms overhead and the legs straight. This version requires good core control. Beginners can bend the knees or raise the legs higher to reduce difficulty.
Execution (Step-by-Step)
- Start from a long body position: Lie on your back with your arms extended overhead and your legs straight. Keep your body aligned before you lift.
- Brace before lifting: Tighten your abs and press your lower back into the floor. This is the most important part of the exercise.
- Lift the shoulders: Raise your head and upper back slightly from the floor. Keep the chin gently tucked instead of forcing the neck forward.
- Lift the legs: Raise both legs together until they hover above the floor. Keep them straight and controlled.
- Reach long: Extend through your fingers and toes. Think about making your body long while keeping the center tight.
- Hold the hollow shape: Maintain the curved “banana” position without rocking, kicking, or dropping the legs too low.
- Breathe under tension: Take short, controlled breaths while keeping your ribs down and your abs braced.
- Finish with control: Lower your shoulders and legs slowly when the hold ends. Do not collapse suddenly.
Pro Tips & Common Mistakes
Pro Tips
- Press the lower back down: This keeps the abs in control and protects the spine from unwanted extension.
- Reach in both directions: Extend through the arms and legs to create full-body tension.
- Keep the ribs down: Avoid flaring the ribs because it usually leads to an arched lower back.
- Use controlled breathing: Small breaths help you maintain tension without holding your breath too hard.
- Choose the correct level: Bent knees are not wrong. They are a smart regression when form starts to break.
Common Mistakes
- Arching the lower back: This is the biggest mistake. It reduces core tension and increases stress on the lumbar spine.
- Dropping the legs too low: Low legs are only useful if your lower back stays glued to the floor.
- Pulling the neck forward: The head should lift naturally with the shoulders. Avoid straining the neck.
- Holding the breath: Breath-holding can make the exercise feel harder and reduce control.
- Relaxing the arms: Keep the arms active and extended. A loose upper body reduces the hollow-body effect.
- Turning it into a crunch: The Hollow Hold is a static anti-extension drill, not a repeated crunching motion.
FAQ
What muscles does the Hollow Hold work?
The Hollow Hold mainly works the rectus abdominis. It also trains the transverse abdominis, obliques, hip flexors, and deep core stabilizers. Because the body stays long and tight, it also improves full-body tension.
Should my lower back touch the floor during the Hollow Hold?
Yes. Your lower back should stay pressed into the floor throughout the hold. If it arches, the exercise is too difficult for your current position. Raise your legs higher or bend your knees.
Is the Hollow Hold good for beginners?
Yes, but beginners should use an easier version first. A bent-knee hollow hold or a higher leg position is usually better than forcing a full hollow hold with poor form.
How long should I hold a Hollow Hold?
Most people should begin with 10–20 seconds per set. As control improves, work toward 30–45 seconds. Quality matters more than time.
Why do my hip flexors feel the Hollow Hold?
The hip flexors help keep the legs lifted, so some activation is normal. However, your abs should remain the main focus. If the hip flexors dominate, raise your legs higher or bend your knees.
Can the Hollow Hold help with calisthenics?
Yes. The Hollow Hold builds the body tension needed for pull-ups, dips, handstands, L-sits, toes-to-bar, and many gymnastics-style movements. It teaches the ribs and pelvis to stay connected under tension.
Recommended Equipment (Optional)
- Exercise Mat — provides floor comfort and support during hollow holds and other core drills.
- Non-Slip Yoga Mat — helps keep the body stable while holding the hollow position.
- Ab Mat — useful for core training support and controlled abdominal work.
- Ankle Weights — optional advanced tool for increasing leg-side resistance after mastering bodyweight form.
- Resistance Bands Set — helpful for pairing hollow holds with anti-extension and core stability progressions.
Tip: Equipment is optional for this exercise. Master the bodyweight version first before adding extra resistance or longer holds.