Lying Lateral Bend: Oblique Core Exercise, Form, Sets, Tips & FAQ
Learn the Lying Lateral Bend for oblique strength, trunk control, and core stability. Includes setup, form steps, mistakes, FAQs, and equipment.
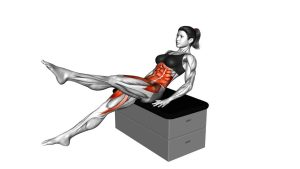
Lying Lateral Bend
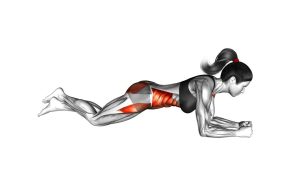
This movement looks simple, yet it requires clean control from the entire body. Your arms stay extended overhead, your legs remain straight, and your torso moves as one connected unit. Because the body is long, the obliques must work harder to guide the side bend without letting the hips, shoulders, or legs separate from the movement.
Unlike a regular side crunch, the Lying Lateral Bend does not rely on a short, fast squeeze. Instead, it uses a longer lever position to challenge your side abdominal muscles with steady tension. As a result, it is especially helpful for athletes, home trainees, and beginners who want to build better awareness of lateral flexion while protecting the lower back from uncontrolled motion.
Quick Overview
| Body Part | Core |
|---|---|
| Primary Muscle | Obliques |
| Secondary Muscle | Rectus abdominis, transverse abdominis, hip flexors, spinal stabilizers |
| Equipment | No equipment required; optional exercise mat for comfort |
| Difficulty | Beginner to intermediate, depending on range of motion and body tension |
Sets & Reps (By Goal)
- Beginner technique practice: 2–3 sets × 6–8 reps per side with slow control.
- Core activation warm-up: 2 sets × 8–10 reps per side before ab training or mobility work.
- Oblique strength: 3–4 sets × 10–14 reps per side with a controlled pause at each side bend.
- Core endurance: 2–3 sets × 30–45 seconds of smooth side-to-side movement.
- Body-control training: 3 sets × 6–10 reps per side using a very slow 3-second bend and 3-second return.
Progression rule: First improve control, then increase reps. After that, increase the range slightly. Do not rush the tempo, because momentum removes tension from the obliques.
Setup / Starting Position
- Lie on your back: Start flat on the floor or on an exercise mat. Keep your body straight from fingertips to toes.
- Extend your arms overhead: Reach both arms behind your head while keeping them close together and in line with your torso.
- Keep your legs long: Straighten both legs fully. Keep the feet together so the lower body moves as one unit.
- Brace your core gently: Tighten the midsection enough to keep the ribs and pelvis connected.
- Set your neck neutral: Avoid lifting the head or forcing the chin down. Let the neck follow the body naturally.
- Create full-body tension: Before moving, imagine your arms, torso, and legs forming one long line.
A soft mat can make the exercise more comfortable, especially if your lower back or shoulders feel pressure on a hard floor.
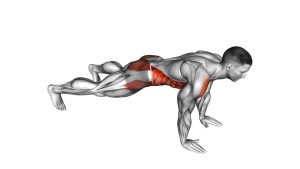
Execution (Step-by-Step)
- Start from a straight line: Begin with your arms overhead, legs together, and torso centered. Take a calm breath before the first repetition.
- Bend gently to one side: Use your obliques to curve the body sideways. Your arms and legs should travel in the same direction instead of moving separately.
- Keep the body long: Maintain straight arms and straight legs. Avoid folding at the hips or twisting the ribs.
- Reach peak contraction: Stop when you feel a strong but controlled squeeze along the working side of your core. The body should look slightly curved, not collapsed.
- Return to center: Slowly pull the body back to a straight neutral line. Keep tension through the abs during the return.
- Repeat to the opposite side: Bend the body the other way with the same speed, range, and control.
- Continue alternating: Move side to side in a smooth rhythm while keeping each repetition clean and deliberate.
Pro Tips & Common Mistakes
Pro Tips
- Move from the waist: Think about shortening one side of your ribs toward your hip while the opposite side lengthens.
- Use a small range first: A short, clean bend is better than a large uncontrolled swing.
- Keep your limbs connected: The arms, torso, and legs should move together as one long lever.
- Breathe through each rep: Exhale slightly as you bend, then inhale as you return to center.
- Control both directions: The return to center matters as much as the side bend.
- Use a mat for feedback: Staying close to the floor helps you notice if your hips or shoulders rotate.
Common Mistakes
- Twisting instead of bending: Rotation changes the target and reduces oblique focus.
- Bending the knees: This shortens the lever and makes the exercise easier than intended.
- Letting the arms separate: Loose arms reduce full-body tension and make the movement sloppy.
- Using momentum: Fast swinging can irritate the lower back and removes tension from the core.
- Overarching the lower back: Keep the ribs controlled so the spine does not extend excessively.
- Forcing range: Going too far can turn a core drill into an uncomfortable spinal bend.
FAQ
What muscles does the Lying Lateral Bend work?
The Lying Lateral Bend mainly works the obliques. It also trains the deep core, rectus abdominis, hip flexors, and spinal stabilizers because the whole body must stay long and controlled.
Is the Lying Lateral Bend good for beginners?
Yes, beginners can use this exercise if they keep the range small and move slowly. However, it becomes more challenging when the arms and legs stay fully extended, so control is more important than speed.
Should I feel this exercise in my lower back?
You may feel light stabilization around the lower back, but the main effort should come from the side abs. If your lower back feels strained, reduce the range, brace more gently, and avoid arching.
Is this exercise a stretch or a strengthening movement?
It can feel like both. One side of the torso lengthens while the other side contracts. Still, the main training goal is controlled oblique activation and lateral core strength.
How do I make the Lying Lateral Bend harder?
Slow the tempo, pause briefly at the side-bent position, increase the number of reps, or keep stronger tension through the arms and legs. Progress gradually so your form stays clean.
How do I make this exercise easier?
Keep the bend smaller, rest your arms slightly wider, or perform fewer reps. You can also place your hands closer to your head instead of reaching fully overhead.
Recommended Equipment
- Exercise Mat — adds comfort and support during floor-based oblique exercises.
- Thick Yoga Mat — useful if your spine, hips, or shoulders need more cushioning.
- Core Sliders — helpful for related oblique and lateral core progressions.
- Resistance Bands Set — useful for pairing with anti-rotation and side-core exercises.
- Ab Workout Mat — supports comfortable core sessions and repeated floor movements.
Tip: Equipment is optional for this exercise. A stable floor and good body control are more important than adding tools too early.