Lying Leg Hip Raise: Proper Form, Lower Abs Tips & FAQ
Learn the lying leg hip raise for stronger lower abs, better pelvic control, and core stability with step-by-step form, sets, tips, mistakes, and gear.
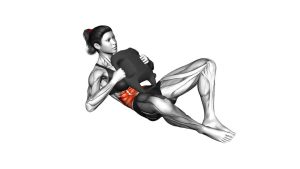
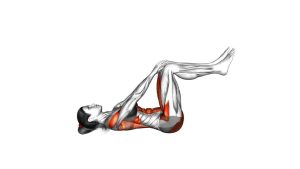
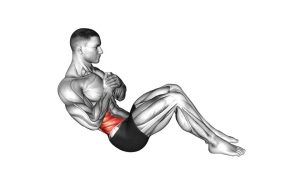
Lying Leg Hip Raise
This exercise is often confused with a basic lying leg raise, but the hip-lift portion makes it more abdominal-focused. During the first part of the movement, the legs travel toward the torso. Then, the pelvis curls upward as the hips lift from the bench or floor. That small curl is the most important part because it turns the movement into a true lower-core contraction rather than only a hip-flexor drill.
For best results, keep every repetition smooth. Avoid bouncing at the top, dropping the legs quickly, or arching the lower back during the return. A clean lying leg hip raise should feel controlled, compact, and deliberate from start to finish.
Quick Overview
| Body Part | Core |
|---|---|
| Primary Muscle | Rectus abdominis, with strong emphasis on lower abdominal control |
| Secondary Muscle | Hip flexors, obliques, transverse abdominis, and pelvic stabilizers |
| Equipment | Bodyweight; optional flat bench, exercise mat, or ankle weights for progression |
| Difficulty | Beginner to intermediate, depending on leg position and range of motion |
Sets & Reps (By Goal)
- Core control and technique: 2–3 sets × 8–12 slow reps with a short pause at the top.
- Lower-ab strength: 3–4 sets × 10–15 reps using a controlled 2–3 second lowering phase.
- Muscular endurance: 2–4 sets × 15–20 reps while keeping the lower back stable.
- Beginner-friendly practice: 2 sets × 6–10 reps with bent knees and a smaller hip lift.
- Advanced progression: 3–4 sets × 8–12 reps with straighter legs or light ankle weights.
Progression rule: First improve control, then increase reps. After that, extend the legs more fully, slow the eccentric phase, or add light resistance. Never progress if the lower back arches or the hips swing upward.
Setup / Starting Position
- Lie on your back: Use a flat bench or exercise mat. Keep your head, upper back, and hips supported.
- Hold for stability: Place your hands beside your hips, grip the bench lightly, or press your palms into the floor.
- Set your ribs down: Keep the rib cage controlled so the lower back does not flare into an arch.
- Position your legs: Start with your legs extended or slightly bent. Beginners should use more knee bend.
- Brace gently: Tighten your abs as if preparing for a controlled exhale. Keep your neck relaxed.
- Prepare the pelvis: Think about drawing your pelvis toward your ribs before you begin the hip lift.
Tip: If the movement feels too difficult, start with bent knees and a shorter range. This keeps the focus on the abs instead of forcing the lower back to compensate.
Execution (Step-by-Step)
- Start with control: Keep your legs slightly above the bench or floor while maintaining abdominal tension. Do not let your lower back arch.
- Bring the legs inward: Bend the knees slightly and guide them toward your torso. Move smoothly rather than kicking upward.
- Curl the pelvis: Once the knees move closer to your body, use your lower abs to roll the pelvis upward. Your hips should lift slightly from the surface.
- Pause at the top: Hold briefly when the hips are raised. Keep the movement compact and avoid rocking backward.
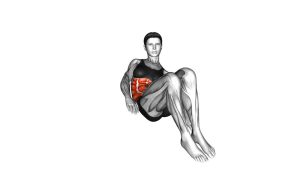
- Lower the hips first: Return the pelvis to the bench or floor with control before extending the legs away.
- Extend without losing tension: Slowly lower the legs back toward the start position. Stop before your lower back lifts.
- Repeat cleanly: Begin the next rep only after your core is stable and your breathing is controlled.
Pro Tips & Common Mistakes
Pro Tips
- Lift the hips, not just the legs: The abdominal benefit comes from curling the pelvis upward.
- Use a slow return: Lowering slowly keeps tension on the abs and protects the lower back.
- Exhale during the curl: Breathing out as the hips lift helps the ribs stay down and the abs contract harder.
- Keep the movement small: A short, clean hip lift is better than a big uncontrolled swing.
- Adjust knee bend: More knee bend makes the exercise easier. Straighter legs make it harder.
- Control the bottom position: Stop the leg descent before the lower back arches away from the surface.
Common Mistakes
- Swinging the legs: Momentum reduces abdominal tension and can irritate the lower back.
- Only raising the legs: Without the pelvic curl, the movement becomes more hip-flexor dominant.
- Dropping too fast: A rushed descent removes control and increases stress on the lumbar spine.
- Pulling hard with the arms: The hands should stabilize the body, not yank the torso into position.
- Arching the lower back: This usually means the legs are too straight, too low, or moving too quickly.
- Lifting too high: Rolling onto the upper back changes the exercise and may reduce targeted control.
FAQ
What muscles does the lying leg hip raise work?
The lying leg hip raise mainly works the rectus abdominis, especially the lower abdominal region. It also uses the hip flexors, obliques, and deep core muscles to stabilize the pelvis and control the legs.
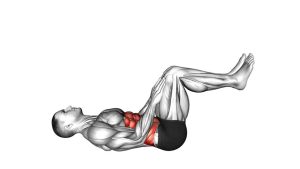
Is the lying leg hip raise the same as a reverse crunch?
It is very similar to a reverse crunch, but the leg position can make it feel slightly different. A reverse crunch often uses bent knees from the start, while the lying leg hip raise may begin with the legs extended before the hips curl upward.
Should my hips lift off the bench or floor?
Yes. A small hip lift is part of the exercise. However, the lift should come from the abs curling the pelvis upward, not from kicking the legs or swinging the body.
Why do I feel this exercise in my hip flexors?
Some hip-flexor involvement is normal because the legs move toward the torso. If the hip flexors dominate, bend your knees, shorten the range, and focus on curling the pelvis toward your ribs at the top.
How can I make the lying leg hip raise easier?
Bend your knees more, keep the movement smaller, and avoid lowering the legs too far. You can also perform the exercise on the floor with your hands pressing gently into the ground for extra stability.
How can I make the exercise harder?
Use straighter legs, slow the lowering phase, pause longer at the top, or add very light ankle weights. Increase difficulty only when your lower back stays controlled throughout every rep.
Is the lying leg hip raise good for lower abs?
Yes. It is a strong lower-ab focused movement because the pelvis curls upward toward the ribs. That pelvic action creates more direct abdominal contraction than a basic leg raise alone.
Can beginners do this exercise?
Beginners can do it if they use bent knees and a short range of motion. The priority should be clean pelvic control, not high reps or heavy resistance.
Recommended Equipment (Optional)
- Flat Weight Bench — provides a stable surface and allows a comfortable grip during bench-based hip raises
- Thick Exercise Mat — cushions the spine and hips when performing the movement on the floor
- Adjustable Ankle Weights — useful for advanced progression once bodyweight reps are fully controlled
- Ab Exercise Bench — gives support for core training and can be used for multiple abdominal exercises
- Mini Resistance Bands — helpful for warm-ups, hip stability drills, and accessory core activation work
Tip: Equipment is optional. Master the bodyweight version first, then use tools only when they improve control, comfort, or progressive overload.