Sit-Up with Chair Assisted: Form, Core Benefits, Sets & Tips
Learn the Sit-Up with Chair Assisted for stronger abs, better core control, and cleaner sit-up form with step-by-step cues, mistakes, FAQs, and gear.
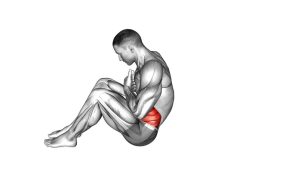
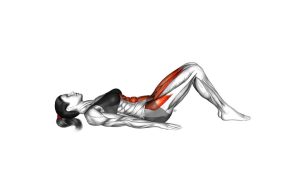
Sit-Up with Chair Assisted
This exercise is useful for beginners who struggle to keep their feet grounded during traditional sit-ups. It also helps more experienced trainees practice better tempo and core tension. Because the chair gives the feet a stable contact point, the body can move through each rep with less shifting. That makes the movement easier to learn and easier to repeat with consistent form.
A strong rep starts with a steady setup. Your knees stay bent, your feet stay supported by the chair, and your torso rises through a controlled curl. Keep your neck relaxed, avoid throwing the arms, and let the abs guide the movement. When performed correctly, the Sit-Up with Chair Assisted trains the rectus abdominis while also improving trunk control and body awareness.
Quick Overview
| Body Part | Core |
|---|---|
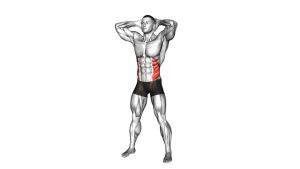
| Primary Muscle | Rectus abdominis |
| Secondary Muscle | Hip flexors, obliques, transverse abdominis, deep trunk stabilizers |
| Equipment | Chair and exercise mat recommended |
| Difficulty | Beginner to Intermediate |
Sets & Reps (By Goal)
- Beginner core control: 2–3 sets × 6–10 reps with slow, clean movement.
- Ab strength: 3–4 sets × 8–15 reps with a controlled lift and a slow lowering phase.
- Muscular endurance: 2–4 sets × 15–20 reps while keeping the same steady tempo.
- Warm-up activation: 1–2 sets × 8–12 reps before a core or full-body workout.
- Tempo focus: 3 sets × 6–8 reps using 2 seconds up, 1 second pause, and 3 seconds down.
Progression rule: Add reps first, then increase sets, then slow down the lowering phase. Do not progress by swinging harder or pulling the neck forward.
Setup / Starting Position
- Place a sturdy chair in front of you: Use a stable chair that will not slide, tip, or move during the exercise.
- Lie on your back: Position yourself on an exercise mat with your knees bent and your feet supported by or lightly hooked against the chair.
- Set your lower body: Keep your feet secure, but avoid pushing aggressively through the chair. The chair is there for support, not force.
- Brace your core: Gently tighten your abs before moving. Think about drawing the ribs slightly down toward the pelvis.
- Choose your arm position: Cross your arms over the chest for control, reach forward for an easier version, or place hands lightly near the head without pulling.
- Relax your neck: Keep the chin slightly tucked and the jaw loose. Your head should follow the torso, not lead the rep.
- Start with control: Before the first repetition, make sure your body is stable and your breathing is calm.
Tip: If the chair slides, place it against a wall or use a non-slip mat under the chair legs. Stability is important for smooth reps.
Execution (Step-by-Step)
- Brace before lifting: Take a small breath in, then lightly tighten your abs as if preparing for a controlled crunch.
- Lift the head and shoulders first: Begin by curling the upper back off the floor. Avoid yanking the neck or throwing the arms.
- Continue into the sit-up: Roll the torso upward one section at a time. Keep the feet steady against the chair.
- Reach the top with control: Sit up until your torso is near upright or until you reach your comfortable range. Do not force the end position.
- Pause briefly: Hold the top for a moment while keeping the abs active and the shoulders relaxed.
- Lower slowly: Reverse the movement with control. Let the spine return to the floor gradually instead of collapsing backward.
- Reset each rep: Once your upper back and head return to the mat, re-brace and begin the next repetition.
Pro Tips & Common Mistakes
- Use the chair as support, not power: The chair should stabilize your feet. It should not become the main driver of the movement.
- Control the lowering phase: The descent builds strength and teaches better core control. Avoid dropping quickly.
- Keep the ribs down: If your ribs flare and your back arches, reset your brace before continuing.
- Avoid neck pulling: Hands behind the head can encourage pulling. Cross the arms or reach forward if your neck feels strained.
- Do not chase speed: Fast reps often turn into momentum. A slower tempo makes the abs work harder.
- Keep breathing: Exhale as you rise and inhale as you lower. Holding your breath can create unnecessary tension.
- Use a comfortable range: You do not need to force a fully upright sit-up if your lower back or hips feel uncomfortable.
- Keep the chair stable: A moving chair can ruin the rep and increase the risk of losing control.
- Brace before every rep: Treat each repetition as a separate controlled movement, not one rushed sequence.
- Progress gradually: First master clean bodyweight reps. Then add tempo, pauses, or more volume.
FAQ
What is the Sit-Up with Chair Assisted?
The Sit-Up with Chair Assisted is a bodyweight core exercise where your feet are supported by a chair while you perform a sit-up. The chair helps stabilize the lower body, making it easier to focus on abdominal control and proper torso movement.
Is this exercise good for beginners?
Yes. This variation is beginner-friendly because the chair helps keep the feet steady. That support can make the sit-up easier to learn, especially for people who struggle with balance, foot movement, or uncontrolled momentum.
What muscles does the Sit-Up with Chair Assisted work?
The main muscle worked is the rectus abdominis, which is the front abdominal muscle responsible for trunk flexion. The hip flexors, obliques, and deep core stabilizers also assist during the movement.
Should I feel this exercise in my hip flexors?
Some hip flexor involvement is normal during sit-ups. However, your abs should still feel like the main working area. If your hips dominate the movement, slow down, reduce the range, and focus on curling the torso rather than snapping upward.
Why does my lower back hurt during sit-ups?
Lower-back discomfort can happen if you use too much momentum, arch excessively, or lack core control during the lowering phase. Try a smaller range, slow down, and keep your ribs controlled. If pain continues, choose a gentler core exercise and seek professional guidance if needed.
Can I do this exercise every day?
You can perform light sets often, but daily hard sit-up training is not necessary for most people. Start with 2–4 sessions per week and allow recovery if your abs or hip flexors feel sore.
How can I make the Sit-Up with Chair Assisted harder?
Make it harder by slowing the lowering phase, adding a pause at the top, increasing reps, or holding a light weight at the chest once your form is strong. Do not make it harder by swinging faster.
Recommended Equipment
- Non-Slip Exercise Mat — provides cushioning for the spine and helps keep your body stable during floor-based core work.
- Stable Folding Workout Chair — useful for assisted sit-ups, step drills, seated exercises, and home workout support.
- Ab Mat — can support the lower back and improve comfort during controlled sit-up variations.
- Adjustable Ankle Weights — optional progression tool for advanced users who already control the movement well.
- Core Sliders — useful for adding more core exercises such as body saws, knee tucks, and mountain climber variations.
Choose equipment that improves stability and comfort. A solid chair and a non-slip mat are the most important tools for this exercise.