Weighted Dead Bug: Core Stability Form, Sets, Tips & FAQ
Learn the Weighted Dead Bug for stronger abs, better core control, and improved spinal stability with step-by-step form, sets, tips, FAQs, and gear.
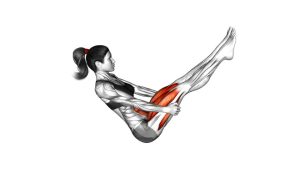
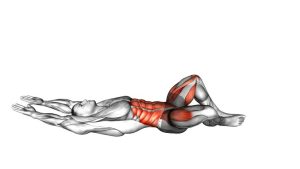
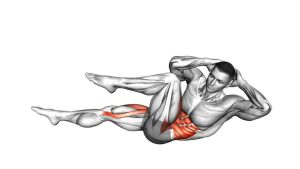
Weighted Dead Bug
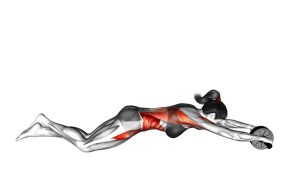
This movement works best when every rep stays slow, quiet, and controlled. Your arms should remain nearly vertical while holding the weight, and your legs should alternate smoothly from the tabletop position. As a result, the abs must work to stop the ribs from flaring and the lower back from lifting off the floor.
Quick Overview
| Body Part | Core |
|---|---|
| Primary Muscle | Rectus abdominis and deep core stabilizers |
| Secondary Muscle | Hip flexors, obliques, transverse abdominis, and shoulder stabilizers |
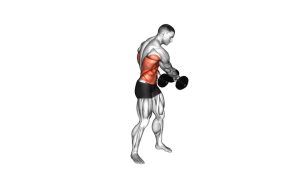
| Equipment | Dumbbell, kettlebell, weight plate, or similar handheld weight |
| Difficulty | Beginner to Intermediate, depending on load and leg range |
Sets & Reps (By Goal)
- Core activation: 2 sets × 6–8 reps per side with a light weight and slow tempo.
- Core stability: 3 sets × 8–10 reps per side with controlled breathing and steady arms.
- Strength endurance: 3–4 sets × 10–12 reps per side using a moderate but manageable load.
- Warm-up control drill: 1–2 sets × 5–6 reps per side before compound lifts or ab training.
Progression rule: First increase control, then increase range of motion, and only then increase the weight. If your back lifts from the floor, the variation is too difficult for your current control level.
Setup / Starting Position
- Lie on your back: Rest your head and torso on the floor with your spine controlled and neutral.
- Hold the weight: Grip a dumbbell, kettlebell, plate, or similar load with both hands above your chest.
- Set the arms: Keep the arms extended upward so the weight stays stacked over the torso.
- Lift the legs: Bring both hips and knees to about 90 degrees so your shins are roughly parallel to the floor.
- Brace the core: Gently press the lower back toward the floor and keep the ribs from flaring upward.
Before starting, make sure the weight feels secure. Additionally, choose a load that lets you keep the arms still while the legs move.
Execution (Step-by-Step)
- Start in tabletop: Keep both knees bent, both hips lifted, and the weight held vertically above the chest.
- Extend one leg: Slowly lower one leg away from your body while straightening it toward the floor.
- Control the hover: Stop before the foot touches down or before your lower back starts to arch.
- Keep the upper body quiet: Maintain steady arms, relaxed shoulders, and a stable rib position.
- Return to tabletop: Bring the extended leg back to the starting position with control.
- Switch sides: Repeat the same movement with the opposite leg while keeping the weight fixed above you.
Pro Tips & Common Mistakes
- Keep the weight stacked: Do not let the arms drift behind your head or toward your hips.
- Move one leg at a time: The video shows an alternating pattern, so avoid extending both legs together for this version.
- Control the lower back: If your back arches, shorten the leg range or bend the knee more.
- Use a slow tempo: A controlled rep builds more core stability than a fast, swinging rep.
- Avoid neck tension: Keep the head resting on the floor instead of lifting it to watch the legs.
- Do not overload early: Too much weight can pull the ribs up and reduce abdominal control.
- Breathe steadily: Exhale as the leg extends, then inhale as it returns to tabletop.
FAQ
What muscles does the Weighted Dead Bug work?
The Weighted Dead Bug mainly trains the abs and deep core stabilizers. In addition, the hip flexors help control the legs, while the shoulders stabilize the weight above the chest.
Is the Weighted Dead Bug good for beginners?
Yes, but beginners should start with a very light weight or no weight. Once the lower back stays stable during every rep, the weighted version becomes a useful progression.
Should my foot touch the floor?
Not necessarily. In this version, the leg lowers under control and can hover above the floor. More importantly, the movement should stop before the lower back arches.
Why hold a weight during a dead bug?
Holding a weight increases the stability demand. As a result, the abs must work harder to keep the ribs down, the arms steady, and the spine controlled.
What is the most common mistake?
The most common mistake is lowering the leg too far and losing lower-back contact with the floor. Therefore, use a smaller range until your core control improves.
Recommended Equipment
- Hex Dumbbell — useful for holding a stable load above the chest during weighted dead bugs.
- Kettlebell — a compact option that can be held securely with both hands.
- Weight Plate — helpful for a flat, two-hand grip when practicing loaded core control.
- Exercise Mat — adds comfort and support for the back, hips, and head while lying on the floor.
- Adjustable Dumbbell — allows gradual load progression without needing many separate dumbbells.
Tip: Choose equipment that feels secure in your hands. Also, avoid slippery grips because the weight must stay stable above your chest throughout the entire exercise.