Self-Assisted Inverted Pullover: Core Form, Sets, Tips & FAQ
Learn the Self-Assisted Inverted Pullover for controlled lower-ab strength, hip lift mechanics, core stability, setup, mistakes, FAQs, and gear.
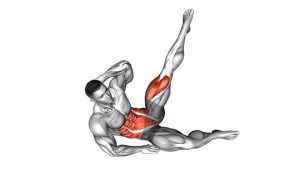
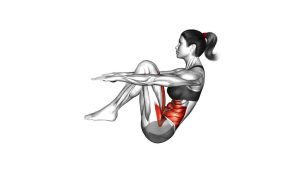
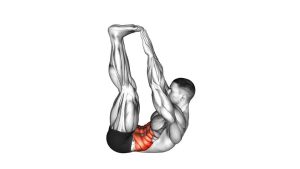
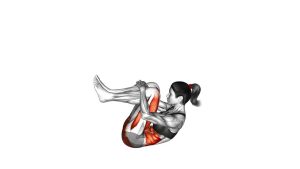
Self-Assisted Inverted Pullover
This exercise works best when every rep stays slow, quiet, and controlled. Instead of throwing the legs upward, you should raise them with abdominal tension, lightly lift the hips at the top, and then lower the legs without letting the lower back arch aggressively. As a result, the movement becomes a strong core drill rather than a momentum-based leg swing.
Quick Overview
| Body Part | Core |
|---|---|
| Primary Muscle | Rectus abdominis, especially lower-abdominal emphasis |
| Secondary Muscle | Hip flexors, obliques, deep core stabilizers |
| Equipment | Flat floor space and a stable bench or fixed support to hold behind the head |
| Difficulty | Intermediate because the straight-leg lowering phase requires strong core control |
Sets & Reps (By Goal)
- Core control: 2–3 sets × 6–10 slow reps with 60–90 sec rest
- Lower-ab strength: 3–4 sets × 8–12 reps with a controlled hip lift at the top
- Eccentric control: 2–3 sets × 5–8 reps with a 3–5 second lowering phase
- Conditioning finisher: 2–3 sets × 10–15 reps only if form stays strict
Progression rule: First improve control at the bottom range. Then add reps, slower lowering, or a slightly longer top squeeze.
Setup / Starting Position
- Lie on your back: Position your body on the floor with your head close to a stable bench or fixed support.
- Reach overhead: Hold the bench behind your head firmly enough to anchor your upper body without pulling your neck.
- Extend your legs: Keep both legs straight and together, hovering slightly above the floor if you can control it.
- Brace your core: Gently press your ribs down and avoid a large lower-back arch before the first rep begins.
- Set your tempo: Prepare to lift and lower slowly instead of using a quick kick from the hips.
Execution (Step-by-Step)
- Start from a low leg position: Keep your legs straight and slightly elevated while your hands hold the bench for support.
- Raise the legs: Lift both legs together toward vertical using controlled hip flexion and abdominal tension.
- Finish with a small hip lift: Once the legs are near vertical, curl the pelvis slightly upward so the hips lift a little from the floor.
- Pause briefly: Hold the top position for a moment while keeping the movement compact and controlled.
- Lower with control: Bring your hips back down first, then lower the straight legs slowly toward the floor.
- Stop before form breaks: End each rep before your lower back arches excessively or your legs drop with momentum.
Pro Tips & Common Mistakes
- Control the bottom range: The hardest part is usually lowering the legs near the floor, so slow down there.
- Avoid swinging: If your legs bounce upward, reduce the range and reset your brace before continuing.
- Keep the hip lift small: A compact lift targets the abs better than a large roll that turns into momentum.
- Do not yank the bench: Grip for support, but avoid pulling your shoulders aggressively toward the bench.
- Protect the lower back: If your back arches hard during descent, bend the knees slightly or stop the legs higher.
- Breathe with control: Exhale as the legs rise and hips lift, then inhale lightly as you lower.
- Keep the legs together: This helps maintain symmetry and reduces unnecessary twisting through the pelvis.
FAQ
What muscles does the Self-Assisted Inverted Pullover work?
It mainly trains the rectus abdominis, especially during the leg raise and hip lift. Additionally, the hip flexors, obliques, and deep core stabilizers help control the legs and pelvis.
Is this the same as a lying leg raise?
It is similar, but not exactly the same. This variation includes a visible small hip lift at the top and uses a bench grip behind the head for assistance and stability.
Should my lower back stay flat the whole time?
Your lower back should stay controlled, especially as the legs lower. However, the hips may lift slightly at the top because the movement includes a reverse-crunch-style pelvic curl.
What if I feel this more in my hip flexors than my abs?
Reduce the range, slow the lowering phase, and focus on lightly curling the pelvis at the top. Also, avoid letting the legs drop too low if your abs cannot maintain control.
Can beginners do this exercise?
Beginners may need an easier version first. For example, they can perform the same movement with bent knees, a smaller range of motion, or a shorter lowering phase.
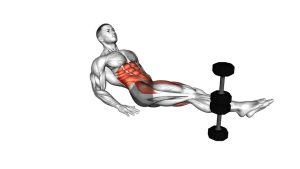
Recommended Equipment
- Flat Weight Bench — provides a stable support to grip behind the head
- Thick Exercise Mat — adds comfort for the spine and hips during floor work
- Non-Slip Yoga Mat — helps prevent sliding while the legs move through the rep
- Adjustable Ankle Weights — optional progression only after strict control is mastered
- Ab Exercise Mat — supports repeated core training with better floor comfort
Tip: Add resistance only when you can lower your legs slowly without arching your lower back or swinging through the hips.