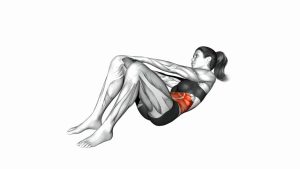
Kneeling Shoulder Tap: Proper Form, Core Benefits, Sets, Tips & FAQ
Learn the Kneeling Shoulder Tap for core stability, shoulder control, and beginner-friendly anti-rotation strength with form tips and FAQs.
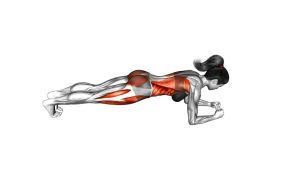
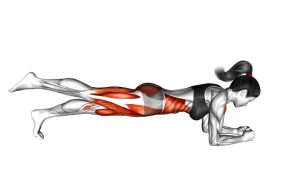
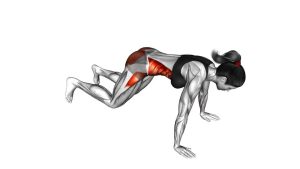
Kneeling Shoulder Tap
This exercise works best when the body stays long from the shoulders to the knees. In addition, the movement should feel controlled rather than rushed. As one hand leaves the floor, the core must resist twisting, while the support shoulder stays strong and stable. Therefore, the Kneeling Shoulder Tap is a smart choice for beginners, home workouts, warm-ups, and anyone learning proper plank control before progressing to the full plank shoulder tap.
Quick Overview
| Body Part | Core |
|---|---|
| Primary Muscle | Rectus abdominis, transverse abdominis, and deep core stabilizers |
| Secondary Muscle | Shoulders, chest, triceps, serratus anterior, glutes, and lower-back stabilizers |
| Equipment | No equipment required; optional exercise mat for knee comfort |
| Difficulty | Beginner |
Sets & Reps (By Goal)
- Beginner technique: 2–3 sets × 6–8 taps per side, slow and controlled
- Core stability: 3–4 sets × 8–12 taps per side, 30–60 seconds rest
- Warm-up activation: 2 sets × 6–10 taps per side, easy effort
- Muscular endurance: 3 sets × 12–20 alternating taps, steady tempo
Progression rule: First, make each tap smooth and quiet. Then, increase reps. After that, progress to a wider plank stance or a full plank shoulder tap only when the hips remain stable.
Setup / Starting Position
- Start on all fours: Place your hands on the floor under your shoulders and your knees under or slightly behind your hips.
- Extend into a kneeling plank: Move the hips forward until your body forms a straight line from shoulders to hips to knees.
- Set your hands firmly: Spread your fingers and press evenly through the palms to support the shoulders.
- Brace your core: Keep the ribs down and avoid letting the lower back sag.
- Keep the neck neutral: Look slightly down at the floor so the head stays aligned with the spine.
Tip: Use a soft mat under the knees if the floor feels uncomfortable. However, keep the surface stable enough so your hands do not slide.
Execution (Step-by-Step)
- Hold the kneeling plank: Keep both hands planted, arms straight, and body stable.
- Shift weight slightly: Move just enough weight into one hand so the opposite hand can lift without collapsing.
- Lift one hand: Raise the hand from the floor while keeping the hips as level as possible.
- Tap the opposite shoulder: Touch the opposite shoulder lightly without pulling or twisting the torso.
- Return with control: Place the hand back under the shoulder softly and reset your plank position.
- Repeat on the other side: Alternate sides while keeping the tempo smooth and the core braced.
Pro Tips & Common Mistakes
Pro Tips
- Press the floor away: This helps keep the shoulder blades stable and prevents sinking between the shoulders.
- Move slowly: A slower tap creates more core control and less momentum.
- Keep the hips square: Imagine balancing a glass of water on your lower back.
- Breathe steadily: Exhale lightly as you tap, then inhale as you reset.
- Use a wider knee stance if needed: A wider base makes the exercise easier and improves balance.
Common Mistakes
- Rocking the hips: This reduces the anti-rotation benefit. Instead, slow the movement down.
- Sagging the lower back: Keep the ribs down and lightly squeeze the glutes.
- Placing hands too far forward: Hands should stay under the shoulders for better control.
- Dropping the hand hard: Return the hand softly to keep tension in the core.
- Rushing the taps: Speed often hides poor control, so prioritize clean reps.
FAQ
What muscles does the Kneeling Shoulder Tap work?
The Kneeling Shoulder Tap mainly works the core muscles, especially the abs and deep stabilizers. In addition, it trains the shoulders, chest, triceps, serratus anterior, glutes, and lower-back stabilizers.
Is the Kneeling Shoulder Tap good for beginners?
Yes. Because the knees stay on the floor, this version is easier than the full plank shoulder tap. Therefore, it is a strong beginner option for learning core bracing and shoulder stability.
Should my hips move during the exercise?
A small weight shift is normal. However, large hip rotation or side-to-side swinging means the movement is too fast or the base is too narrow. Slow down and widen your knees if needed.
How is this different from a full plank shoulder tap?
The kneeling version uses the knees for support, so it places less demand on the core and shoulders. As a result, it is better for beginners or for anyone practicing control before moving to the full plank version.
Can I do Kneeling Shoulder Taps every day?
You can include them often if they feel comfortable and controlled. However, if your wrists, shoulders, or lower back feel irritated, reduce volume and allow recovery.
How do I make the Kneeling Shoulder Tap harder?
First, slow each tap and pause briefly at the shoulder. Then, bring the knees closer together. Finally, progress to a full plank shoulder tap when your hips stay steady.
Recommended Equipment (Optional)
- Exercise Mat — adds comfort under the knees and improves floor support
- Extra Thick Yoga Mat — useful if your knees need more cushioning during kneeling plank work
- Push-Up Handles — can reduce wrist extension for users who need a more neutral grip
- Non-Slip Workout Gloves — improve hand grip and comfort during floor-based exercises
- Core Sliders — optional progression tool for more advanced plank and core stability drills
Tip: Equipment is optional. For this exercise, the most important tool is a stable floor surface that allows your hands to stay planted and your knees to feel comfortable.