Plank Walk-Up (Plank to Push-Up): Form, Sets & Reps, Tips + FAQ
Learn the Plank Walk-Up (Plank to Push-Up) for core stability, shoulder endurance, and anti-rotation strength. Step-by-step form, sets by goal, common mistakes, FAQs, and recommended equipment.
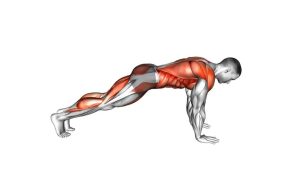
Plank Walk-Up (Plank to Push-Up)
This movement is less about speed and more about control. The goal is to keep your torso stable as your arms move—no twisting, no sagging, and no “piking” the hips. If your hips sway side-to-side, slow down, widen your stance, and shorten the range until you can keep the reps clean.
Quick Overview
| Body Part | Core |
|---|---|
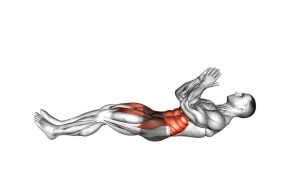
| Primary Muscle | Core stabilizers (Transverse abdominis, Obliques, Rectus abdominis) |
| Secondary Muscle | Shoulders (anterior delts), Triceps, Serratus anterior, Glutes (stability) |
| Equipment | None (optional: exercise mat, timer) |
| Difficulty | Intermediate (core control + shoulder endurance) |
Sets & Reps (By Goal)
- Core stability (quality reps): 3–5 sets × 6–10 reps (45–75 sec rest)
- Shoulder & triceps endurance: 3–4 sets × 10–16 reps (30–60 sec rest)
- Conditioning / fat-loss circuits: 4–8 rounds × 20–40 sec work (20–40 sec rest)
- Warm-up activation: 2–3 sets × 5–8 reps (slow tempo, perfect control)
Progression rule: Earn progress by reducing hip sway first, then adding reps/time. Next progressions: slower negatives, narrower stance, or adding a light vest.
Setup / Starting Position
- Start in a high plank: Hands under shoulders, elbows locked but not hyperextended.
- Foot stance for stability: Set feet slightly wider than hip-width to reduce rocking.
- Brace the core: Ribs down, pelvis neutral—avoid arching the low back.
- Squeeze glutes lightly: This helps keep the hips level and the spine neutral.
- Neck neutral: Eyes on the floor a few inches ahead of your hands.
Tip: If wrists bother you, use push-up handles, dumbbells as handles, or perform the drill on fists (neutral wrist).
Execution (Step-by-Step)
- Shift slightly: Transfer a small amount of weight to one hand without twisting your hips.
- Lower to forearm #1: Place your first forearm down directly under the shoulder.
- Lower to forearm #2: Bring the other forearm down—now you’re in a forearm plank.
- Press up (palm #1): Plant one palm under the shoulder and press to straighten the arm.
- Press up (palm #2): Plant the other palm and return to a strong high plank.
- Alternate the lead arm: Switch which side goes first each rep to keep shoulders balanced.
Pro Tips & Common Mistakes
- Go slow to stay stable: Control beats speed—especially if hips twist.
- Hands & elbows under shoulders: Don’t reach forward and overload the shoulders.
- Avoid low-back sag: Keep ribs down and glutes lightly engaged.
- Don’t hike hips: Piking turns it into a different movement and reduces core demand.
- Alternate sides: Leading with one arm only can irritate one shoulder over time.
- Use a metronome tempo: Example: 1–2 sec down, 1 sec pause, 1–2 sec up.
FAQ
Where should I feel the plank walk-up?
Mostly in the core (especially obliques for anti-rotation), plus shoulders and triceps. If you feel it mainly in the low back, reset your ribs/pelvis and shorten the set.
How do I make it easier?
Use an incline (hands on a bench/couch), widen your stance, and move slower. You can also drop to knees for a controlled regression.
How do I make it harder?
Narrow your stance, slow the tempo, add a brief pause in forearm plank, increase time under tension, or wear a light weighted vest.
Should I do reps or timed sets?
For technique and strength, use reps. For conditioning, use time (20–40 seconds). Choose the option that lets you keep hips stable and spine neutral.
What if my wrists or shoulders hurt?
Try handles (push-up bars), an incline, or shorten your range. Keep hands stacked under shoulders. If pain persists or feels sharp, stop and seek professional guidance.
Recommended Equipment (Optional)
- Non-Slip Exercise Mat — improves grip and comfort for forearms and hands
- Push-Up Handles / Bars — reduces wrist extension and helps keep a neutral wrist position
- Interval Timer — perfect for timed sets, circuits, and progressive overload
- Adjustable Weighted Vest — adds load for advanced progressions (start light and prioritize form)
- Slider Discs (Optional) — useful for core circuits (not required for this movement)
Tip: You don’t need gear to get results. The best upgrade is clean reps and consistent progression.