Kneeling Plank: Proper Form, Core Benefits, Sets, Tips & FAQ
Learn the Kneeling Plank to build core stability with joint-friendly support. Includes form cues, sets, mistakes, FAQs, and equipment tips.
Kneeling Plank
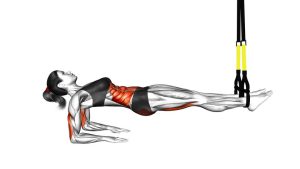
This exercise works best when the body stays quiet and controlled. In the uploaded video, the movement is mostly a static kneeling forearm plank with small natural adjustments through the hips and torso. Therefore, the focus is not on fast repetitions. Instead, the goal is to maintain steady tension through the abs, glutes, shoulders, and thighs while breathing calmly.
Additionally, the kneeling setup makes the plank easier to learn than a full forearm plank. As a result, beginners can practice correct core engagement before progressing to longer holds or a full plank from the toes.
Quick Overview
| Body Part | Core |
|---|---|
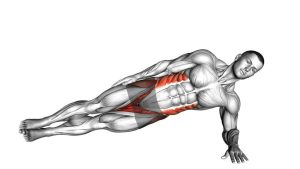
| Primary Muscle | Rectus abdominis and transverse abdominis |
| Secondary Muscle | Obliques, glutes, shoulders, quadriceps, and spinal stabilizers |
| Equipment | No equipment required; optional exercise mat for knee and forearm comfort |
| Difficulty | Beginner |
Sets & Reps (By Goal)
- Beginner core control: 2–3 sets × 15–25 second holds, resting 45–60 seconds between sets.
- Core endurance: 3–4 sets × 25–45 second holds, resting 45–75 seconds between sets.
- Warm-up activation: 1–2 sets × 15–30 second holds before strength training or core work.
- Posture and bracing practice: 2–3 sets × 20–30 second holds with slow, controlled breathing.
- Progression toward full plank: 3 sets × 30–45 second holds before moving to toe-supported planks.
Progression rule: Add time only when your hips stay level, your lower back stays neutral, and your shoulders remain stable. However, if your form breaks, shorten the hold before increasing difficulty.
Setup / Starting Position
- Start on the floor: Place your knees on a mat and position your forearms in front of you.
- Set your elbows: Keep the elbows under or slightly in front of the shoulders for stable support.
- Place your forearms: Keep the forearms on the floor with the hands relaxed or lightly clasped.
- Align your body: Create a straight diagonal line from shoulders to hips to knees.
- Brace gently: Tighten your abs as if preparing for a light punch, then squeeze your glutes lightly.
- Keep the head neutral: Look slightly down toward the floor without dropping the head or lifting the chin.
In the video, the knees stay planted throughout the movement. Therefore, avoid lifting onto the toes unless you are intentionally progressing to a standard forearm plank.
Execution (Step-by-Step)
- Set your forearm base: Press your forearms gently into the floor and keep the shoulders stable.
- Brace the core: Draw the ribs slightly down and tighten the midsection without holding your breath.
- Hold the kneeling plank: Maintain the line from shoulders through hips to knees.
- Control the hips: Prevent the hips from sagging toward the floor or lifting too high.
- Breathe steadily: Take slow breaths while keeping the abdomen firm and the glutes lightly engaged.
- Stay still: Allow only small natural adjustments, but avoid rocking, twisting, or collapsing.
- Finish with control: Lower your hips back gently or sit back toward your heels when the set is complete.
Pro Tips & Common Mistakes
Pro Tips
- Push the floor away: Lightly press through your forearms to keep the upper back and shoulders active.
- Keep your ribs stacked: Pull the ribs slightly toward the pelvis to reduce lower-back arching.
- Use short holds first: Good 20-second holds are better than long holds with poor alignment.
- Squeeze the glutes lightly: This helps the hips stay aligned and reduces pressure on the lower back.
- Keep breathing: Smooth breathing improves control and prevents unnecessary neck or shoulder tension.
Common Mistakes
- Letting the hips sag: This shifts stress into the lower back and reduces core engagement.
- Raising the hips too high: This makes the exercise easier but removes tension from the abs.
- Holding the breath: This creates extra pressure and makes the plank harder to control.
- Shrugging the shoulders: Keep the neck long and the shoulders away from the ears.
- Looking forward too much: Keep the head neutral instead of craning the neck upward.
FAQ
What muscles does the kneeling plank work?
The kneeling plank mainly works the core muscles, especially the rectus abdominis and transverse abdominis. It also trains the obliques, glutes, shoulders, thighs, and spinal stabilizers because the body must stay aligned during the hold.
Is the kneeling plank good for beginners?
Yes. The kneeling plank is an excellent beginner variation because the knees reduce the load compared with a full plank. As a result, you can learn proper bracing and alignment before progressing to harder plank variations.
How long should I hold a kneeling plank?
Start with 15–25 seconds per set. Then, gradually build toward 30–45 seconds while keeping your hips level and your lower back neutral. However, if your form breaks, stop the set and reset.
Should I feel the kneeling plank in my lower back?
You should mainly feel your abs, glutes, shoulders, and thighs working. If your lower back feels strained, your hips may be sagging, or your ribs may be flaring. Shorten the hold and brace the abs more gently.
How do I make the kneeling plank harder?
First, increase the hold time. Next, try longer sets with cleaner breathing. After that, progress to a full forearm plank from the toes, but only when you can maintain strong alignment without hip sagging.
Recommended Equipment
- Thick Exercise Mat — adds comfort for the knees and forearms during longer plank holds.
- Yoga Knee Pad — provides extra cushioning if kneeling pressure feels uncomfortable.
- Forearm Plank Pad — supports the elbows and forearms during static core holds.
- Interval Fitness Timer — helps track hold duration, rest time, and plank progression.
- Core Sliders — useful for future plank progressions once the kneeling plank feels easy.
Tip: Equipment is optional for this exercise. However, a comfortable mat can make the kneeling position easier to hold with better focus and less joint distraction.