Resistance Band Upper Body Dead Bug: Core Stability, Form, Sets & Tips
Learn the Resistance Band Upper Body Dead Bug for core stability, shoulder control, and anti-extension strength with step-by-step form, sets, tips, and FAQs.
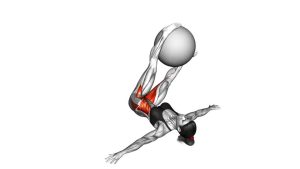
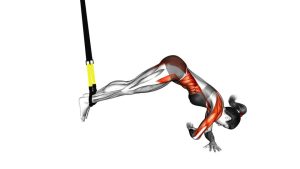
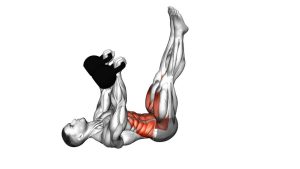
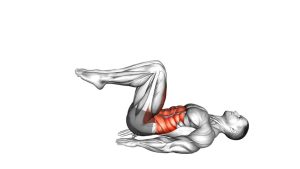
Resistance Band Upper Body Dead Bug
This variation works best when each rep is slow, quiet, and controlled. Instead of rushing the leg extension, focus on keeping the ribs down, the pelvis steady, and the arms locked in position. In addition, the band should stay under light-to-moderate tension throughout the full set.
Quick Overview
| Body Part | Core |
|---|---|
| Primary Muscle | Rectus abdominis and deep core stabilizers |
| Secondary Muscle | Hip flexors, transverse abdominis, obliques, shoulders, and lats |
| Equipment | Resistance band anchored overhead or behind the body |
| Difficulty | Beginner to Intermediate |
Sets & Reps (By Goal)
- Core control: 2–3 sets × 6–10 reps per side with a slow tempo.
- Warm-up activation: 1–2 sets × 5–8 reps per side before strength training.
- Anti-extension strength: 3–4 sets × 8–12 reps per side with steady band tension.
- Beginner technique practice: 2 sets × 5–6 reps per side using a shorter leg range.
Progression rule: First improve control and breathing. Then, increase reps, extend the legs farther, or use slightly stronger band tension.
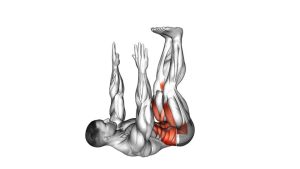
Setup / Starting Position
- Lie on your back: Set up in a supine position with your head, upper back, and hips supported by the floor.
- Anchor the band: Secure the resistance band behind or above your head so it pulls your arms slightly backward.
- Hold the band: Extend your arms upward and keep light tension through the band without shrugging your shoulders.
- Set the legs: Bring both knees above the hips with the knees bent around 90 degrees.
- Brace gently: Pull the ribs down and keep the lower back close to the floor before the first rep begins.
The setup should feel stable before the legs move. If the band feels too strong, move closer to the anchor point or use a lighter band.
Execution (Step-by-Step)
- Start in tabletop: Keep both knees bent, hips flexed, and arms extended while holding the resistance band.
- Lock the upper body: Maintain steady arm position and resist the band pulling your shoulders backward.
- Extend one leg: Slowly lower one leg toward the floor while keeping the opposite knee bent.
- Control the bottom position: Stop before your lower back arches or your ribs flare upward.
- Return with control: Bring the working leg back to tabletop without using momentum.
- Alternate sides: Repeat the same pattern with the opposite leg while keeping the band tension constant.
Pro Tips & Common Mistakes
- Keep the ribs down: If your ribs lift, the lower back usually starts to arch next.
- Move slowly: A slower leg extension makes the core work harder and improves control.
- Do not pull with the arms: The arms should hold position, not turn the movement into a pullover.
- Avoid neck tension: Keep the head relaxed on the floor and breathe smoothly.
- Use a lighter band when needed: Too much resistance can shift the work away from the core.
- Shorten the leg range: If your back arches, stop the leg higher above the floor.
- Keep the movement alternating: Do not extend both legs at once unless you already have strong core control.
FAQ
What muscles does the Resistance Band Upper Body Dead Bug work?
It mainly trains the core, especially the abs and deep stabilizers that resist lower-back extension. In addition, the shoulders and lats work isometrically because the arms hold the band steady.
Should my lower back stay on the floor?
Yes. The lower back should stay controlled and close to the floor. If it arches during the leg extension, reduce the range of motion or use an easier band.
Is this exercise good for beginners?
Yes, it can be beginner-friendly when performed with a light band and a short leg range. However, beginners should prioritize control before adding more tension.
Why add a resistance band to a dead bug?
The band adds an upper-body stability challenge. Therefore, the core must work harder to keep the ribs, pelvis, and shoulders controlled while the legs move.
How do I make this exercise harder?
You can extend the legs closer to the floor, slow down the tempo, add reps, or use a slightly stronger band. Even so, only progress if your lower back stays stable.
Recommended Equipment
- Resistance Bands Set — essential for creating the upper-body band tension used in this exercise
- Door Anchor for Resistance Bands — helps secure the band safely behind or above the body
- Thick Exercise Mat — improves comfort for the back, hips, and shoulders during floor work
- Mini Resistance Bands — useful for other core activation drills and lower-body stability work
- Foam Roller — helpful for warm-ups, mobility work, and post-training recovery
Tip: Choose a band that lets you keep your arms steady without forcing your shoulders to shrug or your ribs to flare.