Reverse Plank on Elbows: Form, Benefits, Sets, Tips & FAQ
Learn the Reverse Plank on Elbows for core stability, glute strength, posture, and posterior-chain control with step-by-step form tips.
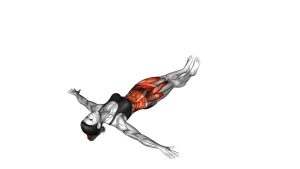
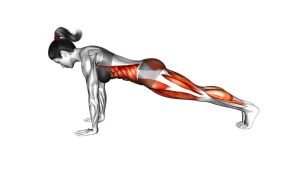
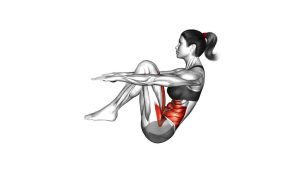
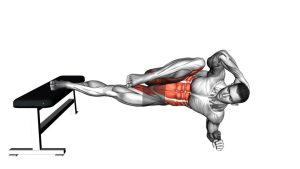
Reverse Plank on Elbows
This exercise works best when the body moves as one controlled unit. First, the elbows press into the floor. Then, the hips lift until the torso and legs form a long diagonal line. During the hold, the glutes stay active, the ribs stay controlled, and the shoulders remain stable. Therefore, the goal is not to lift as high as possible; instead, the goal is to create a clean line without letting the hips sag or the neck collapse backward.
Quick Overview
| Body Part | Core |
|---|---|
| Primary Muscle | Glutes, deep core stabilizers, and posterior-chain muscles |
| Secondary Muscle | Hamstrings, shoulders, triceps, upper back, spinal stabilizers |
| Equipment | No equipment required; exercise mat optional |
| Difficulty | Beginner to Intermediate |
Sets & Reps (By Goal)
- Core stability: 3–4 sets × 15–30 second holds with 45–60 seconds rest
- Glute activation: 2–3 sets × 8–12 controlled lifts with a 2–3 second hold at the top
- Posture and shoulder endurance: 2–4 sets × 20–40 second holds with calm breathing
- Beginner practice: 2–3 sets × 10–20 second holds, stopping before form breaks
Progression rule: Add time before adding difficulty. Once you can hold a straight line without hip sagging, increase each hold by 5–10 seconds or add another set.
Setup / Starting Position
- Sit on the floor: Extend both legs straight in front of you with the heels on the ground.
- Place the elbows behind you: Keep the elbows under or slightly behind the shoulders, with the forearms resting on the floor.
- Set the upper body: Open the chest gently, pull the shoulders away from the ears, and avoid shrugging.
- Brace the core: Tighten the midsection lightly before lifting, so the ribs and pelvis stay controlled.
- Prepare the legs: Keep the legs straight, feet relaxed, and heels planted as your main lower-body contact point.
If the floor feels uncomfortable under the elbows, use a padded exercise mat. However, avoid overly soft surfaces because they can make shoulder positioning less stable.
Execution (Step-by-Step)
- Press into the elbows: Push your elbows and forearms firmly into the floor to create a stable base.
- Lift the hips: Squeeze the glutes and raise the hips upward until your body forms a straight line from shoulders to heels.
- Hold the top position: Keep the core tight, chest open, and legs straight while breathing steadily.
- Maintain alignment: Do not let the hips drop, the shoulders shrug, or the head fall back excessively.
- Lower with control: Bring the hips back down slowly until you return to the seated starting position.
Pro Tips & Common Mistakes
- Drive through the elbows: Stable elbows help protect the shoulders and keep the chest open.
- Squeeze the glutes: Glute tension helps lift the hips and prevents the lower back from taking over.
- Avoid neck collapse: Keep the neck long instead of letting the head drop backward without control.
- Do not over-arch: A strong reverse plank should feel long and stable, not compressed in the low back.
- Keep the legs straight: Bending the knees changes the exercise and reduces the long-lever challenge.
- Use shorter holds first: Clean 15-second holds are better than long holds with sagging hips.
FAQ
What muscles does the Reverse Plank on Elbows work?
It mainly works the glutes, core stabilizers, hamstrings, shoulders, triceps, and upper back. In addition, it trains full-body alignment because the hips, torso, and legs must stay connected during the hold.
Is the Reverse Plank on Elbows good for beginners?
Yes, it can be beginner-friendly when performed with short holds and controlled form. However, people with shoulder discomfort should start carefully and reduce the range if needed.
Should I feel this exercise in my lower back?
You may feel some spinal stabilizer activity, but the lower back should not feel compressed or painful. If the low back takes over, squeeze the glutes harder, brace the core, and lower the hips slightly.
How long should I hold the Reverse Plank on Elbows?
Start with 10–20 seconds per set. Then, gradually build toward 30–45 seconds as long as your hips stay lifted, your shoulders stay stable, and your breathing remains controlled.
What is the biggest mistake during this exercise?
The most common mistake is letting the hips sag. This reduces glute engagement and increases stress on the lower back. Therefore, shorter holds with better alignment are usually more effective.
Recommended Equipment (Optional)
- Thick Exercise Mat — adds elbow comfort and improves floor support during holds
- Non-Slip Yoga Mat — helps keep the elbows and heels from sliding
- Foam Roller — useful for warming up the upper back, hips, and hamstrings
- Resistance Bands Set — helpful for glute activation and posture work before the exercise
- Adjustable Ankle Weights — optional advanced progression for stronger athletes only
Tip: Equipment is optional for this exercise. However, a comfortable mat can improve consistency because the elbows stay supported throughout the hold.