Supported Dip Leg Raise on a Padded Stool: Core Form, Sets & Tips
Learn the supported dip leg raise on a padded stool to train abs and hip flexors with control. Includes form, sets, tips, FAQ, and gear.
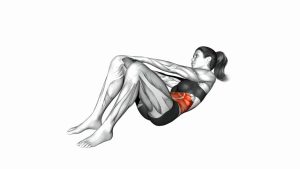
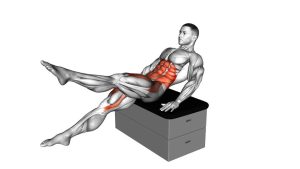
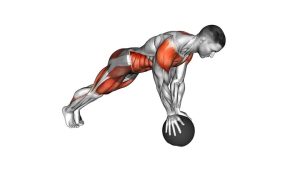
Supported Dip Leg Raise on a Padded Stool
This exercise works best when the movement stays smooth, slow, and deliberate. Because the hands support the body beside the hips, the upper body can stay stable while the legs move through a clean raising and lowering pattern. In addition, the slight backward lean helps create space for the legs to lift without needing momentum.
Focus on keeping the legs together, the torso steady, and the shoulders relaxed. However, avoid rushing the lowering phase because that is where many people lose core tension. Instead, lower the legs with control and stop before your feet fully relax on the floor.
Quick Overview
| Body Part | Core |
|---|---|
| Primary Muscle | Rectus abdominis and hip flexors |
| Secondary Muscle | Transverse abdominis, obliques, quadriceps, and shoulder stabilizers |
| Equipment | Padded stool, bench, or stable elevated seat |
| Difficulty | Beginner to Intermediate, depending on leg height and control |
Sets & Reps (By Goal)
- Beginner control: 2–3 sets × 6–10 reps with a slow, clean tempo
- Core endurance: 3 sets × 10–15 reps while keeping the legs hovering between reps
- Strength focus: 3–4 sets × 8–12 reps with a 1–2 second pause near the top
- Warm-up activation: 1–2 sets × 8–10 controlled reps before a core workout
- Finisher option: 2 sets × 12–20 reps only if form stays strict
Progression rule: First improve control and range. Then, add reps, extend the pause, or slow the lowering phase. Do not progress by swinging the legs higher.
Setup / Starting Position
- Sit on a padded stool: Choose a stable stool or bench that does not slide. Sit near the front edge so the legs can move freely.
- Place your hands beside your hips: Grip the stool or press the palms down for support. Keep the elbows extended or slightly bent.
- Set your torso angle: Lean slightly backward while keeping the chest open and the spine controlled.
- Extend your legs forward: Keep both legs together and position the feet slightly above the floor if possible.
- Brace your core: Pull the ribs down gently and prepare to lift the legs without rocking the upper body.
The stool should feel solid before you begin. If it wobbles, replace it with a stronger bench or a more stable padded platform.
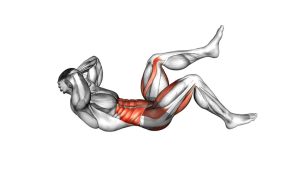
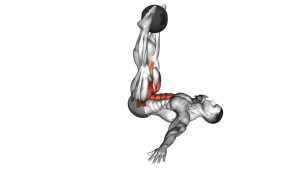
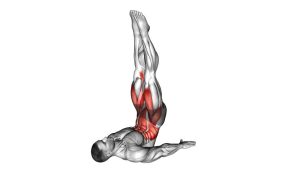
Execution (Step-by-Step)
- Start from a supported seated position: Keep your hands planted beside your hips and maintain a slight backward lean.
- Lift both legs together: Raise the legs forward and upward using the abs and hip flexors. Keep the motion smooth.
- Keep the torso steady: Press lightly into the stool with your hands so your upper body does not swing.
- Reach the top with control: Lift until your legs are around hip height or until your range stays clean.
- Pause briefly: Hold the top position for a moment while keeping the legs together and the core tight.
- Lower slowly: Bring the legs down under control. Do not drop them quickly.
- Stop before relaxing: Return near the starting hover position, then begin the next rep without losing tension.
Pro Tips & Common Mistakes
Pro Tips
- Use your hands for support, not momentum: Press down enough to stabilize your body, but do not bounce through the movement.
- Control the lowering phase: Lowering slowly increases core tension and prevents the legs from simply dropping.
- Keep your legs together: This helps maintain clean alignment and makes the movement easier to control.
- Use a small range first: A shorter clean range is better than a higher lift with swinging.
- Breathe steadily: Exhale as the legs lift, then inhale lightly as they lower.
Common Mistakes
- Swinging the legs: Momentum reduces the core challenge and makes the exercise less effective.
- Leaning too far back: Excessive leaning can turn the drill into a balance struggle instead of a controlled core exercise.
- Dropping the feet to the floor: Fully relaxing at the bottom removes tension from the abs.
- Shrugging the shoulders: Keep the neck long and shoulders down so the upper body stays stable.
- Forcing straight legs: If straight legs create back strain, use a small knee bend while keeping control.
FAQ
What muscles does the supported dip leg raise on a padded stool work?
It mainly works the rectus abdominis and hip flexors. Additionally, the obliques, transverse abdominis, quads, and shoulder stabilizers help keep the body steady.
Is this exercise good for beginners?
Yes, it can be beginner-friendly when the range is small and the tempo is slow. However, beginners should avoid lifting too high if they cannot control the lower back and torso.
Should my feet touch the floor between reps?
Ideally, your feet should hover slightly above the floor to keep tension on the core. Still, if you need to reset your form, you can briefly touch down and restart with control.
Why do I feel this mostly in my hip flexors?
Hip flexor involvement is normal because the legs are lifting from the hips. To increase abdominal tension, brace the ribs down, avoid swinging, and lower the legs slowly.
Can I bend my knees during this exercise?
Yes. A slight knee bend is a useful modification if straight legs feel too difficult or if your lower back starts to arch. Over time, you can work toward straighter legs.
How can I make the exercise harder?
You can slow the lowering phase, add a short pause at the top, increase the number of reps, or keep the legs hovering between repetitions. However, only progress if your torso stays stable.
Recommended Equipment (Optional)
- Padded Workout Stool — useful for supported seated core movements and controlled leg raise variations
- Adjustable Weight Bench — a stable alternative when a padded stool is not available
- Non-Slip Exercise Mat — helps keep the stool or bench area safer during home workouts
- Adjustable Ankle Weights — optional progression for advanced users only after bodyweight control is solid
- Core Sliders — useful for pairing with other core stability exercises in a home routine
Tip: Prioritize stability before intensity. A firm stool or bench is more important than extra resistance for this exercise.