90 Degree Heel Touch: Core Form, Oblique Tips, Sets & FAQ
Learn the 90 Degree Heel Touch for stronger obliques and core control. Includes setup, step-by-step form, sets, mistakes, FAQs, and equipment.
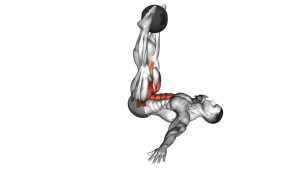
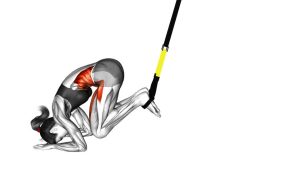
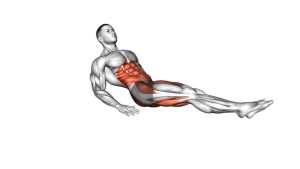
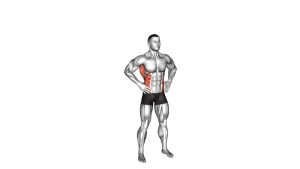
90 Degree Heel Touch
This exercise works best when the upper torso stays slightly elevated while the ribs move side to side. Instead of pulling hard with the neck, focus on sliding your hand toward the same-side heel through your waist. Therefore, the goal is not to sit up high, but to create a small, controlled side crunch with steady breathing.
Quick Overview
| Body Part | Core |
|---|---|
| Primary Muscle | Obliques |
| Secondary Muscle | Rectus abdominis, deep core stabilizers |
| Equipment | No equipment required; exercise mat optional |
| Difficulty | Beginner |
Sets & Reps (By Goal)
- Core activation: 2 sets × 10–12 touches per side with slow control.
- Beginner strength: 2–3 sets × 12–16 touches per side with 45–60 seconds rest.
- Muscular endurance: 3–4 sets × 20–30 total alternating touches with steady breathing.
- Warm-up use: 1–2 sets × 10 touches per side before a core or full-body session.
Progression rule: First, improve control and range. Then, add repetitions. Finally, slow the tempo to increase time under tension.
Setup / Starting Position
- Lie on your back: Position yourself flat on the floor or on an exercise mat.
- Bend your knees: Keep both knees bent at about 90 degrees, with your feet flat and stable.
- Place your feet evenly: Set your feet about hip-width apart so each heel is reachable.
- Extend your arms: Keep your arms long by your sides, with your hands pointing toward your heels.
- Lift slightly: Raise your head and shoulders just enough to keep light abdominal tension.
- Set your neck: Keep your neck neutral and avoid pulling the chin aggressively toward the chest.
Tip: If your neck gets tired before your core, lower the shoulders briefly, reset, and continue with a smaller range.
Execution (Step-by-Step)
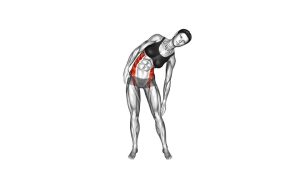
- Brace gently: Tighten your core enough to keep your lower back controlled against the floor.
- Reach to one side: Side-bend your torso and slide one hand toward the same-side heel.
- Keep the feet planted: Do not let your heels shift or lift as you reach.
- Return to center: Move your torso back to the middle with control instead of dropping down.
- Reach to the opposite side: Repeat the same side-bending motion toward the other heel.
- Continue alternating: Maintain a smooth rhythm while keeping the shoulders slightly lifted.
Pro Tips & Common Mistakes
- Reach from the ribs, not the arm: Let the torso side-bend instead of simply stretching the hand forward.
- Keep both feet planted: Stable feet help keep tension focused on the core.
- Avoid neck strain: Keep your gaze steady and avoid yanking the head from side to side.
- Do not rush: A slower tempo makes the obliques work harder and reduces sloppy momentum.
- Stay slightly lifted: Keep the shoulders off the floor during the set if you can do so without neck discomfort.
- Control the center return: Do not bounce through the middle; reset your ribs before reaching to the other side.
- Use a smaller range if needed: You do not have to touch the heel if doing so breaks your form.
FAQ
What muscles does the 90 Degree Heel Touch work?
The exercise mainly targets the obliques. In addition, the rectus abdominis and deep core muscles help keep the torso lifted and controlled.
Should I actually touch my heels?
Touching the heels is useful if you can do it without twisting, jerking, or lifting your feet. However, controlled side bending matters more than reaching farther.
Why does my neck feel tired during heel touches?
Your neck may be working too hard if your head is pulled forward or your shoulders are lifted too high. Therefore, reduce the lift, keep your chin relaxed, and move from your ribs.
Is the 90 Degree Heel Touch good for beginners?
Yes. It is beginner-friendly because it uses bodyweight only and a short range of motion. Still, beginners should move slowly and stop before the neck or lower back takes over.
How can I make this exercise harder?
You can slow the tempo, add more total touches, or hold the side reach briefly. However, do not add difficulty until your feet stay planted and your torso stays controlled.
Recommended Equipment (Optional)
- Exercise Mat — adds comfort for floor-based core training.
- Thick Yoga Mat — helpful if your spine or shoulders feel pressure on hard floors.
- Ab Workout Mat — supports repeated floor core exercises with better cushioning.
- Non-Slip Fitness Mat — helps keep your body stable during alternating side reaches.
- Core Sliders — useful for progressing into other controlled core and oblique drills.
Tip: Equipment is optional for this exercise. However, a comfortable non-slip mat can make the movement easier to control and more comfortable on the floor.