Seated 8 Leg Crunch: Form, Core Benefits, Sets, Tips & FAQ
Learn the Seated 8 Leg Crunch for abs, hip flexor control, and seated core strength with step-by-step form, sets, tips, FAQs, and equipment.
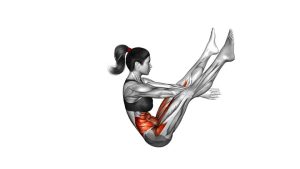
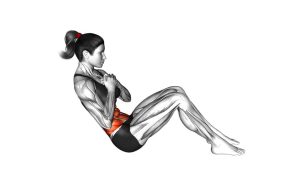
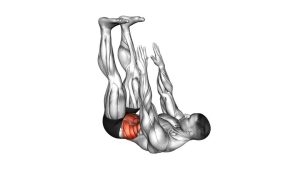
Seated 8 Leg Crunch
This exercise is best performed with a controlled rhythm. First, sit on the floor with your hands placed beside or slightly behind your hips for support. Then, lean your torso back just enough to challenge your core while keeping your chest lifted. As you pull your knees in, bring your torso slightly forward. As you extend your legs, lean back again without collapsing through the lower back.
Unlike a basic crunch, the Seated 8 Leg Crunch keeps the body balanced in a seated position. Therefore, your abs must work to control both the inward tuck and the outward leg extension. In addition, the hip flexors assist the movement, especially when the legs straighten and hover above the floor.
Quick Overview
| Body Part | Core |
|---|---|
| Primary Muscle | Rectus abdominis |
| Secondary Muscle | Hip flexors, transverse abdominis, obliques, lower abdominal region, deep core stabilizers |
| Equipment | No equipment required; optional exercise mat for comfort |
| Difficulty | Beginner to Intermediate, depending on leg height, tempo, and control |
Sets & Reps (By Goal)
- Beginner core control: 2–3 sets × 6–10 reps with a short rest between reps if needed.
- Core endurance: 3–4 sets × 12–20 reps using a steady, controlled tempo.
- Abs and hip flexor strength: 3–4 sets × 8–15 reps with slower leg extension and a 1-second pause near the tuck.
- Home workout finisher: 2–3 rounds × 20–30 seconds while maintaining clean form.
- Technique practice: 2 sets × 5–8 slow reps, focusing on balance and smooth breathing.
Progression rule: Start with bent knees and a shorter range. Then, gradually extend the legs farther as your core control improves. However, never increase range if your lower back starts to arch or your legs swing.
Setup / Starting Position
- Sit on the floor: Place your hips on a comfortable surface and extend your legs forward.
- Set your hands: Put your hands beside or slightly behind your hips for support, just as shown in the video.
- Lean back slightly: Angle your torso backward until your abs engage, but do not collapse into a rounded lower-back position.
- Lift or lightly hover the legs: Keep the legs extended forward with control. If needed, allow the heels to stay close to the floor.
- Brace your core: Pull the ribs down slightly and keep your stomach firm before starting the first rep.
- Keep your neck neutral: Look forward naturally instead of throwing the head back or tucking the chin aggressively.
If balance feels difficult, place the hands wider on the floor and reduce the leg extension range. This adjustment keeps the exercise safer while still training the core.
Execution (Step-by-Step)
- Begin in the seated lean-back position: Keep your hands on the floor, your torso slightly reclined, and your legs extended forward.
- Pull the knees in: Bend both knees and draw them toward your chest while bringing your torso slightly forward.
- Compress the abs: At the top of the movement, let your ribs and pelvis move closer together without jerking.
- Pause briefly: Hold the tucked position for a moment so the abs stay active instead of rushing through the rep.
- Extend the legs forward: Slowly straighten your legs as your torso leans back again.
- Control the bottom position: Stop before your lower back loses position or your feet drop heavily to the floor.
- Repeat with rhythm: Continue the tuck-and-extend pattern using smooth, repeatable reps.
Pro Tips & Common Mistakes
Pro Tips
- Use your hands for support, not pulling: The hands should help you balance, while the abs control the crunch.
- Exhale as the knees come in: This helps the ribs drop and improves abdominal compression.
- Move both legs together: Keep the knees tracking evenly so one side does not dominate the movement.
- Keep the tempo smooth: A slower extension phase makes the exercise more effective and reduces momentum.
- Stay tall through the chest: Although the torso moves, avoid collapsing into a sloppy rounded posture.
- Control the end range: Stop the legs before the lower back arches or the hips feel pinched.
Common Mistakes
- Swinging the legs: Momentum reduces core tension and makes the exercise less effective.
- Dropping the feet hard: Letting the legs fall removes control from the abs and may stress the lower back.
- Leaning too far back: Excessive recline can shift stress away from the abs and into the hip flexors or lower back.
- Holding the breath: Breath-holding increases tension and makes the movement harder to control.
- Shrugging the shoulders: Keep the shoulders relaxed even though the hands support your position.
- Rushing reps: Fast reps often hide poor control, especially during the leg extension phase.
FAQ
What muscles does the Seated 8 Leg Crunch work?
The Seated 8 Leg Crunch mainly targets the rectus abdominis. However, it also trains the hip flexors, transverse abdominis, obliques, and deep stabilizers because the body must stay balanced while the legs move in and out.
Is the Seated 8 Leg Crunch good for beginners?
Yes, beginners can use it, especially with a shorter range of motion. For better control, keep the heels closer to the floor, bend the knees more, and use the hands for extra balance.
Should my feet touch the floor between reps?
They can lightly touch if you need a beginner-friendly version. However, keeping the feet hovering makes the exercise more challenging because the abs must stay active throughout the full rep.
Why do I feel this exercise in my hip flexors?
Some hip flexor involvement is normal because the legs are moving toward and away from the torso. Nevertheless, if the hip flexors dominate completely, reduce the range, slow down, and focus on curling the knees in with abdominal control.
How can I make the Seated 8 Leg Crunch harder?
To make it harder, extend the legs farther, slow down the lowering phase, pause longer in the tucked position, or keep the feet hovering the entire time. However, only progress when your lower back stays controlled.
How can I make it easier?
To make it easier, keep the knees bent, use a smaller range, place your hands wider on the floor, or let the heels lightly tap down between reps. These changes reduce the load while keeping the same movement pattern.
Is this exercise the same as a seated knee tuck?
It is very similar to a seated knee tuck. In this version, the visible movement includes a controlled seated lean-back, a double-leg extension, and a knee tuck toward the chest, making it a strong seated crunch variation.
Recommended Equipment (Optional)
- Exercise Mat — adds comfort under the hips and hands during seated floor crunches.
- Thick Yoga Mat — useful if the floor feels hard during seated core training.
- Core Sliders — helpful for related knee-tuck and ab-control progressions.
- Adjustable Ankle Weights — advanced option for increasing leg-control difficulty once form is solid.
- Small Pilates Ball — useful for core activation drills, support variations, and controlled ab progressions.
Tip: Equipment is optional for this exercise. Start with bodyweight first, then add tools only when your reps stay smooth and your lower back remains comfortable.