Standing Side Bend: Core Mobility, Oblique Form, Sets & Tips
Learn the Standing Side Bend to improve oblique control, lateral core mobility, and posture. Includes setup, form steps, mistakes, FAQs, and equipment.
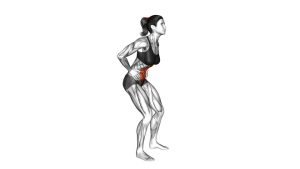
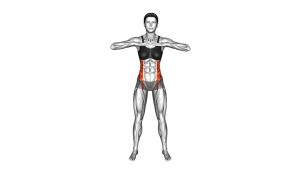
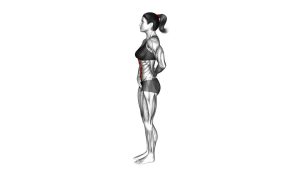
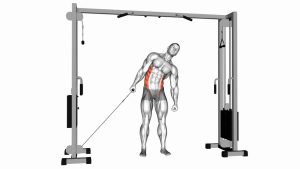
Standing Side Bend
This exercise works best when the movement comes from the torso rather than the shoulder or hips. Because the Standing Side Bend uses a slow standing pattern, it is useful for beginners, warm-ups, mobility sessions, and low-impact core practice. Also, it can help improve awareness of the obliques, especially when each repetition is performed without twisting, leaning forward, or rushing.
Quick Overview
| Body Part | Core |
|---|---|
| Primary Muscle | Obliques |
| Secondary Muscle | Quadratus lumborum, intercostals, spinal stabilizers |
| Equipment | None |
| Difficulty | Beginner |
Sets & Reps (By Goal)
- Mobility warm-up: 2–3 sets × 8–12 reps per side with a slow, relaxed tempo.
- Core control: 3–4 sets × 10–15 reps per side, focusing on clean torso movement.
- Beginner conditioning: 2–3 sets × 12–20 reps per side with short rest between sides.
- Desk-break movement: 1–2 easy sets × 6–10 reps per side to reset posture and reduce stiffness.
Progression rule: First improve control and range of motion. Then, if needed, slow the tempo or add a light hold at the bottom before adding external load.
Setup / Starting Position
- Stand tall: Place your feet about hip-width apart and keep your weight balanced through both feet.
- Set your posture: Keep your chest lifted, ribs controlled, shoulders relaxed, and head neutral.
- Position the arms: Let one arm rest near the side of the body while the other arm reaches overhead.
- Brace lightly: Engage your core just enough to prevent uncontrolled arching or twisting.
- Prepare to bend: Keep your hips steady and think about moving the upper body sideways in one smooth line.
Tip: Start with a small range of motion. As a result, you can learn the pattern without forcing your spine into an uncomfortable position.
Execution (Step-by-Step)
- Reach one arm overhead: Extend the arm upward without shrugging aggressively.
- Begin the side bend: Slowly bend your torso to the opposite side while keeping your feet planted.
- Slide the lower hand naturally: Allow the opposite hand to move down the outside of the thigh as the torso bends.
- Keep the body facing forward: Avoid twisting the chest or rotating the hips during the bend.
- Pause briefly: Hold the side-bent position for a short moment while staying relaxed and controlled.
- Return to center: Use your obliques to bring the torso back upright without bouncing.
- Reset before repeating: Stand tall again, then continue for the planned reps or switch sides.
Pro Tips & Common Mistakes
- Move in the frontal plane: Bend directly to the side instead of leaning forward or rotating backward.
- Keep both feet grounded: Stable feet help the torso move with better control.
- Do not bounce: Bouncing at the bottom can irritate the lower back and reduce muscle control.
- Avoid excessive hip shift: A small natural shift may happen, but the hips should not swing far to one side.
- Reach long, not hard: The overhead arm should lengthen the side body without creating neck or shoulder tension.
- Control the return: The upward phase matters because the obliques help bring the torso back to neutral.
- Use breathing: Exhale gently as you bend, then inhale as you return to standing.
FAQ
What muscles does the Standing Side Bend work?
The Standing Side Bend mainly works the obliques. In addition, it can involve the quadratus lumborum, intercostals, and small spinal stabilizers because the torso must bend and return with control.
Is the Standing Side Bend good for beginners?
Yes. This exercise is beginner-friendly because it uses bodyweight and a simple standing position. However, beginners should keep the range comfortable and avoid forcing the lower back.
Should I use weight for this exercise?
You can use weight later, but first master the bodyweight version. Once your movement is smooth, a light dumbbell may be added carefully. Still, heavy loading is not necessary for most mobility-focused goals.
Where should I feel the Standing Side Bend?
You should feel the side of the waist working and lengthening. Also, you may feel a mild stretch through the side body. You should not feel sharp pain in the spine or pinching in the lower back.
How can I avoid lower-back discomfort?
Keep the movement slow, avoid excessive range, and prevent twisting. Additionally, keep your ribs controlled and return to center with the core instead of snapping upright.
Recommended Equipment (Optional)
- Exercise Mat — useful for warm-up sessions, stretching, and floor-based core exercises.
- Light Dumbbells Set — helpful if you later progress to lightly loaded side bends.
- Resistance Bands Set — great for pairing this movement with standing core and posture drills.
- Foam Roller — useful for thoracic mobility and recovery before or after core training.
- Full-Length Workout Mirror — helps you monitor torso alignment and avoid twisting during each rep.
Tip: Equipment is optional for the Standing Side Bend. For best results, prioritize clean form, steady breathing, and controlled range before adding extra tools.