Medicine Ball Rotary Throw: Core Power, Form, Sets & Tips
Build explosive core rotation with the Medicine Ball Rotary Throw. Learn setup, throwing form, sets, common mistakes, FAQs, and equipment.
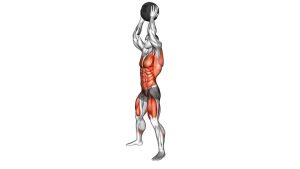
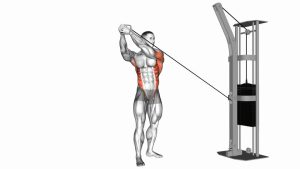
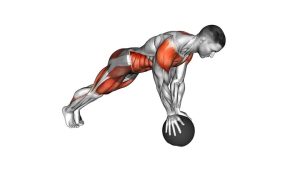
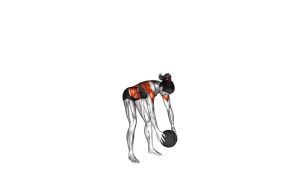
Medicine Ball Rotary Throw
This exercise works best when power starts from the floor and travels through the hips, core, shoulders, and arms. First, the body creates a controlled coil away from the wall. Then, the hips rotate toward the target while the torso follows. Finally, the arms release the medicine ball with force. Because the drill uses the entire kinetic chain, it trains the core to transfer power rather than simply create tension.
For best results, use a ball that moves quickly and allows clean technique. In addition, keep each rep sharp, controlled, and intentional. Although the movement should be explosive, your posture should stay organized from the loading phase through the follow-through.
Quick Overview
| Body Part | Core |
|---|---|
| Primary Muscle | Obliques, transverse abdominis, and rotational core muscles |
| Secondary Muscle | Glutes, hip rotators, shoulders, lats, chest, and arms |
| Equipment | Medicine ball and a solid wall or safe throwing target |
| Difficulty | Intermediate; best for lifters who can brace, rotate, and throw with control |
Sets & Reps (By Goal)
- Explosive power: 3–5 sets × 3–6 throws per side with 60–120 seconds rest.
- Athletic conditioning: 3–4 sets × 6–10 throws per side with 45–90 seconds rest.
- Core coordination: 2–4 sets × 6–8 throws per side using a moderate ball and smooth timing.
- Warm-up activation: 2–3 sets × 3–5 throws per side with a light ball and crisp rotation.
Progression rule: Increase speed and accuracy before increasing ball weight. Moreover, keep the reps low when training pure power, because tired throws often become slower and less coordinated.
Setup / Starting Position
- Stand side-on to the wall: Place one shoulder toward the wall while leaving enough space for a safe rebound.
- Set an athletic stance: Keep your feet about shoulder-width apart, with soft knees and steady balance.
- Hold the medicine ball firmly: Position the ball near the outside hip or slightly in front of the torso.
- Brace before you rotate: Stack the ribs over the pelvis so the lower back does not arch or collapse.
- Load away from the target: Rotate the hips and shoulders slightly away from the wall to create a strong coil.
- Focus on the target: Look toward the throwing area so the release stays accurate and controlled.
A strong setup should feel stable but not rigid. Therefore, keep the feet grounded, the hips loaded, and the core engaged before every throw.
Execution (Step-by-Step)
- Begin in the loaded position: Keep the ball controlled while your torso rotates slightly away from the wall.
- Drive from the ground: Push through the feet and start the throw by turning the hips toward the target.
- Rotate through the trunk: Let the torso follow the hips while the core transfers force across the body.
- Release with speed: Extend the arms as the chest turns toward the wall, then throw the ball powerfully.
- Follow through naturally: Allow the arms to continue across the body while the back foot pivots if needed.
- Control the rebound: Catch or retrieve the ball safely before resetting your stance.
- Repeat with quality: Reset your posture before each rep instead of rushing into the next throw.
Pro Tips & Common Mistakes
Pro Tips
- Use a fast ball: A lighter medicine ball often builds better power because it can be thrown explosively.
- Rotate from the hips: Power should begin in the lower body before it moves through the trunk and arms.
- Let the rear foot pivot: This reduces unwanted stress on the knee, hip, and lower back.
- Brace before release: A firm core helps transfer power while keeping the spine organized.
- Train both directions: Balanced reps on both sides support better rotational strength and coordination.
- Rest for quality: When your goal is power, take enough rest so each throw stays sharp.
Common Mistakes
- Throwing only with the arms: This reduces force and may overload the shoulders.
- Twisting through the lower back: Instead, rotate through the hips and trunk as one coordinated chain.
- Using too much weight: A heavy ball can slow the throw and make the pattern less athletic.
- Standing too close: Poor distance can make the rebound unsafe and disrupt rhythm.
- Skipping the reset: Without a clean reset, reps often become rushed and poorly aligned.
- Holding the breath too long: Brief bracing is useful, but breathing should remain controlled between throws.
FAQ
What muscles does the Medicine Ball Rotary Throw work?
This exercise mainly trains the obliques, transverse abdominis, and other rotational core muscles. Additionally, the glutes, hip rotators, shoulders, lats, chest, and arms help transfer force from the floor into the throw.
Is the Medicine Ball Rotary Throw good for core power?
Yes. Because the movement requires fast rotation, strong bracing, and force transfer, it is excellent for building athletic core power. However, it should be performed with clean mechanics rather than heavy, slow, uncontrolled reps.
How heavy should the medicine ball be?
A light-to-moderate ball is usually best. For many people, a ball in the 4–10 lb range works well, although the right load depends on strength and skill. If your throw slows down or your posture breaks, choose a lighter ball.
Should I do high reps with this exercise?
For power, lower reps are better because every throw should be fast and crisp. For conditioning, moderate reps can work, but only if your rotation stays controlled. Once fatigue causes sloppy twisting, the set should end.
Can beginners perform the Medicine Ball Rotary Throw?
Beginners can practice the movement with a very light ball and slower tempo. Nevertheless, they should first learn basic bracing, hip rotation, and safe wall distance. If the lower back feels stressed, easier core drills are a better starting point.
What is the biggest form mistake?
The most common mistake is trying to throw with the arms instead of the whole body. Ideally, the throw starts from the feet, continues through the hips, transfers through the core, and finishes through the arms.
Recommended Equipment
- Medicine Ball — the main tool for rotary throws, power drills, and athletic core training.
- Wall Ball Medicine Ball — a softer option that works well for wall-based throwing drills and controlled rebounds.
- Slam Ball — a durable option for explosive throws, slams, and conditioning sessions.
- Non-Slip Exercise Mat — useful for warm-ups, core accessory drills, and stable floor-based training.
- Athletic Training Cones — helpful for marking stance position, wall distance, and training zones.
Before throwing, confirm that the wall is strong enough, the rebound path is clear, and nearby objects are protected. Also, make sure the ball type matches your training space and safety needs.