Hollow Body Hover: Core Form, Benefits, Sets, Tips & FAQ
Learn the Hollow Body Hover to build core strength, anti-extension control, and better body tension with proper form, sets, tips, FAQs, and gear.
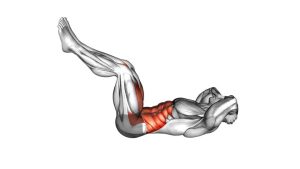
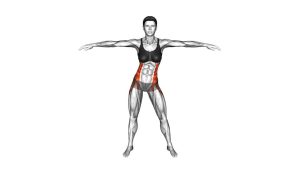
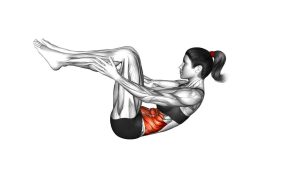
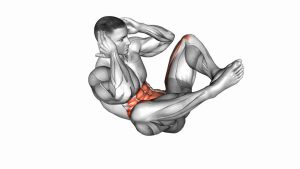
Hollow Body Hover
This exercise works best when every repetition looks calm, controlled, and intentional. First, the abs brace hard enough to flatten the lower back. Then, the shoulders and legs lift just enough to create tension without losing position. As a result, the Hollow Body Hover becomes an excellent choice for athletes, calisthenics training, home workouts, and anyone who wants stronger anti-extension core control.
Quick Overview
| Body Part | Core |
|---|---|
| Primary Muscle | Rectus abdominis and transverse abdominis |
| Secondary Muscle | Hip flexors, obliques, deep core stabilizers, and serratus anterior |
| Equipment | None; optional exercise mat for comfort |
| Difficulty | Intermediate; can be regressed by bending the knees or raising the legs higher |
Sets & Reps (By Goal)
- Core activation: 2–3 sets × 10–20 second holds, resting 30–45 seconds between sets.
- Strength and control: 3–4 sets × 15–30 second holds, resting 45–75 seconds between sets.
- Core endurance: 3–5 sets × 30–45 second holds, resting 60–90 seconds between sets.
- Beginner regression: 2–3 sets × 8–15 second holds with knees bent or legs higher.
Progression rule: Add time before lowering the legs closer to the floor. Moreover, only progress when your lower back stays flat for the full set.
Setup / Starting Position
- Lie on your back: Start supine on a mat with your legs straight and arms extended overhead.
- Brace your core: Exhale slightly, pull the ribs down, and press the lower back into the floor.
- Tuck the pelvis: Create a gentle posterior pelvic tilt so the abs take control instead of the lower back.
- Lift the shoulders: Raise the upper back just enough to bring the shoulder blades slightly off the floor.
- Prepare the hover: Keep the legs together, toes pointed or flexed, and body tight from fingertips to toes.
Tip: If your lower back arches before you begin, bend your knees or lift your legs higher. This adjustment keeps the target on the abs.
Execution (Step-by-Step)
- Set the brace: Press your lower back into the floor and keep the ribs pulled down.
- Lift into the hollow shape: Raise your shoulders and legs until your body forms a shallow banana-like position.
- Hold the hover: Keep your arms long, legs straight, and abs tight while breathing with control.
- Maintain tension: Avoid relaxing the ribs, dropping the legs too low, or letting the back arch.
- Finish with control: Lower your shoulders and legs slowly, then reset before the next set.
Pro Tips & Common Mistakes
- Keep the ribs down: Do not let the chest flare upward, because that usually causes the lower back to arch.
- Use controlled breathing: Breathe behind the brace instead of holding your breath for the entire set.
- Do not chase low legs too soon: Lower legs increase difficulty, but they only help if your back stays flat.
- Relax the neck slightly: Keep the chin gently tucked and avoid pulling the head forward aggressively.
- Squeeze the legs together: Full-body tension improves the hollow shape and makes the hold more stable.
- Regress when needed: Bent-knee hollow holds are still effective and often better for learning proper control.
FAQ
What muscles does the Hollow Body Hover work?
The Hollow Body Hover mainly trains the rectus abdominis and transverse abdominis. Additionally, the obliques, hip flexors, and deep stabilizers help maintain the hollow position.
Is the Hollow Body Hover good for beginners?
It can be useful for beginners when modified correctly. For example, bending the knees or raising the legs higher reduces the lever length and makes the exercise easier to control.
Why does my lower back lift during the Hollow Body Hover?
Your lower back usually lifts when the legs are too low or the abs are not bracing enough. Therefore, raise your legs, shorten the hold, or use a bent-knee version until you can keep full contact with the floor.
How long should I hold a Hollow Body Hover?
Most people should start with 10–20 seconds per set. Over time, progress toward 30–45 seconds while keeping the same clean body position.
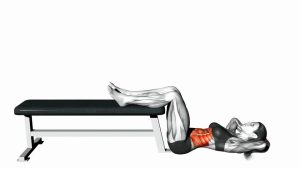
Is the Hollow Body Hover better than crunches?
It depends on your goal. Crunches focus more on spinal flexion, while the Hollow Body Hover emphasizes bracing, anti-extension strength, and full-body tension.
Recommended Equipment (Optional)
- Exercise Mat — adds comfort and support for the spine during floor-based core training.
- Thick Yoga Mat — useful if your lower back or hips need extra cushioning on hard floors.
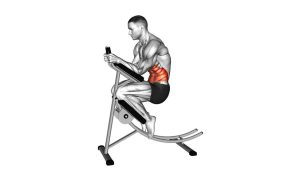
- Core Sliders — helpful for related core progressions such as body saws, plank slides, and knee tucks.
- Ab Wheel — a strong progression tool for anti-extension strength once hollow control improves.
- Resistance Bands Set — useful for dead bugs, pullover variations, and core bracing drills.
Note: Equipment is optional. However, a comfortable mat can make the Hollow Body Hover easier to practice consistently.