Bodyweight Jump Squat: Proper Form, Power Benefits, Sets & Tips
Learn the Bodyweight Jump Squat for explosive leg power, glute strength, athletic conditioning, proper landing form, sets, tips, FAQs, and gear.
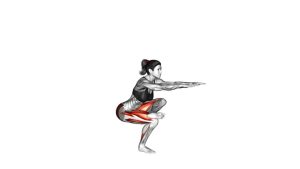
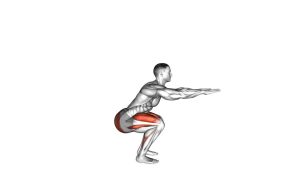
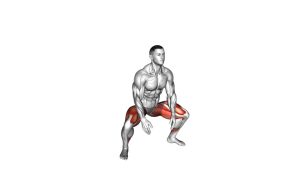
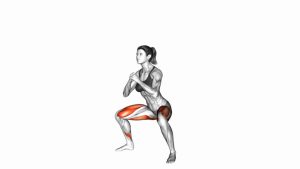
Bodyweight Jump Squat
This exercise is best used for power development, athletic conditioning, and explosive leg training. Unlike a regular squat, the Bodyweight Jump Squat should be performed with speed, clean posture, and soft landings. Quality matters more than fatigue, so every rep should feel powerful, controlled, and balanced.
Quick Overview
| Body Part | Legs |
|---|---|
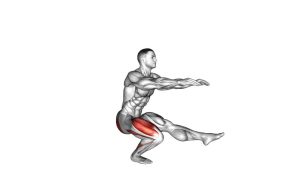
| Primary Muscle | Quadriceps, glutes |
| Secondary Muscle | Calves, hamstrings, core stabilizers |
| Equipment | No equipment required |
| Difficulty | Intermediate because it requires explosive power, coordination, and safe landing control |
Sets & Reps (By Goal)
- Power development: 3–5 sets × 3–6 reps with 60–120 seconds rest
- Athletic conditioning: 3–4 sets × 8–12 reps with 45–75 seconds rest
- Beginner plyometric practice: 2–3 sets × 4–6 reps with full control
- HIIT workout: 20–30 seconds of reps, followed by 40–60 seconds rest
Progression rule: Increase jump height or total sets only when every landing stays soft, balanced, and pain-free. Do not chase high reps if your form becomes loud, stiff, or unstable.
Setup / Starting Position
- Stand tall: Place your feet about shoulder-width apart with toes slightly turned out.
- Brace lightly: Keep your ribs stacked, core engaged, and spine neutral.
- Set your arms: Let your arms move naturally so they can help create upward momentum.
- Prepare your knees: Keep knees soft and aligned with your toes before starting the descent.
- Look forward: Keep your head neutral and eyes forward to maintain balance.
Tip: Perform this exercise on a stable, non-slippery surface with enough space overhead and around your body.
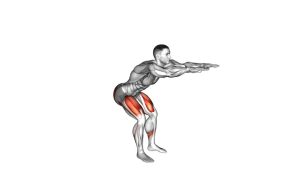
Execution (Step-by-Step)
- Lower into a squat: Push your hips back and bend your knees while keeping your chest lifted.
- Load with control: Descend to a comfortable squat depth without rounding your back or letting your knees collapse inward.
- Swing the arms: Drive your arms back during the descent to prepare for the jump.
- Explode upward: Extend your hips, knees, and ankles quickly to jump vertically.
- Reach full extension: Allow the body to leave the floor while staying tall and balanced.
- Land softly: Contact the floor with control and immediately bend your knees and hips to absorb impact.
- Reset or repeat: Either pause briefly to regain position or flow into the next controlled repetition.
Pro Tips & Common Mistakes
- Jump upward, not forward: Keep the movement vertical to train clean lower-body power.
- Use your arms naturally: A strong arm swing helps improve rhythm and jump height.
- Land like an athlete: Bend your knees and hips immediately after contact to absorb force.
- Do not lock the knees: Keep the knees soft during takeoff and landing.
- Avoid knee collapse: Knees should track in the same direction as the toes.
- Do not turn it into cardio too early: If power drops, stop the set and rest.
- Keep your chest controlled: Do not fold forward at the bottom or on landing.
- Use moderate depth: A powerful athletic squat depth is better than forcing an extremely deep squat.
FAQ
What muscles do Bodyweight Jump Squats work?
Bodyweight Jump Squats mainly work the quadriceps, glutes, and calves. They also involve the hamstrings and core because the body must stabilize during the squat, jump, and landing.
Are Jump Squats good for building muscle?
Jump Squats can support muscle development, but they are mainly used for power, explosiveness, and conditioning. For hypertrophy, combine them with controlled strength movements such as squats, lunges, leg presses, and hip thrusts.
How deep should I squat before jumping?
Use a depth that lets you stay powerful and controlled. Most people perform best around a parallel or slightly above-parallel squat depth. Avoid dropping too low if it reduces speed or makes your landing unstable.
Should beginners do Bodyweight Jump Squats?
Beginners should first master regular bodyweight squats. Once they can squat with good knee alignment, balance, and control, they can start with low-height Jump Squats and focus on soft landings.
Why do my knees hurt during Jump Squats?
Knee discomfort may come from hard landings, poor knee tracking, too much volume, weak hip control, or jumping before mastering basic squat mechanics. Reduce intensity, improve landing technique, and stop if pain continues.
Recommended Equipment
- Exercise Mat — provides a cleaner, more comfortable surface for warm-ups and floor-based lower-body training
- Cross-Training Shoes — helps support stable landings, lateral control, and athletic plyometric movement
- Mini Resistance Bands — useful for glute activation drills before jump squats
- Plyometric Box — useful for related jump training progressions such as box jumps and step-down landing drills
- Foam Roller — helpful for lower-body warm-ups, recovery, and mobility work around the quads, calves, and glutes
Tip: Equipment is optional for this exercise. The most important requirement is a stable surface, good shoes, and clean landing mechanics.