Push-Up to Side Plank: Form, Muscles Worked, Sets & Tips (Chest + Core)
Learn how to do the Push-Up to Side Plank with perfect form. Step-by-step technique, muscles worked, sets & reps by goal, common mistakes, FAQs, and recommended gear.
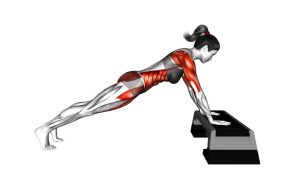
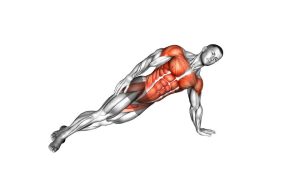
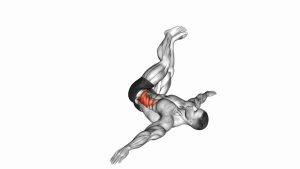
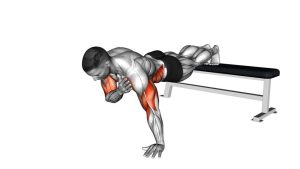
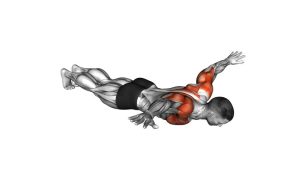
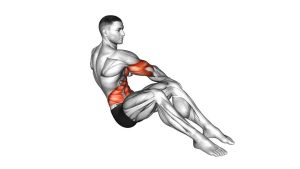
Push-Up to Side Plank
This movement rewards tight body position and slow, stable transitions. Your push-up should look like a straight, strong plank (no sagging hips), and your rotation should feel like the torso moves as one unit. If balance is difficult, widen your stance or perform the push-up from knees.
Quick Overview
| Body Part | Chest |
|---|---|
| Primary Muscle | Pectoralis major (chest) |
| Secondary Muscle | Triceps, anterior deltoids, obliques, transverse abdominis, serratus anterior |
| Equipment | None (optional: exercise/yoga mat) |
| Difficulty | Intermediate (core + shoulder stability required) |
Sets & Reps (By Goal)
- Strength (controlled reps): 3–5 sets × 4–8 reps per side (rest 90–150 sec)
- Muscle & endurance: 2–4 sets × 8–12 reps total (alternate sides) (rest 60–90 sec)
- Core + stability finisher: 2–3 sets × 6–10 reps total + 10–20 sec side plank hold each rep (rest 60–90 sec)
- Beginner modification (knees): 2–3 sets × 6–10 reps total (rest 60–90 sec)
Progression rule: Add reps first, then increase the side plank hold time. Only progress speed or difficulty when your body line stays straight and your rotation stays stable.
Setup / Starting Position
- Hands: Place palms on the floor slightly wider than shoulder-width. Spread fingers and “grip” the ground.
- Body line: Brace your core and squeeze glutes so your body forms a straight line (head → heels).
- Feet: Start with feet a bit wider than hip-width for balance (you can narrow later).
- Shoulders: Stack shoulders over wrists; keep shoulder blades active (push the floor away).
- Neck: Neutral—look slightly ahead of your hands, not straight down or forward.
Tip: If wrists bother you, use push-up handles or dumbbells as grips to keep wrists more neutral.
Execution (Step-by-Step)
- Lower into a push-up: Bend elbows and descend under control until your chest is close to the floor.
- Press up: Drive through palms to return to a strong plank—do not let hips sag or pike.
- Rotate to side plank: Shift weight onto one hand, pivot your feet, and rotate your torso open.
- Reach up: Extend the top arm toward the ceiling. Lift hips so your body forms a straight line.
- Pause and breathe: Hold 1–2 seconds (or longer for stability work) while keeping ribs down.
- Return to plank: Bring the top hand down, rotate back, reset your feet.
- Repeat and alternate: Perform the next rep and rotate to the opposite side.
Pro Tips & Common Mistakes
- Keep the plank “locked in”: ribs down, glutes tight, and core braced before you rotate.
- Don’t rush the turn: fast rotation usually causes shoulder collapse and hip drop.
- Elbow angle matters: for chest focus, avoid flaring elbows straight out; aim ~30–60° from the torso.
- Hips should stay high in side plank: dropping hips turns it into a sloppy twist instead of a stability rep.
- Avoid shrugging: keep the neck long and shoulders away from ears.
- Scale smart: do the push-up from knees, or keep feet wider until control improves.
FAQ
What muscles does the Push-Up to Side Plank work?
The push-up targets the chest, triceps, and front delts. The side plank rotation heavily trains the obliques, deep core (anti-rotation), and shoulder stabilizers (serratus anterior + rotator cuff).
Should my feet be stacked or staggered in the side plank?
Both work. Stacked feet is harder and more balance-demanding. A staggered stance (top foot slightly in front) is more stable and often better while learning.
My wrists hurt—what can I do?
Try using push-up handles or gripping a pair of dumbbells to keep wrists more neutral. You can also reduce range of motion, warm up wrists, and ensure you’re distributing pressure through the whole palm.
Is this exercise more for chest or core?
It’s both. You’ll get a strong chest push plus a serious core and shoulder stability challenge. For pure chest hypertrophy, use traditional push-ups or weighted push-ups; for athletic control and conditioning, this shines.
How do I make it easier or harder?
Easier: do push-ups from knees, widen your stance, shorten the side plank hold. Harder: slow the tempo, add a longer side plank hold, elevate feet, or wear a weighted vest.
Recommended Equipment (Optional)
- Push-Up Handles — reduces wrist extension and improves pressing comfort
- Non-Slip Yoga / Exercise Mat — better grip for hands/feet and comfort for floor training
- Weighted Vest — progressive overload if standard reps become easy
- Parallettes / Push-Up Bars — neutral grip option with extra range of motion
- Training Gloves (Wrist Support) — optional support for grip comfort and wrist stability
Tip: If any tool increases pain, stop and simplify the exercise. Form and consistency beat intensity for long-term progress.