Band Seated Leg Extension: Form, Muscles, Sets & Tips
Learn the Band Seated Leg Extension with correct single-leg form, quad-focused sets, resistance band setup, common mistakes, and helpful training tips.
Band Seated Leg Extension
The Band Seated Leg Extension trains the quadriceps while allowing each leg to work independently. Unlike squats or lunges, it primarily involves movement at the knee rather than coordinated hip and knee extension. Therefore, it can help develop focused quadriceps strength, muscular endurance, and controlled knee movement.
Additionally, resistance bands offer adjustable tension without requiring a dedicated weight machine. A stronger band increases the challenge, while a lighter band makes controlled repetitions easier. However, effective training depends on secure anchoring, appropriate resistance, and a comfortable range of motion.
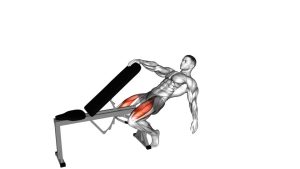
During the exercise, the working thigh should remain supported by the bench as the lower leg extends forward. Meanwhile, your hands stabilize your body, and the opposite leg stays relaxed in a bent position. As a result, the quadriceps can perform the movement without unnecessary swinging or upper-body assistance.
Quick Overview
| Body Part | Legs |
|---|---|
| Primary Muscle | Quadriceps femoris: Rectus femoris, Vastus lateralis, Vastus medialis, and Vastus intermedius |
| Secondary Muscle | Hip flexors and core stabilizers provide postural support. The opposite leg helps maintain a stable seated position. |
| Equipment | Resistance band, stable flat bench, and secure low anchor point. A padded ankle attachment is optional. |
| Difficulty | Beginner. Resistance and range of motion can be adjusted for different training levels. |
Sets & Reps (By Goal)
- Strength: 3–4 sets × 8–12 reps per leg. Use challenging but manageable band tension. Rest 60–90 seconds between sets. Additionally, maintain controlled movement rather than relying on momentum.
- Hypertrophy (Muscle Growth): 3–4 sets × 12–15 reps per leg. Choose resistance that makes the final repetitions challenging. Meanwhile, maintain a controlled lowering phase to increase muscular effort.
- Muscular Endurance: 2–3 sets × 15–25 reps per leg. Select a lighter resistance band. Consequently, you can maintain consistent repetitions without sacrificing technique. Rest approximately 30–60 seconds.
- Warm-Up and Movement Control: 1–2 sets × 10–15 reps per leg. Begin with light resistance and a comfortable range of motion. Then, gradually increase movement quality before progressing to harder exercises.
- Rehab-Style Strengthening: When approved by a qualified professional, perform 1–3 sets × 8–12 controlled reps. Start with very light resistance. However, follow individualized rehabilitation instructions rather than pushing through pain.
Progression rule: First, master a smooth extension and controlled return. Next, increase repetitions or add a brief pause near the extended position. Once every repetition feels stable, progress to a slightly stronger resistance band. However, avoid increasing tension if your knee becomes uncomfortable or your thigh starts lifting.
Setup / Starting Position
- Choose a stable bench: Sit on a sturdy flat bench that supports your thighs while allowing your lower legs to move freely below the front edge.
- Secure the resistance band: Attach one end to a reliable low anchor positioned behind the working ankle. For example, use a suitable fixed anchor beneath or behind the bench.
- Connect the working ankle: Place the free end around one ankle using a secure, comfortable attachment. Additionally, make sure the band cannot slide off during extension.
- Establish your seated posture: Sit upright with your chest lifted, shoulders relaxed, and spine neutral. Keep your hips stable against the bench.
- Position the opposite leg: Keep the non-working knee bent and relaxed. If your foot comfortably reaches the floor, it may provide additional stability.
- Grip the bench: Place your hands beside your hips and hold the bench lightly. This support helps prevent unnecessary torso movement during the exercise.
- Prepare the working knee: Allow the working lower leg to hang downward with the knee comfortably bent. Then, check that the band follows a clear path without rubbing or catching.
Correct Band Position and Starting Tension
Before your first repetition, check the direction of resistance. The band should pull the working lower leg back toward its bent position as you extend the knee. Therefore, the anchor must be positioned appropriately behind the working ankle.
Additionally, choose enough starting tension to keep the band secure without making the movement excessively difficult. If your torso shifts or your knee feels strained, reduce the resistance and reassess the setup.
Setup tip: Position the working thigh securely on the bench. Meanwhile, leave enough clearance for the ankle to travel forward without striking equipment.
Execution (Step-by-Step)
- Establish your posture: Sit tall with your core lightly engaged. Keep both hands beside your hips for stability. Meanwhile, maintain a relaxed neck and neutral spine.
- Activate the quadriceps: Gently contract the muscles along the front of your working thigh. Before moving, keep the thigh supported and the opposite knee bent.
- Begin knee extension: Slowly straighten the working knee, allowing the lower leg to move forward and upward against the resistance band. Exhale naturally during this phase.
- Maintain thigh stability: Continue the extension while keeping your upper leg relatively stationary. Consequently, most of the movement should occur around the working knee joint.
- Approach full extension: Raise the lower leg until the knee is nearly straight or reaches a comfortable end position. However, avoid aggressively locking or hyperextending the knee.
- Contract at the top: Briefly emphasize the quadriceps contraction without forcing additional range. If comfortable, pause for approximately one second before lowering.
- Lower with control: Slowly bend the working knee as the lower leg returns toward the starting position. Meanwhile, inhale and resist the band’s tendency to pull your ankle backward.
- Complete the repetition: Return to a comfortable bent-knee position without dropping the foot. Then, repeat the movement for the prescribed repetitions before switching legs.
Movement Tempo and Muscle Engagement
A useful starting tempo is approximately two seconds during extension, a brief controlled pause, and two to three seconds during the return. However, the movement should remain comfortable rather than mechanically rigid.
Focus on the front of the working thigh throughout the repetition. Additionally, keep the opposite leg quiet and avoid lifting your hips from the bench. Consistent control matters more than extending the knee as quickly as possible.
Pro Tips & Common Mistakes
- Keep the working thigh supported: Avoid lifting the entire leg from the hip. Instead, isolate the movement primarily at the knee joint.
- Do not swing the lower leg: Fast, uncontrolled repetitions reduce movement precision. Therefore, use a steady tempo during both extension and lowering.
- Avoid excessive resistance: A very strong band may encourage compensation. Start lighter and increase tension only after developing consistent control.
- Do not snap the knee straight: Reach a comfortable extension position. However, avoid forcing the joint backward or aggressively locking the knee.
- Maintain an upright torso: Excessive backward leaning changes your position and reduces stability. Instead, use your hands and core to maintain steady posture.
- Control the return: Do not allow the resistance band to pull your foot downward suddenly. Consequently, a slower return improves control throughout the repetition.
- Keep the opposite leg steady: The non-working leg should remain bent rather than extending simultaneously. This preserves the single-leg movement demonstrated in the exercise.
- Check the band attachment: A slipping ankle attachment or moving anchor can interrupt the movement. Therefore, inspect the setup before every training session.
- Train both sides consistently: Complete the prescribed repetitions on one leg before switching. Additionally, begin with the weaker side when appropriate and avoid adding excessive extra repetitions on the stronger leg.
How to Improve Quadriceps Activation
To emphasize the quadriceps, focus on straightening the knee rather than kicking the foot forward with momentum. As a result, the working thigh remains more stable during each repetition.
Furthermore, a brief controlled contraction near the top can help reinforce movement awareness. Nevertheless, avoid forcing a maximal squeeze if it causes knee discomfort. Smooth, repeatable technique should remain the main training priority.
FAQ
What muscles does the Band Seated Leg Extension work?
The Band Seated Leg Extension primarily targets the quadriceps femoris, including the rectus femoris and three vastus muscles. These muscles straighten the knee against resistance. Additionally, the core and hip stabilizers help maintain an upright seated position. However, they are not the primary movers.
Is the Band Seated Leg Extension good for beginners?
Yes, this exercise can be suitable for beginners because resistance is easy to adjust. Start with a light band and focus on smooth knee extension. Furthermore, the seated position reduces balance demands compared with standing single-leg exercises. Nevertheless, correct anchoring remains essential.
Should I extend one leg or both legs together?
In the demonstrated variation, only one leg extends at a time. Meanwhile, the opposite leg remains bent and relatively stationary. After completing the desired repetitions, switch to the other leg. Consequently, each quadriceps muscle group receives focused training independently.
Can resistance bands replace a leg-extension machine?
Resistance bands can provide an effective alternative for training knee extension. Additionally, they are portable and offer several resistance levels. However, band resistance changes as the elastic stretches, so the loading pattern differs from a machine. Both options can support quadriceps training.
Why do I feel discomfort around my knee?
Knee discomfort may occur when resistance is excessive, the movement is forced, or the setup is unsuitable. First, stop the painful movement rather than continuing through symptoms. Then, reassess resistance and technique. If discomfort persists, seek guidance from a qualified healthcare professional.
Recommended Equipment
- Resistance Tube Bands Set — provides adjustable resistance levels for quadriceps training and controlled seated knee extensions
- Flat Weight Bench — offers stable seated support while allowing the working lower leg to move freely
- Padded Resistance Band Ankle Cuffs — provide a comfortable connection between compatible resistance bands and the working ankle
- Heavy-Duty Resistance Band Anchor Strap — helps secure compatible resistance bands to an appropriate fixed anchor during training
- Non-Slip Exercise Equipment Mat — provides a protective floor surface beneath suitable exercise equipment and helps reduce unwanted movement
Equipment tip: Choose resistance bands with appropriate tension and secure attachment points. Additionally, ensure your bench remains stable throughout the exercise. Before training, inspect all bands, ankle attachments, and anchors for damage. Never attach a stretched band to an unstable or unsuitable object.