Cable Seated Rear Delt Fly with Chest Support: Form, Sets, Muscles Worked & FAQ
Learn how to perform the Cable Seated Rear Delt Fly with Chest Support for better rear shoulder isolation, safer form, and constant tension. Includes setup, execution, sets by goal, common mistakes, FAQs, and recommended equipment.
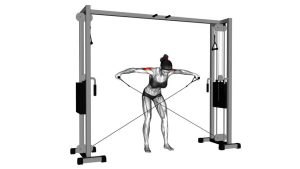
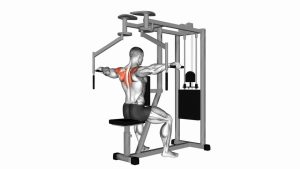
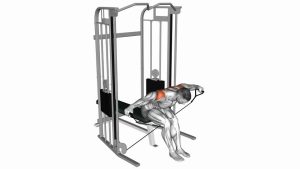
Cable Seated Rear Delt Fly with Chest Support
This exercise is especially useful for lifters who want to build the rear delts without overloading the lower back or using body English. The chest support improves stability, while the cable setup keeps tension on the target muscles through both the lifting and lowering phases. Use a moderate load, keep the motion controlled, and avoid letting the traps or upper back take over.
Quick Overview
| Body Part | Rear Shoulders |
|---|---|
| Primary Muscle | Rear deltoids (posterior delts) |
| Secondary Muscle | Rhomboids, middle trapezius, rotator cuff stabilizers |
| Equipment | Cable machine, adjustable bench or chest support pad, cable handles |
| Difficulty | Beginner to Intermediate |
Sets & Reps (By Goal)
- Muscle growth: 3–4 sets × 10–15 reps with controlled tempo and 45–75 seconds rest
- Shoulder isolation / accessory work: 2–4 sets × 12–20 reps using lighter weight and strict form
- Strength-endurance: 2–3 sets × 15–20 reps with smooth reps and minimal body movement
- Warm-up activation: 1–2 sets × 12–15 reps with very light resistance before pressing or upper-body training
Progression rule: Increase reps first, then load. If the exercise starts looking like a row or your traps dominate, the weight is too heavy.
Setup / Starting Position
- Position the bench or chest pad: Set yourself so your chest is firmly supported and your torso stays stable throughout the set.
- Adjust the cables: Place the pulleys around shoulder height or slightly below, depending on your structure and machine setup.
- Grab the handles: Use a neutral grip and extend your arms forward with a slight bend in the elbows.
- Set your posture: Keep the chest supported, core braced, neck neutral, and shoulders away from the ears.
- Start in the stretched position: Let the rear delts lengthen under control without collapsing your upper back.
Tip: Your setup should allow the arms to move in a wide arc. If the elbows are tucked too close to the torso, the movement turns into more of a row.
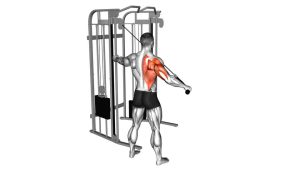
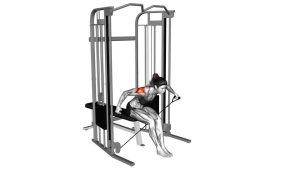
Execution (Step-by-Step)
- Begin from the front: With arms extended forward and elbows softly bent, maintain full-body stability against the support.
- Lead outward with the elbows: Pull the handles out and slightly back in a wide arc, keeping the elbows lifted roughly in line with the shoulders.
- Squeeze the rear delts: At the top, pause briefly when the arms open into a wide “T” shape without over-pulling behind the body.
- Control the eccentric: Return the handles forward slowly, resisting the cable so the rear delts stay loaded on the way down.
- Repeat with strict form: Keep each rep smooth and deliberate, avoiding jerking, shrugging, or swinging.
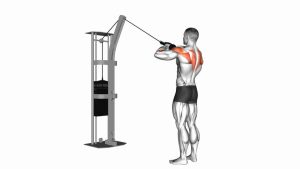
Pro Tips & Common Mistakes
- Lead with the elbows: This helps keep the emphasis on the rear delts instead of the hands and forearms.
- Keep a slight elbow bend: Locking the arms straight can increase joint stress and reduce smooth control.
- Stay chest-supported: Use the pad to eliminate cheating and prevent the torso from rocking backward.
- Do not shrug: Letting the shoulders rise shifts tension toward the upper traps.
- Avoid turning it into a row: The arm path should be wide, not narrow and close to the ribs.
- Control the negative: The lowering phase is where a lot of rear delt stimulus happens—do not let the stack yank you forward.
- Use moderate weight: Rear delts respond best to precision and tension, not sloppy overload.
FAQ
What muscles does the Cable Seated Rear Delt Fly with Chest Support work?
The main target is the rear deltoid. Secondary muscles include the rhomboids, middle traps, and smaller shoulder stabilizers that help control the movement.
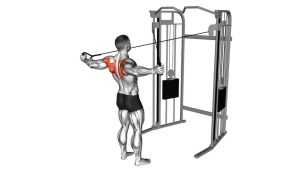
Is this better than dumbbell rear delt flys?
For many lifters, yes. The cable provides constant tension, and the chest support reduces momentum, making it easier to isolate the rear delts with strict form.
Should I pull the handles as far back as possible?
No. Pull only until you reach a strong rear delt contraction with good shoulder position. Over-pulling often shifts the movement into upper-back work instead of keeping the emphasis on the posterior delts.
Can beginners use this exercise?
Absolutely. It is a very good rear delt variation for beginners because the chest support improves control and helps reduce compensation from the lower back and hips.
Where should I feel this exercise most?
You should feel it mainly in the back of the shoulders. If you mostly feel your traps or biceps, adjust the weight, arm path, and elbow position.
Recommended Equipment
- Cable Machine Handles — useful for comfortable grip and better arm positioning during rear delt fly variations
- Adjustable Weight Bench — provides chest support and helps reduce body swing for stricter isolation work
- Resistance Bands Set — a great alternative for rear delt activation, warm-ups, and travel-friendly shoulder work
- Lifting Straps — helpful if grip fatigue limits your shoulder training before the rear delts are fully worked
- Foam Roller — useful for upper-back mobility work that can improve shoulder positioning during rear delt training
Tip: Keep equipment simple. The best results come from consistent form, controlled reps, and a setup that lets the rear delts do the work.