Cable Standing Face Pull: Proper Form, Muscles Worked, Sets & Tips
Learn how to do the Cable Standing Face Pull with proper form to build rear delts, upper back strength, and shoulder stability. Includes setup, execution, sets and reps, mistakes, FAQs, and recommended equipment.
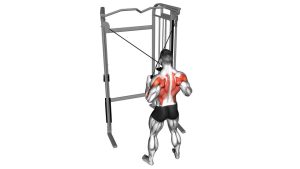
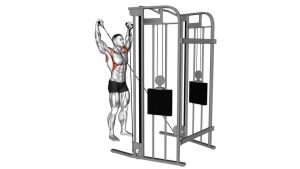
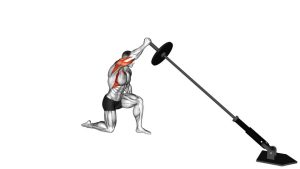
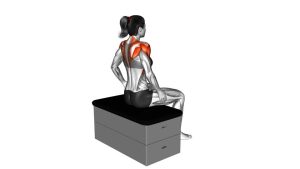
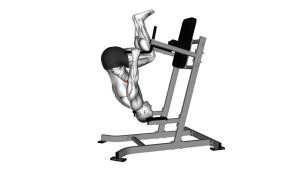
Cable Standing Face Pull
The Cable Standing Face Pull works best when you prioritize clean movement, scapular control, and moderate resistance rather than heavy loading. You should feel the movement in the rear shoulders, mid traps, and rhomboids, not in the lower back or wrists. If the exercise turns into a sloppy row, the weight is usually too heavy or the elbows are dropping too low.
Quick Overview
| Body Part | Rear Shoulders |
|---|---|
| Primary Muscle | Rear deltoids |
| Secondary Muscle | Rhomboids, middle trapezius, lower trapezius, rotator cuff, upper back stabilizers |
| Equipment | Cable machine with rope attachment |
| Difficulty | Beginner to intermediate |
Sets & Reps (By Goal)
- Muscle growth: 3–4 sets × 10–15 reps with controlled tempo and full rope separation
- Shoulder health / posture: 2–4 sets × 12–20 reps using lighter weight and strict form
- Warm-up / activation: 2–3 sets × 12–15 reps before upper-body training
- Strength-endurance: 3 sets × 15–20 reps with short rests and smooth control
Progression rule: Add reps before adding load. Face pulls respond best to quality contraction, controlled tempo, and clean elbow positioning—not ego weight.
Setup / Starting Position
- Set the pulley height: Position the cable around upper chest, chin, or face height depending on your structure and machine setup.
- Attach the rope: Use a rope handle so your hands can separate naturally during the pull.
- Take your stance: Stand tall with feet about hip-width apart. A slight staggered stance is fine if it helps balance.
- Grip neutral: Hold the rope ends with palms facing each other and arms extended forward.
- Brace the body: Keep the ribs down, core tight, chest up, and knees softly bent.
- Start with tension: Step back until the cable is taut before beginning the first rep.
Tip: A small lean back is acceptable for balance, but avoid turning the exercise into a full-body heave.
Execution (Step-by-Step)
- Begin the pull: Pull the rope toward your face by driving your elbows outward and slightly upward.
- Lead with the elbows: Think about moving the elbows first rather than curling the hands inward.
- Separate the rope: As the rope comes closer, let the hands split apart so each end travels to the sides of the face.
- Reach peak contraction: Finish with the rope near eye or nose level, elbows high, shoulder blades retracted, and rear delts fully engaged.
- Pause briefly: Hold the top for a short squeeze without shrugging or arching the lower back.
- Return with control: Extend the arms forward smoothly and allow the shoulder blades to move naturally without losing posture.
- Repeat cleanly: Keep every rep controlled and identical rather than rushing through the set.
Pro Tips & Common Mistakes
- Pull to the face, not the chest: Bringing the rope too low shifts tension away from the rear delts and external rotators.
- Keep the elbows high: Elbows that drop too much usually turn the movement into a standard cable row.
- Separate the rope: The split at the top helps reinforce external rotation and a stronger rear-delt contraction.
- Use moderate weight: Face pulls are a control exercise. Heavy weights often cause momentum, torso swinging, and sloppy mechanics.
- Don’t shrug hard: Keep the traps involved naturally, but avoid jamming the shoulders up toward the ears.
- Control the eccentric: The return phase matters. Lowering too fast reduces tension and makes the movement less effective.
- Stay tall through the torso: Don’t overextend the lower back to finish the rep.
- Program it intelligently: Face pulls work well on shoulder days, pull days, upper-body days, and as a warm-up before pressing.
FAQ
What muscles does the Cable Standing Face Pull work?
The main target is the rear deltoid. It also trains the rhomboids, middle traps, lower traps, and the smaller muscles that help stabilize and externally rotate the shoulder.
Should I pull the rope to my nose, forehead, or chest?
In most cases, pull the rope toward the face—around the nose, eyes, or upper face— while separating the rope ends. Pulling too low usually reduces the shoulder-health and rear-delt emphasis.
Are face pulls better for high reps?
Yes, many lifters get the best results using moderate to high reps with strict form. Sets of 10–20 reps are common because the goal is tension, control, and joint-friendly volume.
Can beginners do Cable Standing Face Pulls?
Absolutely. Beginners often benefit from face pulls because they help build postural strength, rear-delt awareness, and better shoulder mechanics. Start light and focus on elbow path and rope separation.
How often should I do face pulls?
Most people can perform them 1–3 times per week depending on training volume. They are useful as a warm-up, accessory movement, or postural support exercise.
Recommended Equipment
- Tricep Rope Cable Attachment — the most direct attachment for cable face pulls, pressdowns, and other cable pulling work
- Adjustable Rope Cable Attachment — useful if you want different rope lengths or grip positions for face pulls and upper-body cable work
- Resistance Bands Set with Door Anchor — a practical home-training option for band face pulls when you do not have a cable machine
- Exercise Bands with Handles and Door Anchor — helpful for home workouts, warm-ups, and shoulder-friendly pulling variations
- Home Cable Pulley / Lat Pulldown System — a compact setup for cable-based face pulls, pulldowns, rows, and general upper-body training
Tip: For face pulls, prioritize smooth cable travel, comfortable rope grip, and controlled resistance over maximum load.