Criss-Cross Knee Tuck: Core Form, Oblique Tips, Sets & FAQ
Learn the Criss-Cross Knee Tuck for stronger abs and obliques. Get form cues, sets, mistakes, FAQs, and equipment tips for core control.
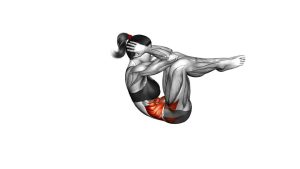
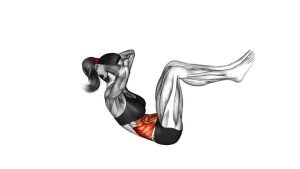
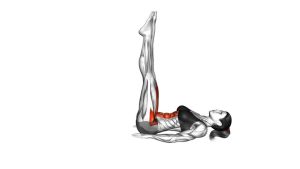
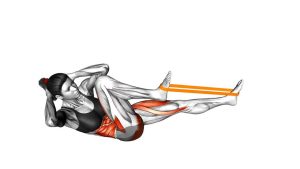
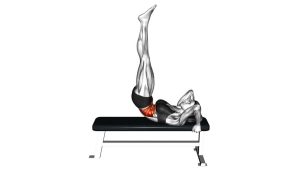
Criss-Cross Knee Tuck
This exercise works best when each rep stays controlled, compact, and balanced. Because the legs alternate without fully resting, your core must resist arching while your obliques help guide the criss-cross pattern. As a result, the movement trains abdominal endurance, coordination, and rotational control at the same time.
Quick Overview
| Body Part | Core |
|---|---|
| Primary Muscle | Rectus abdominis and obliques |
| Secondary Muscle | Hip flexors, transverse abdominis, deep core stabilizers |
| Equipment | No equipment required; optional exercise mat |
| Difficulty | Beginner to intermediate, depending on leg height and tempo |
Sets & Reps (By Goal)
- Beginner core control: 2–3 sets × 8–12 reps per side, slow tempo, 45–60 sec rest
- Abs and oblique endurance: 3–4 sets × 12–20 reps per side, steady rhythm, 45–75 sec rest
- Core conditioning: 3–5 rounds × 30–45 seconds, controlled pace, 30–60 sec rest
- Warm-up activation: 1–2 sets × 8–10 reps per side, easy effort, smooth breathing
Progression rule: First increase control and rep quality. Then, once your lower back stays stable, extend the legs slightly lower or use a slower tempo for more core tension.
Setup / Starting Position
- Lie on your back: Set up on a mat with your spine long and your core lightly braced.
- Lift the legs: Bring both legs off the floor so they can alternate without resting between reps.
- Set the upper body: Keep the head and shoulders slightly lifted only if you can do it without neck strain.
- Brace the abs: Gently press the lower back toward the floor before the first knee tuck.
- Prepare to alternate: One knee will drive in while the opposite leg extends outward.
Tip: If your neck gets tired, keep the head lower and focus on the knee-tuck pattern first. The core should lead the movement, not the neck.
Execution (Step-by-Step)
- Start with tension: Brace your abs and keep both feet hovering above the floor.
- Drive one knee in: Pull one knee toward your torso while the opposite leg extends away.
- Add the criss-cross action: Slightly rotate your torso toward the incoming knee without yanking the neck forward.
- Reach the contraction: Pause briefly when the knee is closest and the abs feel compressed.
- Switch sides smoothly: Extend the tucked leg while the opposite knee comes in.
- Repeat with rhythm: Continue alternating sides while keeping your lower back stable and your breathing controlled.
Pro Tips & Common Mistakes
- Keep the lower back controlled: Do not let the extended leg pull your pelvis into an arch.
- Use a small twist: Rotate enough to feel the obliques, but avoid throwing the shoulder across the body.
- Do not rush the switch: A steady tempo keeps tension on the abs and reduces momentum.
- Extend with control: The straightening leg should reach away smoothly rather than snap outward.
- Relax the neck: Keep the chin slightly tucked and avoid pulling the head forward with the hands.
- Breathe through the reps: Exhale as the knee comes in, then inhale lightly during the switch.
- Adjust leg height: Keep the legs higher if you are learning; lower them only when your back stays stable.
FAQ
What muscles does the Criss-Cross Knee Tuck work?
It mainly works the abs and obliques. Additionally, the hip flexors assist the leg motion, while the deep core muscles help stabilize the pelvis and lower back.
Is the Criss-Cross Knee Tuck good for beginners?
Yes, beginners can use it when the range is controlled. However, the movement becomes harder if the legs are extended lower, the tempo is slower, or the upper body stays lifted throughout the set.
Should my feet touch the floor between reps?
Ideally, the feet stay hovering to maintain core tension. Still, beginners can briefly tap down between reps if needed, especially when learning how to keep the lower back stable.
Why do I feel this more in my hip flexors than my abs?
This often happens when the legs drop too low, the lower back arches, or the abs are not braced before the switch. To fix it, lift the legs higher, slow down, and focus on pulling the ribs toward the pelvis.
How is this different from a bicycle crunch?
The Criss-Cross Knee Tuck is usually more compact and knee-tuck focused. A bicycle crunch often uses a larger elbow-to-knee rotation, while this variation emphasizes alternating knee drives, hovering legs, and constant abdominal tension.
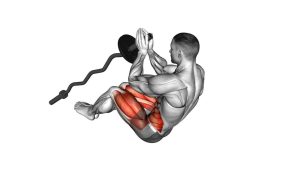
Recommended Equipment (Optional)
- Exercise Mat — adds comfort and grip for floor-based core exercises
- Thick Yoga Mat — helpful if your lower back or hips need extra cushioning
- Core Sliders — useful for progressing into sliding knee tuck variations
- Mini Resistance Bands — can support glute and hip activation before core training
- Workout Interval Timer — useful for timed core circuits and conditioning sets
Tip: Equipment is optional for this exercise. However, a comfortable mat can help you keep better control and stay focused on clean abdominal tension.