Floor Triceps Dip: Proper Form, Sets, Tips & FAQ
Learn how to do the Floor Triceps Dip with proper form to target your triceps at home. Includes setup, execution, sets by goal, common mistakes, FAQ, and recommended Amazon equipment.
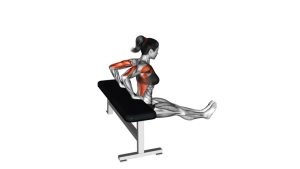
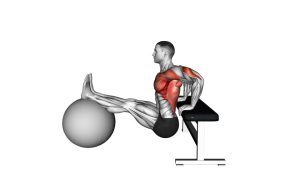
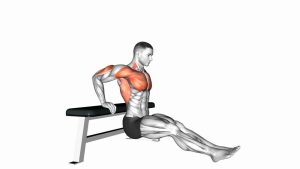
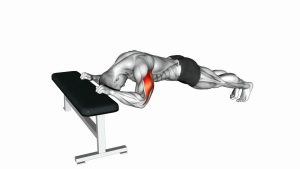
Floor Triceps Dip
This exercise is best performed with a moderate range of motion and a steady tempo. You should feel the work mostly in the back of the upper arms, with some support from the shoulders and chest. Keep your hands planted firmly, your shoulders controlled, and your hips hovering just above the floor instead of dropping too aggressively.
Quick Overview
| Body Part | Triceps |
|---|---|
| Primary Muscle | Triceps brachii |
| Secondary Muscle | Anterior deltoids, lower chest, forearm stabilizers, core |
| Equipment | Bodyweight only; floor or exercise mat recommended |
| Difficulty | Beginner |
Sets & Reps (By Goal)
- Technique practice: 2–3 sets × 6–10 reps with slow, controlled lowering
- Muscle endurance: 2–4 sets × 10–15 reps with 45–60 seconds rest
- General strength: 3–4 sets × 8–12 reps with 60–90 seconds rest
- Finisher in home workouts: 1–2 sets close to technical fatigue while keeping clean form
Progression note: First improve control and depth. Then add reps, slow the lowering phase, or elevate the hands on sturdy dip bars or parallettes for a more challenging variation.
Setup / Starting Position
- Sit on the floor with your knees bent and feet flat.
- Place your hands behind your hips with fingers pointing forward or slightly outward, depending on wrist comfort.
- Press through your palms and lift your hips slightly off the floor.
- Keep your chest open and shoulders pulled back rather than rounded forward.
- Start with your arms extended and your elbows pointing mostly backward.
Tip: If your wrists feel stiff, place your hands slightly wider or turn the fingers out a little to find a more comfortable angle.
Execution (Step-by-Step)
- Brace your upper body: Keep the chest lifted, core lightly engaged, and hips just off the floor.
- Lower under control: Bend your elbows and let your hips move downward toward the floor.
- Keep elbows tracking backward: Avoid letting them flare too wide as you descend.
- Pause near the bottom: Stop when your elbows are around 90 degrees or when your shoulder comfort starts to decrease.
- Press back up: Push through your palms and extend your elbows until you return to the top position.
- Repeat smoothly: Maintain even tempo without bouncing off the bottom.
Pro Tips & Common Mistakes
- Use a smaller range first: A shorter dip with better shoulder position is more effective than forcing extra depth.
- Keep the chest proud: Avoid slouching or letting the shoulders roll forward.
- Do not rush the reps: Slow lowering increases triceps tension and improves control.
- Watch elbow direction: Let the elbows move back rather than flare far out to the sides.
- Avoid dropping to the floor: Hips should descend in a controlled way, not crash down.
- Protect the wrists: Use a mat, push-up handles, or wrist wraps if needed for comfort.
- Stop before joint strain: Shoulder comfort matters more than chasing a deeper bottom position.
FAQ
What muscles does the Floor Triceps Dip work most?
The main target is the triceps. You will also get support from the front delts, chest, and stabilizing muscles around the wrists and core.
Is the Floor Triceps Dip good for beginners?
Yes. It is a useful beginner bodyweight movement because it does not require special equipment and can be done with a limited range of motion while you learn control.
Why do my wrists hurt during this exercise?
Wrist discomfort usually comes from hand position, limited wrist mobility, or loading the hands too far behind the body. Try adjusting hand angle, reducing depth, using a mat, or using push-up handles for a more neutral grip.
How deep should I go on each rep?
Lower until your triceps are challenged and your shoulder position still feels strong. For many people, that means stopping around a 90-degree elbow bend rather than sinking as low as possible.
How can I make the exercise harder?
You can slow the tempo, add reps, increase total sets, pause longer at the bottom, or progress to elevated dip variations using dip bars or parallettes.
Recommended Equipment (Optional)
- Dip Bars / Dip Station — a strong upgrade when you want to progress from floor dips to deeper bodyweight pressing
- Wooden Parallettes Bars — helpful for neutral wrist positioning and more advanced dip-style bodyweight work
- Push-Up Bars — useful for reducing wrist extension and making floor pressing exercises more comfortable
- Wrist Wraps — can provide extra support if your wrists feel stressed during bodyweight pressing
- Folding Exercise Mat — adds comfort for floor-based training and protects the hips, hands, and workout space
Tip: For most beginners, a good mat and wrist-friendly setup are enough. Upgrade to bars or parallettes when you want more range of motion and progression options.