Lever Lying Bent-Knee Leg Raise: Form, Benefits, Sets & Tips
Learn the Lever Lying Bent-Knee Leg Raise for lower abs, hip control, and core strength. Includes setup, steps, mistakes, FAQs, and equipment.
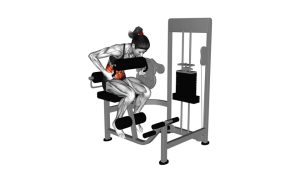
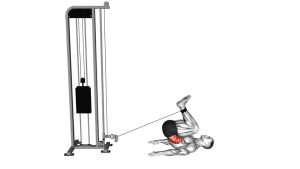
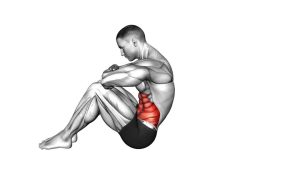
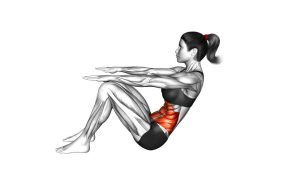
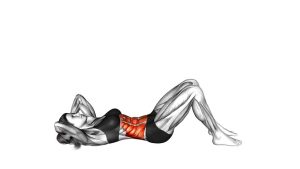
Lever Lying Leg Raise Bent Knee
This exercise works best when the movement is controlled from the pelvis, not thrown from the legs. The knees bend to reduce excessive hip-flexor strain, while the machine supports the upper body. As the knees rise, the abs should pull the pelvis into a smooth curl. At the top, the hips lift slightly, and the lower back gently rounds into the pad.
The goal is not to swing the legs as high as possible. Instead, focus on a clean knee lift, a small hip raise, and a slow return. When performed correctly, this exercise creates strong tension through the lower portion of the rectus abdominis without requiring advanced hanging strength.
Quick Overview
| Body Part | Core |
|---|---|
| Primary Muscle | Rectus abdominis, especially the lower abdominal region |
| Secondary Muscle | Hip flexors, obliques, deep core stabilizers |
| Equipment | Lever lying leg raise machine or lying ab raise machine |
| Difficulty | Beginner to intermediate, depending on machine resistance and control |
Sets & Reps (By Goal)
- Core activation: 2–3 sets × 10–12 reps with light resistance and slow control.
- Lower-ab strength: 3–4 sets × 8–12 reps with a strong hip curl at the top.
- Muscle endurance: 2–4 sets × 12–18 reps using a smooth, steady tempo.
- Beginner practice: 2 sets × 6–10 reps with a short range and no swinging.
- Advanced control: 3–5 sets × 8–10 reps with a 1–2 second pause at peak contraction.
Progression rule: Add reps first, then increase resistance only when your hips curl cleanly and your lower back does not snap into an arch during the lowering phase.
Setup / Starting Position
- Lie on the machine bench: Position your back flat on the pad with your head near the upper support.
- Grip the handles: Hold the handles behind or beside your head to keep your upper body stable.
- Bend your knees: Keep the knees bent around 90 degrees, similar to the position shown in the video.
- Set your hips: Start with your hips slightly open and your legs lowered under control.
- Brace your core: Pull the ribs down gently and prepare to lift from the abs, not from momentum.
- Keep the neck neutral: Avoid pulling your head forward or pressing your chin hard into your chest.
Execution (Step-by-Step)
- Start from the lowered position: Let your bent legs hang down under control. Keep your core lightly braced.
- Begin the knee lift: Bring your knees upward toward your torso. Move smoothly without kicking the feet.
- Keep the knees bent: Maintain the bent-knee shape throughout the rep. This keeps the movement more controlled.
- Curl the pelvis: As the knees approach your torso, roll your pelvis upward into a posterior tilt.
- Lift the hips slightly: At the top, allow the hips to rise a small amount from the pad. This is the main lower-ab contraction.
- Pause briefly: Hold the top position for a moment. Squeeze the abs without jerking your legs higher.
- Lower with control: Slowly return your hips and legs to the starting position. Do not let the weight pull you down.
- Repeat cleanly: Start the next rep only after your body is stable and your lower back is under control.
Pro Tips & Common Mistakes
Pro Tips
- Use a slow tempo: Lift for 1–2 seconds, pause briefly, then lower for 2–3 seconds.
- Focus on the hip curl: The lower abs work hardest when the pelvis rolls upward at the top.
- Keep the knees bent: Straightening the legs too much can shift more load into the hip flexors.
- Control the bottom: Stop before your lower back arches aggressively off the pad.
- Exhale at the top: Breathe out as your hips curl to help the abs contract harder.
- Use light resistance first: Clean control is more important than heavy machine loading.
Common Mistakes
- Swinging the legs: Momentum reduces abdominal tension and makes the movement less effective.
- Only lifting the knees: If the hips never curl, the exercise becomes mostly hip flexion.
- Dropping the legs too fast: A fast descent can pull the lower back into extension.
- Pulling with the arms: The handles are for stability, not for yanking the body into position.
- Using too much range: Lower only as far as you can maintain control through the spine and pelvis.
- Holding the breath: Breath-holding can create unnecessary tension and reduce movement quality.
FAQ
What muscles does the Lever Lying Bent-Knee Leg Raise work?
It mainly targets the rectus abdominis, especially the lower-ab region through the pelvic curl. The hip flexors also assist during the knee lift, while the obliques and deep core muscles help stabilize the pelvis.
Is this exercise better than a regular lying leg raise?
It can be easier to control because the machine supports your upper body and guides the movement. The bent-knee position also reduces leverage, which may make it more beginner-friendly than a strict straight-leg raise.
Should my hips lift off the pad?
Yes, but only slightly. A small hip lift shows that your pelvis is curling upward. That pelvic motion is what makes the exercise more effective for the lower abs.
Why do I feel this mostly in my hip flexors?
You may be lifting only from the thighs instead of curling the pelvis. Reduce the range, slow down, and focus on pulling the ribs down while rolling the hips upward at the top.
Can beginners do this exercise?
Yes. Beginners can use a short range of motion, light machine resistance, and fewer reps. The priority should be smooth control, not heavy loading or maximum range.
How can I make this exercise harder?
You can increase resistance, pause longer at the top, slow the lowering phase, or perform more controlled reps. Progress only when your lower back stays stable and your hips curl without momentum.
Recommended Equipment
- Ab Crunch Machine — useful for machine-based abdominal training and controlled core resistance.
- Roman Chair / Captain’s Chair — helpful for knee raises, leg raises, and progressive lower-ab training.
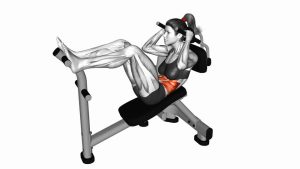
- Adjustable Decline Bench — allows decline reverse crunches and lying leg raise variations at home.
- Thick Exercise Mat — supports floor-based core variations when a machine is not available.
- Adjustable Ankle Weights — optional progression tool for controlled leg raise and hip raise variations.
Tip: Choose equipment that lets you control the movement without forcing your lower back into an uncomfortable arch. For this exercise, stability and smooth resistance matter more than heavy loading.