Lying Straight Leg Reverse Crunch: Form, Benefits, Sets, Tips & FAQ
Learn the Lying Straight Leg Reverse Crunch to strengthen lower abs with strict form, controlled hip lift, sets, mistakes, FAQs, and equipment tips.
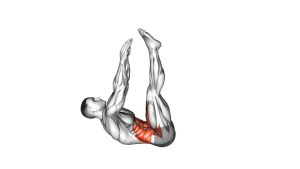
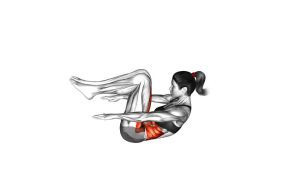
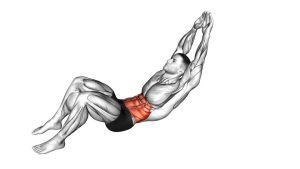
Lying Straight Leg Reverse Crunch
This exercise is best used when you want to train the lower portion of the rectus abdominis, improve posterior pelvic tilt control, and build stronger core stability without machines. Because the legs stay straight, the movement creates more leverage than a bent-knee reverse crunch, so it requires better abdominal control and slower tempo.
Quick Overview
| Body Part | Core |
|---|---|
| Primary Muscle | Rectus abdominis, especially lower-abdominal fibers |
| Secondary Muscle | Hip flexors, obliques, transverse abdominis, deep core stabilizers |
| Equipment | Exercise mat only |
| Difficulty | Intermediate because the straight-leg position increases leverage and core demand |
Sets & Reps (By Goal)
- Core control: 2–3 sets × 8–10 slow reps with a 1-second hip lift pause.
- Lower-ab strength: 3–4 sets × 10–15 reps with controlled lowering.
- Muscle endurance: 2–4 sets × 12–20 reps using a smooth, steady rhythm.
- Beginner progression: 2–3 sets × 6–8 reps with slightly bent knees if needed.
- Advanced tempo: 3 sets × 8–12 reps with a 3-second lowering phase.
Progression rule: Master clean hip lifts first. Then increase reps, slow the lowering phase, or add light ankle weights only when your lower back stays controlled.
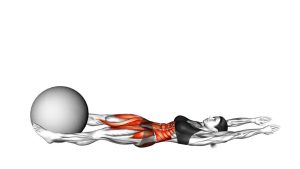
Setup / Starting Position
- Lie on your back: Use a mat and keep your head, shoulders, spine, and hips aligned.
- Place your arms beside you: Keep palms down for light support without pushing hard into the floor.
- Extend both legs: Keep legs straight, together, and active from thighs to toes.
- Brace your core: Gently pull the ribs down and flatten the lower back toward the floor.
- Set the starting angle: Begin with legs low only if your back stays stable. Otherwise, start with legs slightly higher.
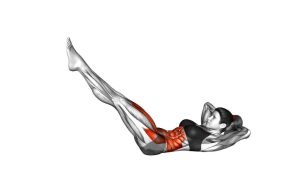
Execution (Step-by-Step)
- Brace and lift the legs: Raise both straight legs upward while keeping them together and controlled.
- Reach vertical: Bring the legs close to a 90-degree position without bending the knees or swinging.
- Curl the pelvis upward: Use your abs to lift the hips slightly off the floor. Think of rolling the tailbone upward.
- Pause briefly: Hold the top position for a short moment while keeping your legs straight and your core tight.
- Lower the hips first: Return the pelvis to the floor with control before lowering the legs.
- Lower the legs slowly: Move back toward the starting position without letting your lower back arch.
- Repeat with control: Start the next rep only when your body is stable and your abs are engaged again.
Pro Tips & Common Mistakes
Pro Tips
- Think “curl,” not “kick”: The hips should lift from abdominal contraction, not leg momentum.
- Control the lowering phase: Lowering too fast reduces tension and increases lower-back stress.
- Keep the legs straight but not locked painfully: Maintain long legs without forcing knee hyperextension.
- Use your hands lightly: Your arms can stabilize, but they should not drive the hip lift.
- Exhale during the hip lift: Breathing out helps deepen the abdominal contraction.
Common Mistakes
- Swinging the legs: This shifts the work away from the abs and makes the movement sloppy.
- Arching the lower back: This usually means the legs are lowering too far or too fast.
- Lifting the hips too high: A small clean curl is better than a large uncontrolled swing.
- Relaxing at the bottom: Keep tension between reps instead of fully resting.
- Turning the head or neck: Keep the neck relaxed and neutral throughout the set.
FAQ
What muscles does the Lying Straight Leg Reverse Crunch work?
It mainly targets the rectus abdominis, especially the lower-abdominal region. The hip flexors assist during the leg raise phase, while the obliques and deep core help stabilize the pelvis.
Is this exercise better than a regular reverse crunch?
It is not automatically better, but it is usually harder. Keeping the legs straight increases leverage, which makes the abs work harder to control the pelvis and lower back.
Should my hips come high off the floor?
No. The hip lift should be small, clean, and controlled. A high lift often means you are using momentum instead of abdominal strength.
Why do I feel this in my hip flexors?
Some hip flexor involvement is normal because the legs are straight. However, if the hip flexors dominate, focus more on the pelvic curl and reduce the leg-lowering range.
How can I make it easier?
Bend your knees slightly, start with the legs higher, reduce the lowering range, or perform a basic bent-knee reverse crunch first.
How can I make it harder?
Slow down the lowering phase, pause longer at the top, keep the legs lower between reps, or add light ankle weights once your form is strict.
Is this good for lower abs?
Yes. While the rectus abdominis works as one muscle, the pelvic curling action strongly challenges the lower-ab region and improves control of the pelvis.
Recommended Equipment
- Exercise Mat — provides floor comfort and helps protect the spine during lying core exercises.
- Adjustable Ankle Weights — useful for advanced progression after strict bodyweight form is mastered.
- Mini Resistance Bands — helpful for pairing this exercise with glute and hip stability training.
- Core Sliders — useful for related core progressions such as body saws, knee tucks, and plank variations.
- Home Ab Workout Equipment — optional tools for building a complete home core-training setup.
Tip: Equipment is optional. For this movement, clean bodyweight control is more important than adding resistance too early.