Roll Shoulder Back Rotation (Lying on Floor): Form, Benefits, Sets & FAQ
Learn how to perform the Roll Shoulder Back Rotation while lying on the floor to improve shoulder mobility, external rotation, posture, and upper-back control. Includes form tips, sets by goal, mistakes, FAQs, and recommended equipment.
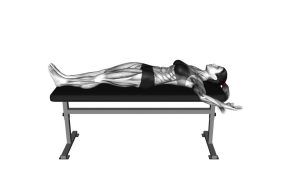
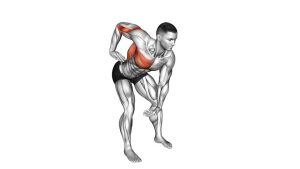
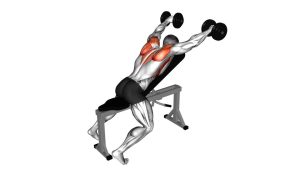
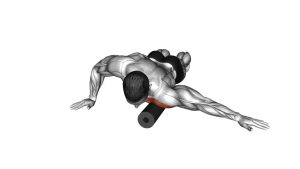
Roll Shoulder Back Rotation (Lying on Floor)
This exercise works best when the movement stays slow, smooth, and controlled. The goal is not to slam the hands toward the floor, but to gently rotate the shoulders back while keeping the ribcage quiet and the neck relaxed. You should feel mild work around the rear shoulder, rotator cuff, and upper back, along with a light stretch through the front of the shoulders and chest.
Quick Overview
| Body Part | Shoulders |
|---|---|
| Primary Muscle | Rotator cuff (especially infraspinatus and teres minor) |
| Secondary Muscle | Rear deltoids, middle/lower traps, rhomboids, and upper-back stabilizers |
| Equipment | Bodyweight, floor space, optional foam roller or soft support |
| Difficulty | Beginner (mobility-focused, low load, technique-driven) |
Sets & Reps (By Goal)
- Shoulder mobility warm-up: 2–3 sets × 8–12 reps per side or both arms together, 30–45 sec rest
- Posture / desk reset: 1–2 sets × 10–15 controlled reps, easy range, minimal rest
- Rotator cuff activation: 2–4 sets × 6–10 slow reps with a 1–2 second pause in the open position
- Rehab-style movement control: 2–3 sets × 5–8 reps, very slow tempo, 45–60 sec rest
Progression rule: First improve control and range quality. Increase reps or pause time before increasing difficulty. Better movement is more valuable here than more volume.
Setup / Starting Position
- Lie on your back: Position yourself on the floor with your knees bent and feet flat for stability.
- Place the upper body comfortably: Keep the spine neutral and the head supported. A foam roller or soft support may sit under the upper back if desired.
- Set the arms: Bring the elbows out and bend them roughly to 90 degrees, with the hands elevated and ready to rotate backward.
- Relax the neck and ribs: Keep the neck long, jaw relaxed, and avoid flaring the ribcage.
- Start with a manageable range: Do not begin at the deepest stretch. Start where you can control the motion smoothly.
Tip: If one shoulder is much tighter, slow that side down and work only through the range you can control without compensation.
Execution (Step-by-Step)
- Brace lightly: Keep your torso still and shoulders relaxed away from your ears.
- Rotate the shoulders back: Move the forearms and hands backward toward the floor by rotating at the shoulder joint.
- Keep the elbows controlled: Let the elbows stay bent and relatively stable instead of letting them drift wildly.
- Open only as far as you own: Pause briefly when you feel a mild stretch or controlled end range.
- Return slowly: Bring the arms back to the start under control without bouncing or losing position.
Pro Tips & Common Mistakes
- Move slowly: This is a mobility-control drill, not a fast repetition exercise.
- Do not force the floor touch: Your hands do not need to reach the floor for the rep to be effective.
- Keep the ribs down: Excessive rib flare can fake shoulder mobility and reduce the drill’s value.
- Stay out of pain: A stretch is fine; pinching in the front of the shoulder is not.
- Keep the neck relaxed: Avoid shrugging or tensing the traps to create extra range.
- Use it before upper-body workouts: This drill fits well before presses, pull-ups, rows, and overhead work.
- Focus on symmetry: Compare both sides, but do not force the tighter side to match immediately.
FAQ
What is the main benefit of this exercise?
The main benefit is improved shoulder mobility and external rotation control. It can also help open the chest, support posture, and prepare the shoulders for upper-body training.
Where should I feel it?
You may feel light work in the rear shoulders, rotator cuff, and upper back, plus a gentle stretch through the front of the shoulders and chest.
Is this a strength exercise or a mobility drill?
It is primarily a mobility and activation drill. The emphasis is on control, positioning, and quality of movement rather than heavy resistance.
Can beginners do this exercise?
Yes. It is very beginner-friendly as long as the range stays pain-free and the movement is controlled. Start small and avoid forcing deeper rotation.
Should I use a foam roller?
A foam roller is optional. Some people use it for upper-back support or to create a slightly more open chest position, but the drill can also be done directly on the floor.
How often can I do this movement?
Most people can perform it 3–6 times per week as part of a warm-up, mobility routine, or posture reset, provided it stays comfortable and controlled.
Recommended Equipment (Optional)
- Foam Roller — useful for upper-back support and general thoracic mobility work
- Yoga Mat / Exercise Mat — adds comfort and support when performing floor-based shoulder drills
- Mobility Peanut / Massage Ball — helpful for upper-back soft tissue work before mobility sessions
- Light Resistance Bands Set — great for pairing with rotator cuff activation and shoulder stability exercises
- Yoga Bolster / Support Pillow — optional support to make floor mobility drills more comfortable
Tip: Optional tools should improve comfort and body position, not force extra range. Use them to support smooth movement, not to push deeper than you can control.